Marbled Almond Cake with Espresso Glaze

Marbled Almond Cake with Espresso Glaze

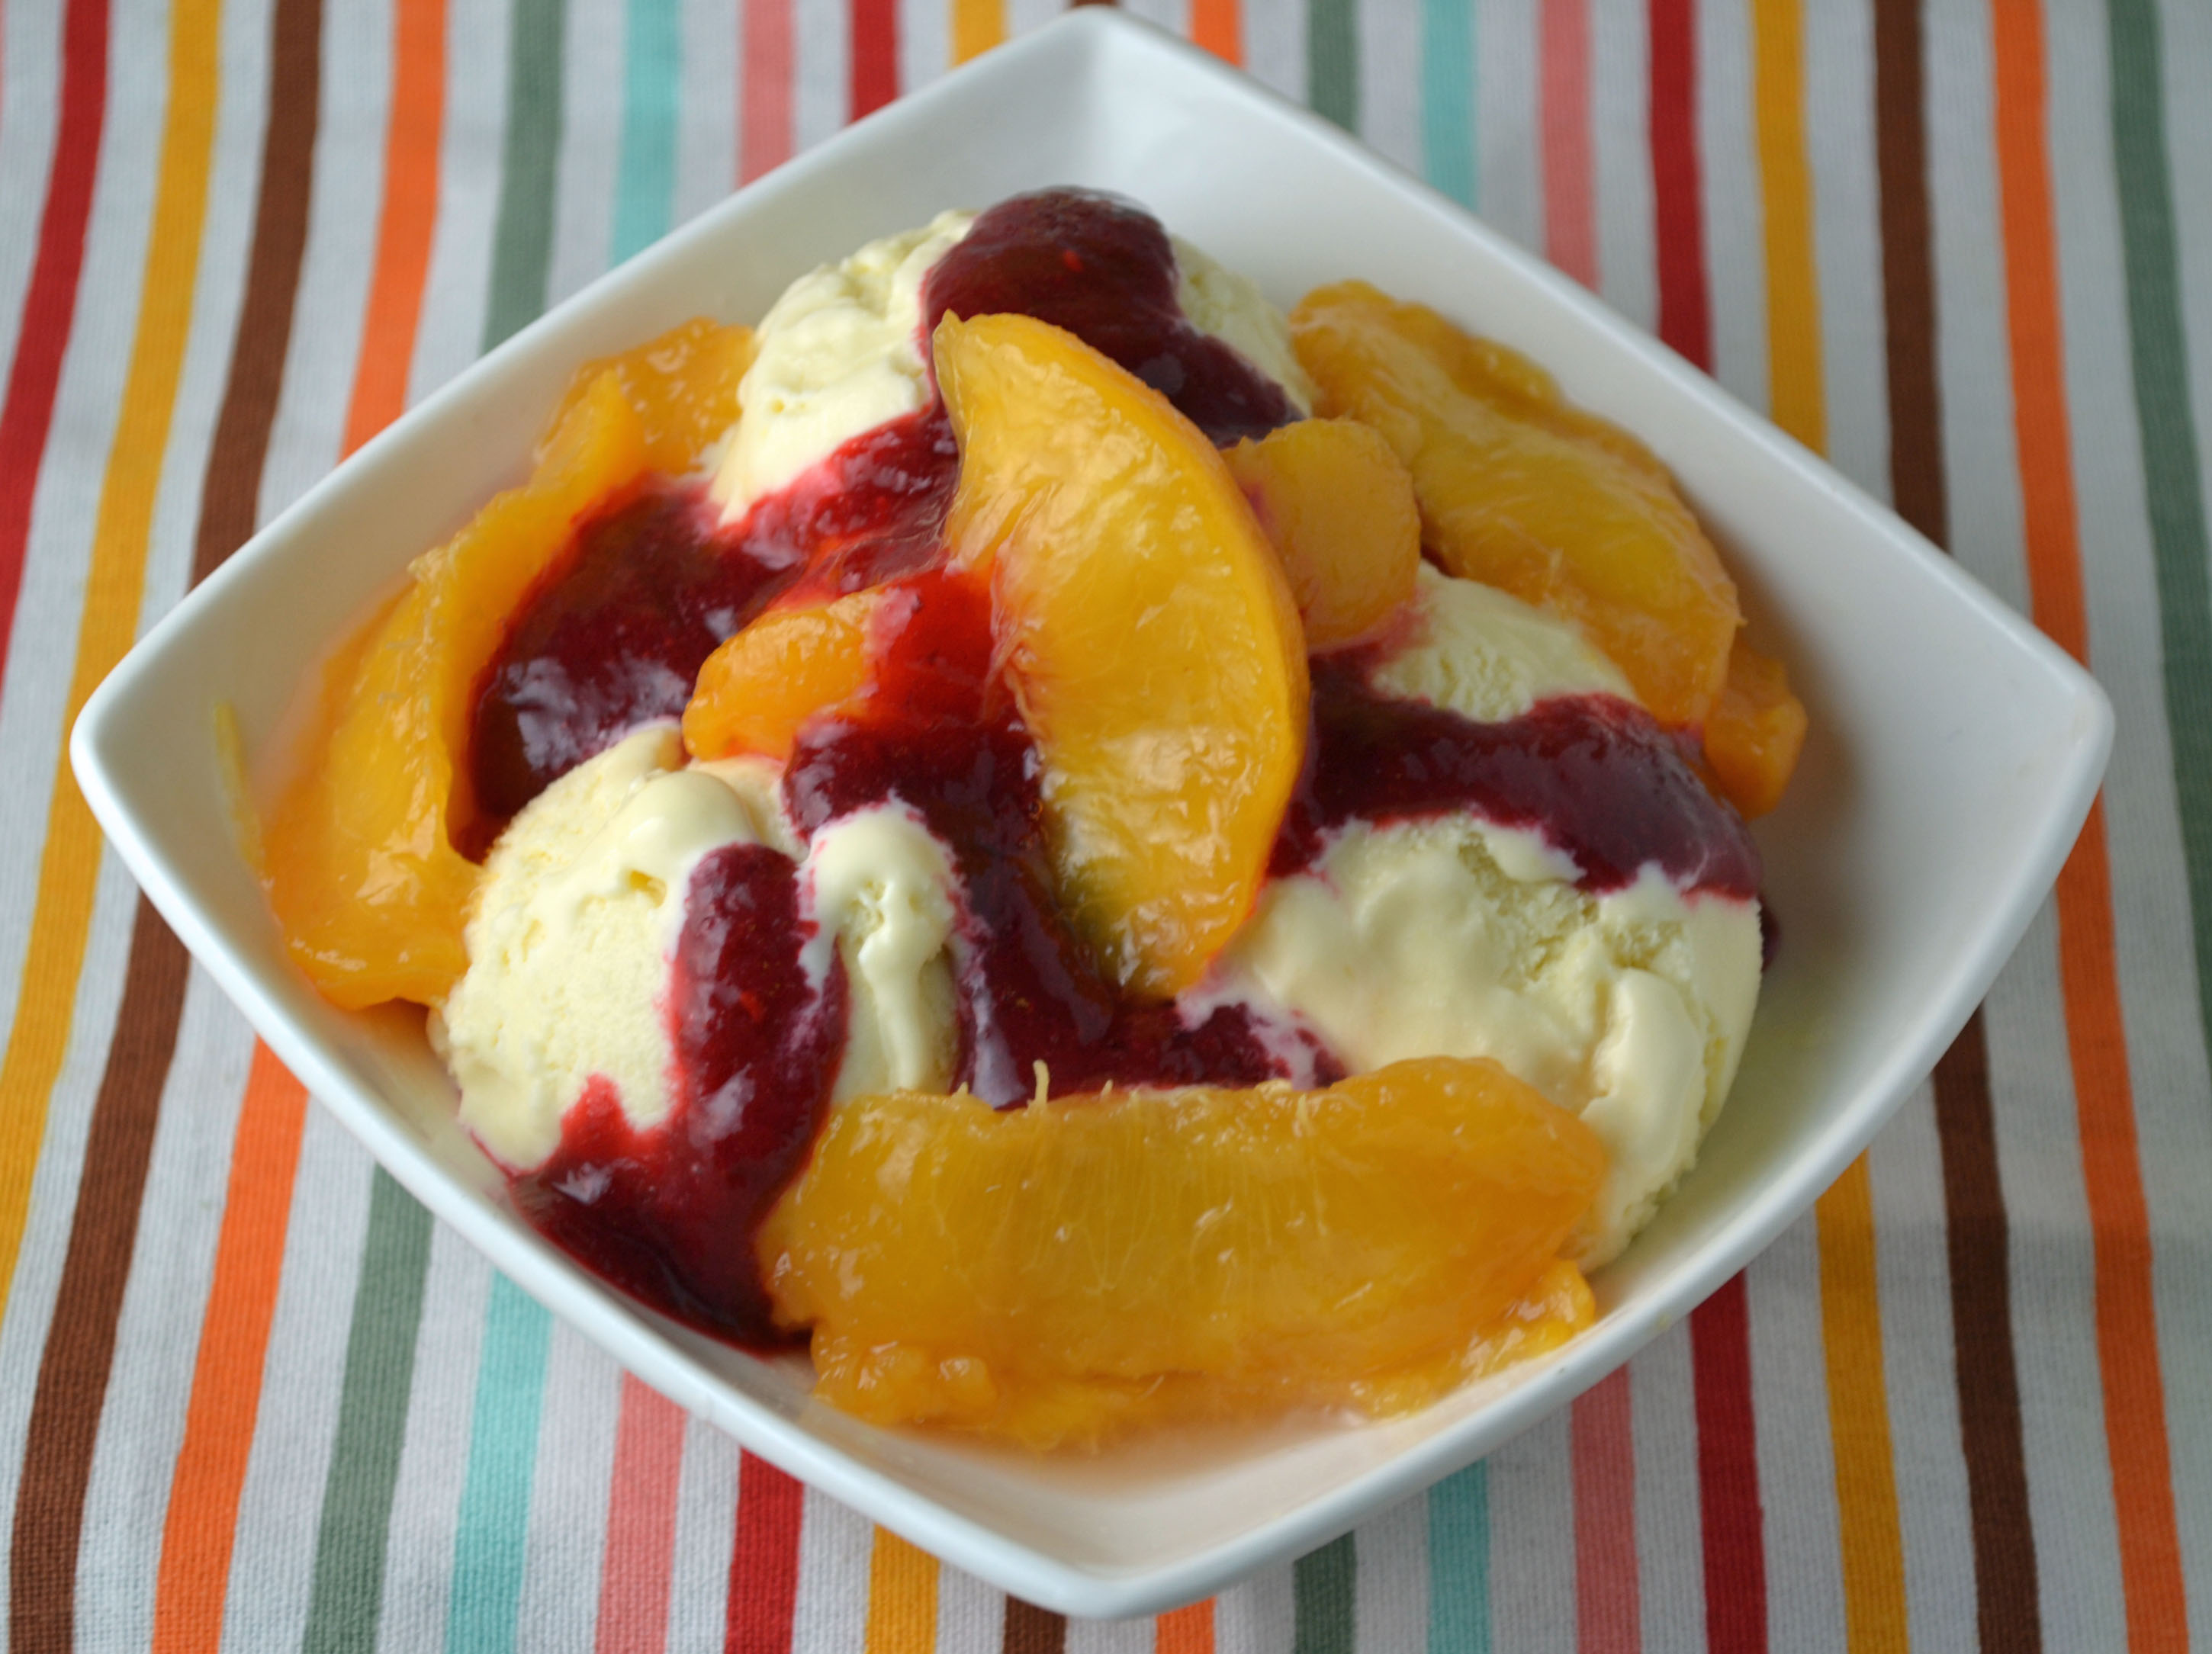
Chocolate. Almond. Espresso. It’s hard to go wrong with this indulgent trio. Perfect with coffee or tea, this lovely bundt cake is my grandmother’s marbled almond cake recipe from “The Art of Fine Baking,” topped with a simple espresso glaze. I like to think of it as a Sunday morning cake. The espresso in the glaze can count towards your morning coffee (I’ll take any excuse to eat cake for breakfast).

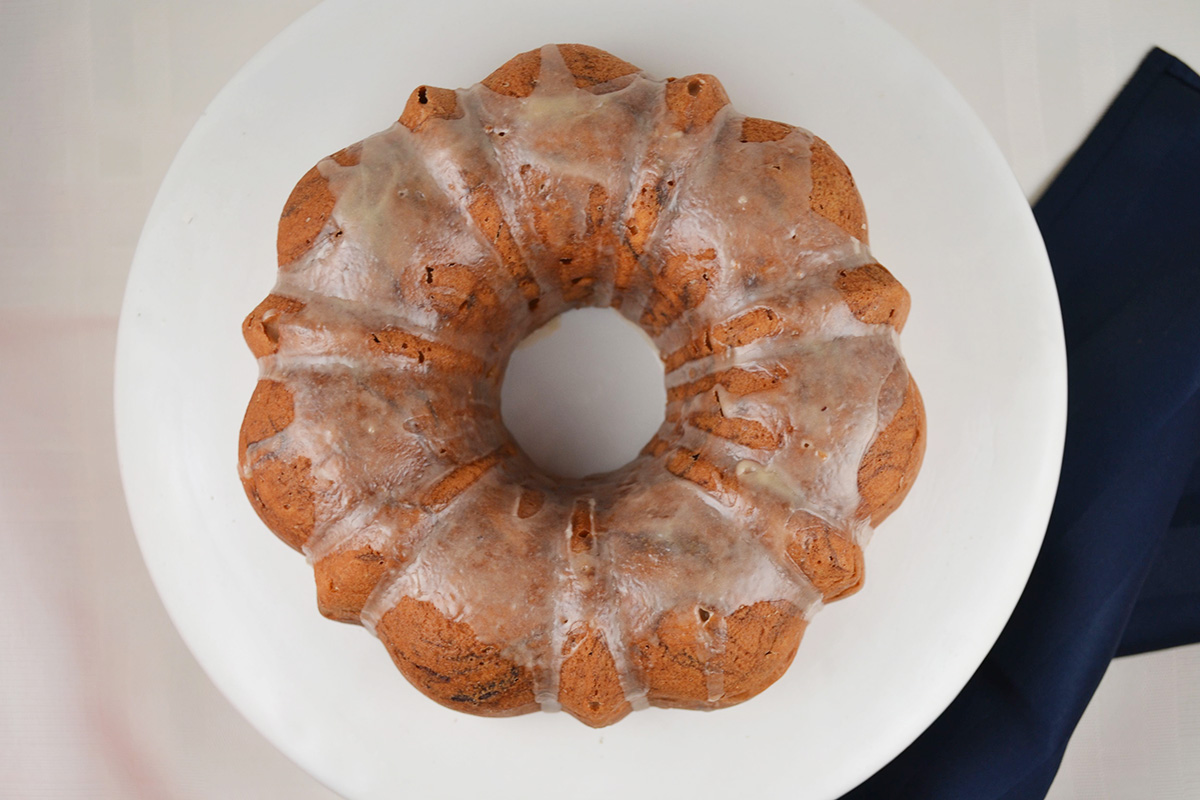
I’ve barely scratched the surface of Paula Peck cake recipes but each one that I make seems to be better than the last. This is yet another example of a fabulous Paula Peck cake creation. The base almond cake recipe is versatile and can be used for many different types of cakes.The texture holds up well to both frosting and glazes, and would make an amazing layer cake with mocha frosting. One of best secrets of this cake recipe is the almond paste. This is what gives the cake its almond flavor but when combined or marbled with chocolate, it’s reminiscent of marzipan. Think chocolate swirled marzipan cake with sweet espresso glaze – are you with me yet?

This cake may look like it deserves a special occasion but it’s not necessary. I could tell you that I made this for a fabulous brunch or a breakfast for someone special but the truth is, I just wanted tasty homemade cake. Don’t be shy, you can do it too. Go ahead and make this fluffy marbled almond cake with addictive espresso glaze just for you and your cup of coffee.

Marbled Almond Cake with Espresso Glaze

Marbled Almond Cake with Espresso Glaze

Marbled Almond Cake with Espresso Glaze

Ingredients

¾ cup unsalted butter
1 2/3 cups sugar
½ cup almond paste
5 egg yolks
1 teaspoon vanilla extract
12 egg whites
½ teaspoon salt
2 ½ cups sifted all purpose flour
3 oz semi-sweet chocolate, melted
3 tablespoons prepared espresso or strong coffee
1 1/3 cups confectioners sugar

Instructions

Preheat oven to 350 degrees.

Grease and flour a 10-inch tube pan or two 6-inch bundt pans.

Cream butter and ¼ cup sugar. Add almond paste, a little at a time, creaming well after each addition until mixture looks light and fluffy. Add egg yolks, one at a time. Add vanilla.

In the bowl of an electric mixer, add egg whites and salt. Beat on high speed until egg whites hold soft peaks. Then add sugar, one tablespoon at a time, beating constantly until egg whites are firm and hold stiff peaks.

Stir ¼ of the stiffly beaten egg whites into creamed almond paste mixture. Pour mixture back over remaining egg whites. Fold together, sprinkling flour as you fold.

Add melted chocolate. Marble roughly in batter by drawing through it with a rubber spatula.

Pour in prepared pan(s). Bake 1 hour and 15 minutes or until cakes are golden brown and pull away from the sides of the pan(s).

When cake(s) are completely cooled, sift confectioners sugar into a medium bowl. Whisk in coffee or espresso. Drizzle the glaze over the cake, allowing it run down the sides. Let set for 1 hour before serving.

Chocolate Chip Stuffed Marshmallow Mug Toppers

Chocolate Chip Stuffed Marshmallow Mug Toppers

Marshmallow is not just for kids anymore. In the past few years, there’s been a surge of gourmet marshmallows. I frequently see lavender, lemon, and chocolate flavored marshmallows for sale in clear plastic bags with a bow at price that usually exceeds $5. Even the good old Jet Puffed marshmallows from the grocery store have expanded into different sizes and flavors. This may be why I love marshmallows more now than I did as a child. The light fluffy texture is irresistible and when combined with chocolate, it’s easily one of the best confectionary combinations.

Homemade marshmallows take these sweet airy puffs to another level. Not only can you control the texture, you also have some control over the sugar content. This recipe is based on a classic version by David Lebovitz. A process similar to Italian meringue, the use of egg whites makes a super fluffy, almost spongy marshmallow that can easily be eaten on its own. If you’ve never made marshmallows, this is the recipe to try.

So why mug toppers? Well if you haven’t figured it out from the photos, mug toppers are simply marshmallows cut into rounds about the size of the top of a mug. This allows the marshmallow to fully cover the top of your hot cocoa so there are fewer holes or cracks. More surface area of marshmallow means more delicious mouthfuls of melting sweet marshmallow foam and hot chocolate. As if that’s not enough, I also stuffed these marshmallows with a layer of mini chocolate chips. As the marshmallow melts into your mug, bits of melted chocolate add a delightful contrast to each sweet foamy sip. A perfect treat for the family on a cold winter Sunday or cut in the shape of hearts for that special someone on Valentines Day. These chocolate chip stuffed marshmallow mug toppers are sure to satisfy the sweetest of sweet tooths.

Chocolate Chip Stuffed Marshmallow Mug Toppers

Chocolate Chip Stuffed Marshmallow Mug Toppers

Ingredients

2 ½ envelopes gelatin
1/2 cup + 1/2 cup cold water
1 cup sugar
1/2 cup light corn syrup
3 large egg whites, at room temperature
pinch of salt
2 teaspoons vanilla extract
½ cup corn starch
½ cup powdered sugar
½ cup mini chocolate chips

Instructions

In a small bowl, sprinkle the gelatin over a 1/2 cup of cold water to dissolve and soften.

In a small saucepan fitted with a candy thermometer, mix the sugar and corn syrup with 1/2 cup of water. Place over medium high heat.

In the bowl of an electric mixer, pour in the egg whites and pinch salt. Beat on low speed until frothy.

When the syrup reaches about 210 degrees, increase the speed of the mixer to high and beat the whites until they are thick and fluffy.

When the syrup reaches 245 degrees, while the mixer is running on high speed, slowly pour the hot syrup into the whites in a steady stream, avoiding the whisk.

Scrape the gelatin and water into the pan that you used for the syrup. Add 2 tablespoons of the water into the pan and swirl it to dissolve. (Place over low heat if necessary but there should still be residual heat left in the pan from making the syrup in it to dissolve it).

Pour the liquified gelatin slowly into the whites as they are whipping. Add the vanilla extract and continue to whip for 5 minutes, until the mixture feels completely cool when you touch the outside of the bowl (if mixture is not cooled all of the way, it will cause the marshmallows to perspire).

Sift together corn starch and powdered sugar in a large bowl. Dust a 9” x 13” baking dish evenly and completely with a layer of this mixture. Make sure there are absolutely no bare spots.

Use a spatula to spread half the marshmallow mixture in one even layer in the dish. Sprinkle chocolate chips in one layer on top. Pour remaining marshmallow mix on chocolate chip layer and carefully spread so that the layer is even. Allow to dry for at least 4 hours, preferably overnight, uncovered.

Dust the top of the marshmallows and a large cutting board with some of the remaining cornstarch sugar mixture. Loosen sides of the marshmallow sheet and turn out onto cutting board. Dip a two inch round (or whichever size fits the top of your mugs) cookie cutter and cut rounds of the marshmallow. Toss rounds in the cornstarch sugar mixture. Shake the rounds vigorously in a wire strainer to remove the excess powder.

Place on hot steaming mugs of hot chocolate or cocoa and enjoy!

Storage: The marshmallows can be made up to one week in advance, and stored in an airtight container.

Chocolate Chip Stuffed Marshmallow Mug Toppers

The Best Recipes of 2014

It’s been an interesting year. From the disappearance of Malaysia flight 370 to the Ebola outbreak and many other poignant news stories, those compiling this year’s lists of highlights and countdowns have their work cutout for them. Since I’ve never done a list of highlights on this blog before but I always catch myself reading those that I come across,  I thought I would give it try – for my recipe posts, not news events of course (I have no business discussing those). So I went back and reviewed the roughly 30 recipe posts of 2014 and picked my favorite 5 recipes, almost exclusively based on taste. Yes, pretty photos and writing are important but what we really want is a darn tasty recipe, right?

Before we get to the top 5 picks, other notable highlights of 2014 for Megan Peck Cooks include the a few stories I wrote for Edible Magazine:

Striped Bass Plaki on Edible East End  – a story about my grandmother’s amazing whole striped bass dish made with local Eastern Long Island seafood.

Linzer Torte on Edible Manhattan (featured in the Holiday Issue) – holiday memories surrounding my grandmother, Paula Peck’s, festive cocoa scented Linzer Torte Recipe.

I also had the honor of participating in the research for “1000 Foods to Eat Before You Die,” by Mimi Sheraton – just recently released and can be purchased on amazon (available in bookstores January 13th).  It was such a pleasure to work with Mimi Sheraton, a good friend of my grandmother’s.

Now for my top 5 recipe posts of 2014:

Classic Baked Lasagna

A classic lasagna recipe made with béchamel sauce instead of ricotta cheese. This will quickly become your favorite lasagna recipe and replace that tomato sauce-drenched version from the local mediocre Italian restaurant.

Lasagna No Ricotta

Smoked Salmon in Sour Cream-Horseradish Sauce

Horseradish, salmon, and dill add a freshness to this dip-like spread. Add a few slices of cucumbers for a refreshing crunch and this is the perfect light lunch or appetizer.

Smoked Salmon Spread

Salad Nicoise with a Twist

A salad nicoise that doesn’t follow any of the rules. Purple Peruvian potatoes, cherry tomatoes, and garlic scapes are added to make an amazing seasonal salad, exploding with flavor.

Salad Nicoise with a Twist

Stuffed Baked Apples with Homemade Caramel Sauce

Baked apples are taken to a whole new level with this crisp stuffed version. Oats, sugar, butter, and cinnamon are stuffed into a whole apple then baked and topped with homemade caramel sauce and vanilla ice cream. Excessiveness never tasted so good.

Stuffed Baked Apples with Caramel Sauce and Vanilla Ice Cream

Ginger Almond Sandwich Cookies

Lemon buttercream fills these spicy ginger almond sandwiches. A Paula Peck cookie favorite turned into irresistible sandwiches that will disappear as fast as you can make them.

Ginger Almond Sandwich Cookies


Happy New Year and hope to see you all in 2015.

Mini Chocolate Almond Meringue Tarts

Mini Chocolate Meringue TartsI know this may seem like an odd selection for a recipe post just a few days before Christmas. It’s not holiday specific and it doesn’t contain peppermint, molasses or ginger, or any other Christmasy baking ingredient that is usually expected this time of year. What you have here is a tasty little party dessert that covers all your festive baking bases. Almond paste is the dominant flavor in the crust, which then accents the rich chocolate ganache filling. But lets not forget the meringue. These lovely white peaks are the finishing touch that brings all of the components together into one delicious mini dessert.

I developed this recipe solely based on inspiration. It is not a Paula Peck recipe nor one from her colleagues. I happen to try a version of these little delights at an Italian Bakery in New Jersey that I often frequent. A chocolate tart with an almond flavored crust seemed brilliant to me and I’m always a sucker for meringue. I had seen the recipe for Almond Short Pastry in my grandmother’s book , “The Art of Fine Baking,” and the use of both ground almonds and almond paste convinced me it would make the perfect tart dough. The richness of the hard cooked egg yolks (one of her best tart-making techniques) combined with the nutty almond pairs beautifully with the chocolate filling. The meringue may be over kill but it definitely gives these tartlets the snowy-peak feel appropriate for holiday entertaining. Besides, who can resist the pillowy white marshmallow texture on top of almond chocolaty morsels of magic?

Ingredients:

Almond Short Pastry
1/2 cup almond paste
3 egg yolks
2/3 cup unbalanced almonds
1 1/4 cups all purpose flour, sifted
1/3 cup sugar
1/2 teaspoon salt
1 teaspoon lemon zest
1/2 cup butter
pinch cloves
1/4 teaspoon cinnamon
2 hard boiled egg yolks, pushed through a sieve

Chocolate Ganache
1 cup heavy cream
1/2 cup whole milk
1-12 ounce bag of semi sweet chocolate chips
2 tablespoons sugar
1/4 teaspoon salt
2 large eggs

Meringue
4 large egg whites
1 cup sugar
1/4 teaspoon cream of tartar
1 teaspoon vanilla extract

Lightly grease a muffin pan.

Cream almond paste with raw egg yolks until soft. Place almonds in a food processor and pulse until finely ground.

Mix flour and ground almonds together and place in a bowl, making a well in the center. In the well, place sugar, salt, lemon zest, softened butter, spices, hard boiled egg yolk, and almond-paste mixture.

With finger tips, combine the center ingredients, gradually incorporating flour and nuts to make a smooth, firm ball of dough. Chill until firm enough to roll between sheets of wax paper (about 1 hour).

Roll out dough 1/4 inch thick. Using a 3 inch round cookie cutter or top of a glass, cut out rounds of dough and gently place them in muffin tin, lightly pressing down to line each cup. Chill for 30 minutes. Meanwhile preheat oven to 350 degrees.

Bake 15-20 minutes or until just barely beginning to lightly brown. Half way through baking, prick centers of cups so they do not continue to puff up. Allow to fully cool.

While tarts cool, make the ganache filling:

Heat the heavy cream and milk in a pot over medium-low until it simmering slightly. Remove from the heat; add the chocolate and stir until melted and smooth. Add the sugar and salt and whisk until well incorporated. Beat the eggs and add them to the chocolate mixture, stir until completely combined. Pour the filling into the cooled tartlets and bake at 325 degrees for 15 minutes until the filling is set and the surface is glossy. Cool completely.

While tartlets cool, make the meringue topping:

Place egg whites, sugar, and cream of tartar in the heatproof bowl. Set over a saucepan with simmering water. Whisk constantly until sugar is dissolved and whites are warm to the touch.
Transfer bowl to electric mixer fitted with the whisk attachment. Beat, starting on low speed, gradually increasing to high, until stiff, glossy peaks form, 5 to 7 minutes. Add vanilla, and mix until combined.

Pipe mixture onto tartlets. Raise oven heat to 350 and place tartlets in oven, until meringue is golden (about 5-10 minutes). Cool.

Yield about 12 mini tarts.

Mini Chocolate Ganache Meringue Tarts


Ginger Almond Sandwich Cookies

Ginger Almond Sandwich Cookies

There is no shortage of cookie recipes this time of year. Everyone seems to have a favorite type of cookie or baking tradition that they don’t normally stray from during the holidays. I am no different. I have few really good cookie recipes that I repeat for special occasions. A recipe has to be both special and scrumptious to make it into that repeat category. But this year, I used a familiar good cookie recipe and promoted it to an amazing one by creating these sandwich cookies. These are delicious cookies. Seriously. After taking just one bite, a friend commented “you should sell these,” and he doesn’t even like dessert.

Ginger is an obvious go to flavor this time of year and I’ve been making these tasty almond cookies from “The Art of Fine Baking” for a few holidays now. I even shared the popular recipe in culinary school when we were required to make a gourmet buffet of sorts. Molasses, cinnamon, cloves, and ground ginger provide these buttery cookies with a rich spicy kick. Sliced almonds add a tender crunch to the soft (but not gooey or crumbly) finished cookies. Since the dough (if you don’t eat most of it first) is formed into a log, chilled, and then sliced into even symmetrical rounds, these are easy candidates for sandwiches. Lemony butter cream was the logical choice to help balance the strong spices that accent the deep molasses flavor. Piping this sweet cream onto the cookies proved surprisingly quick. I had to stop myself from eating each cookie sandwich as I made them.

It’s easy to fall back into the same habits and bake the same desserts every holiday season but without trying anything different, you may never establish your next favorite baking tradition. This is the lesson I’m learning…as I gobble down another gingery lemon scented sandwich cookie.

Ingredients:

1 cup unsalted butter, softened
1 cup sugar
1 egg
1/2 cup molasses
1 tablespoon ground ginger
1 teaspoon ground cinnamon
1/2 teaspoon ground cloves
1 teaspoon baking soda
2 cups sliced almonds
3 1/4 cups all purpose flour

Lemon Buttercream
6 tablespoons unsalted butter, softened
1 1/2 cups confectioners sugar
1/4 teaspoon lemon zest
1 1/2 tablespoons lemon juice
1 tablespoon vanilla extract

Cream butter and sugar. Add egg, molasses, spices, baking soda, and almonds. Mix in flour. Form dough into two logs about 1 1/2 inches in diameter. Chill for 1 hour.

Preheat oven to 350 degrees. Lightly grease or line baking sheets with parchment paper. Slice dough logs 1/4 inch thick and place slices on prepared baking sheets about 1 inch apart. Bake 8-10 minutes or until just lightly browned.

While cookies cool, make the lemon cream:

Beat butter with sugar in an electric mixer until light and fluffy. Mix in zest, lemon juice, and vanilla.

When cookies are cool, fill a piping bag with lemon cream and pipe an even layer of cream on half the cookies. Top each cream filled cookie with a plain one to create sandwiches.

Yield approximately 30

Pumpkin Cake Roll

Pumpkin Cake Roll We can’t seem to get enough pumpkin these days. From pumpkin spice Oreos to pumpkin spice latte burgers (yes, really), there’s more and more of this popular flavor combination every year. And why not? The pairing of this seasonal squash with sugar and comforting cloves, cinnamon, and nutmeg can be almost addictive. This is also why many classic recipes are so easily adaptable to a pumpkin spice version. Although Pumpkin may not have been a common ingredient at the height of my grandmother’s career, the spice mix was. My grandmother used these spices in her simple spiced sponge cake recipe, which I used as a base for this pumpkin cake roll.

I often wonder what my grandmother would think of this pumpkin explosion. I’m sure she would have first perfected pumpkin pie and then possibly expanded to pumpkin cookies or bread. She may have stopped at that point or continued on a quest to master the best of the pumpkin recipes. This type of cake roll would have been somewhat abstract for her but I was inspired by the pumpkin craze and decided to merge her chocolate roll/yule log recipe with her spiced sponge cake one. The light whipped mascarpone cream is what differentiates this from other cake roll recipes that often use cream cheese frosting. I have nothing against cream cheese frosting (love it on carrot cake) but those of us who are somehow offended by it may prefer this light whipped cream to help balance the spice of the cake. The rich buttery taste remains but without the sourness often experienced with cream cheese. If you’re not tired of pumpkin yet but don’t want to stray too far from the classic pumpkin desserts, a cake roll could be the sweet finish to end your Thanksgiving meal.

Ingredients:

Cake
4 eggs
pinch salt
1/2 cup + 2 tbs sugar
1/2 cup pumpkin purée
1/2 teaspoon vanilla extract
1/4 cup sifted corn starch
3/4 cup sifted all purpose flour
1 teaspoon ground cinnamon
1/2 teaspoon ground cloves
1/2 teaspoon ground nutmeg

Mascarpone Whipped Cream
1 cup heavy whipping cream
3-4 tablespoons powdered sugar
3 tablespoons mascarpone cheese
1 teaspoon vanilla extract

Preheat oven to 400 degrees. Grease an 11 x 16 jelly roll pan or a 9 x 13 pan and line with parchment paper.

Separate eggs. Beat egg whites with salt until they hold soft peaks. Gradually beat in sugar, sprinkling it in a little at a time. Continue beating until whites are very firm, about 5 minutes in all.

Stir yolks with a fork to break them up. Whisk in pumpkin. Add vanilla. Fold a quarter of the stiffly beaten egg whites thoroughly into egg yolks. Pour egg yolk mixture on top of remaining whites. Sprinkle corn starch, flour, and spices over mixture. Fold all very gently together until no pieces of egg white show. Careful not to over mix.

Pour into prepared pan, spreading batter evenly. Bake 10-12 minutes or until cake is very lightly browned.

While cake sheet cools, make the whipped cream:

Beat heavy cream until soft peaks form. Add vanilla and 1 tablespoon powdered sugar. Continue beating, gradually adding remaining sugar, until the cream holds stiff peaks. Carefully bear in mascarpone cheese until just combined.

To assemble the cake roll:

Place cake on a sheet of wax paper large enough to extend at least 1 inch on all sides and dusted with powdered sugar or a little flour. Spread cake with whipped cream. Lifting one long side of the wax paper, roll pastry inward. Continue to lift wax paper while pastry rolls up, jelly-roll style. Twist wax paper firmly around cake roll to help give it shape. Dust with powdered sugar.


Stuffed Baked Apples with Homemade Caramel Sauce

Stuffed Baked Apples with Caramel Sauce and Vanilla Ice Cream

This recipe might be over the top. It didn’t start out that way but before I could realize what was happening, I had created the most delicious and elaborate baked apples I have ever had. The plan was originally a minimalist approach. My grandmother doesn’t have a baked whole apple recipe (though she has many other apple recipes) but her mentor, James Beard has a very simple one in “The James Beard Cookbook.” It offers a few options of varying spices for the cavity of the apples but doesn’t venture as far as stuffing them. It even offers a flamed version which involves pouring heated alcohol over the apple and igniting it (“bring to the table blazing”) but I thought it might be best to avoid burning down my apartment building or at least the complaints of “fire smell” from the neighbors. Perhaps I will wait for a special occasion.

I settled for a simple spiced baked apple. But I couldn’t help feeling that something was missing or that it somehow lacked the excitement I was looking for. That’s when I decided to stuff it with crisp. Apple crisp is a favorite I make at least a few times every fall. It’s hard to go wrong with oats, sugar, butter, flour, and cinnamon so why not stuff a whole apple with this lovely crumbly topping? This simple baked apple was getting more interesting.

I then thought about those lonely parts of the apple that wouldn’t be exposed to the tasty crisp. Perhaps it needed a sauce? Enter my second favorite apple accompaniment: Caramel. And not just any caramel, easy homemade caramel sauce. Drizzled over the finished juicy baked apple stuffed with the cinnamon spiced crisp, it’s a combination to die for. I was already out of control so I topped the finished warm apple with a small scoop of vanilla ice cream. Melting into the crevices of the crisp and dripping down the sides of the apple while mixing with the caramel sauce, excessiveness never looked or tasted so good.

Ingredients:

1/2 cup all purpose flour
1/2 cup light brown sugar
1/4 teaspoon salt
1/2 teaspoon ground cinnamon
1/2 cup quick cooking oats
1/2 cup unsalted butter, diced
5 baking apples around the same size (I like Macoun or Honeycrisp)
1 lemon
cinnamon sugar

Caramel Sauce
1/2 cup granulated sugar
2 tablespoons unsalted butter
1/3 cup heavy cream

Preheat oven to 350 degrees. Lightly grease a shallow baking dish (large enough to hold all of the apples).

Combine flour, sugar, salt, cinnamon, and oats in a medium mixing bowl. Add diced butter and mix until well combined but still a little crumbly. Set aside.

Slice the tops off of apples. Carve out the core and some of the flesh, leaving about a 1/2 inch border. Slice lemon in half and rub the cavities of the apples with lemon to stop from browning. Sprinkle the cavities with cinnamon sugar.

Scoop crisp mixture into apples until full and rounded on top. Place apples in baking dish and bake for 30 minutes or until apples are soft and can be easily pierced with a fork (baking time may depend on the type of apples used).

To Make the Caramel Sauce:

Heat sugar over medium heat in a heavy saucepan until melted and amber in color. Be careful not to let burn. Add butter and whisk until combined. Whisk in cream (careful adding both cream and butter as it causes the mixture to seize and possibly splatter). Remove from heat and allow the caramel to cool slightly (it will thicken as it cools).

Drizzle caramel sauce over crisp stuffed apples and serve with vanilla ice cream (see Peach Melba recipe for a homemade version).

Baked Apples

Polish Butter Cookies (Autumn Version)

Polish Butter CookiesI like to think of these as cut-out cookies for adults. They can be for kids too (perhaps the cookie shapes seem more childlike) but the buttery flavor is what differentiates these from those regular sugar cookies, often topped with bright colored sprinkles. It’s also the hardboiled egg yolks that bring out the richness in these sweet bites. My grandmother used this technique in many of her recipes for cookies and tarts. It may sound odd at first, to push a hardboiled egg through a sieve, but it adds a depth of flavor to the dough that is unlike anything else.

This recipe was originally brought to my attention by a reader who previously owned my grandmothers book, “The Art of Fine Baking.” Hidden in the cookie section, I had scanned over this recipe a number of times but wasn’t particularly inspired to try it. I’m glad I finally did. It is a versatile recipe that is so simple and basic, it can be used for a number of different occasions. The shapes of the cookies can vary from cutout stars and crescents, to Holiday specific ones such as witch’s hats for Halloween or gingerbread boys for Christmas. I chose these cute little fall shapes because they seemed appropriate for the chilly autumn weather and falling leaves.

The toppings are also up to you. My grandmother recommends cinnamon sugar or poppy seeds. I will eat cinnamon sugar on almost anything so this was a natural choice for me but poppy seeds, chopped nuts, or even those different colored sprinkles (if making them with kids) would be tasty as well. You will be surprised how something as simple as little butter cookie cut-outs will disappear so quickly from the kitchen counter (especially if you accidentally toss half of them on the floor like I did – oops). Good thing it’s a large recipe!

Ingredients:

1 cup unsalted butter
3/4 cup sugar
5 hardboiled egg yolks, pushed through a sieve
1 teaspoon vanilla extract
2 cups sifted all purpose flour
1/2 teaspoon salt
1 whole egg mixed with
1 teaspoon milk

Toppings:
cinnamon sugar
finely chopped nuts
poppy seeds

Cream butter and sugar. Stir in sieved hardboiled egg yolks, vanilla, and then flour mixed with salt. Chill dough for 1 hour.

Preheat oven to 350 degrees and lightly grease or line a baking sheet with parchment paper.

Flour counter top or work surface. Roll out cookie dough 1/4 inch thick. Cut cookies with cookie cutters into small crescents, stars, or other shapes. Transfer to a cookie sheet, leaving about an inch between cookies. Brush with beaten egg and milk mixture. Sprinkle with toppings of your choice. Bake about 8-10 minutes or until cookies are lightly browned.

Yield approximately 48 cookies

Adapted from “The Art of Fine Baking,” by Paula Peck

Autumn Polish Butter Cookies

Viennese Cookie Pockets

Viennese Pockets


It appears my grandmother went through a serious Austrian Dessert phase at one point. Her book,“The Art of Fine Baking,” includes recipes for Strudel, Mocha Torte (similar to the famous Sacher Torte), Linzer Slices, and these cute little pocket cookies. I find that Austrian Desserts have two major commonalities: fruit and lots of butter. Strudel for example, is basically sheets of thin butter rolled with the filling, usually fruit such as apples or cherries. Strudel is one of the few desserts that doesn’t use jam or preserves. These cute little pockets are similar to many other popular Viennese desserts where the fruit jam is the star – or so it seems. As a chocolate lover, I actually tried filling these with Nutella to add some excitement. In the end, I preferred the strawberry jam version because it pairs so well with the buttery lemon scented dough.

I like to think of these cookie pockets as turnovers with less commitment. They’re smaller than turnovers and the soft crumbly exterior is much more of a cookie than a pastry. Just eating one won’t commit you to finishing a large pastry (like a turnover), but I can’t promise you won’t eat three or four of them anyway.

Ingredients:

1 1/4 cups butter
2/3 cup sugar
2 hard-cooked egg yolks mashed or pressed through a sieve
1 raw egg yolk
1 teaspoon grated orange zest
2 teaspoons vanilla extract
2 1/2 cups sifted all-purpose flour
1/2 teaspoon salt
thick jam or preserves
2 egg whites
2 teaspoons water

Lightly grease and flour 2 baking sheets or line with parchment paper.

Cream butter with sugar. Stir in hard-cooked egg yolks, raw egg yolk, orange zest, and vanilla. Gently add flour and salt. Mix just to combine. Chill dough.

Roll out dough 1/8 inch thick. Cut into 2-inch squares. Place a small dab of thick jam on each square. Fold in half to make triangles. Pinch edges together and place on baking sheets. Chill again.

Preheat oven to 350 degrees. Prick top of each cookie with a fork. Beat egg whites with water and brush each cookie. Bake 10-15 minutes until lightly browned.

Yield about 20-25 cookies

Viennese Pockets

Peach Melba

Peach Melba

This summery ice cream based dessert may seem more appropriate for August than September. Classic Peach Melba uses summery peaches and raspberries, normally in season in late July and early August. However, most produce has been late this year and surprisingly so has the weather. So far, September in NYC has been hotter than August. It may change soon but in the meantime, sweet juicy peaches from the farmers market are perfect for this cool timeless dessert.

Some of you may not be familiar with Peach Melba. Besides the name, there is nothing particularly unique about this old fashioned dessert. In its most basic form, it simply consists of vanilla ice cream with peaches and raspberry sauce. It is somewhat historic though – legend says it was developed by the French chef Escoffier in the late 1800’s and named after Opera singer, Nellie Melba.  This recipe is adapted from the James Beard version in “The James Beard Cookbook.” It continues to surprise me how this one time dear friend and mentor of my grandmother, is becoming more and more of a famous culinary figure. There is currently a movie in the works about him (“America’s First Foodie”) as well as postage stamps (yes, James Beard Postage Stamps).

The main difference in this recipe from the James Beard one is the use of fresh raspberries for the raspberry sauce. I would imagine this is somewhat closer to the original that Escoffier made (I doubt frozen raspberries were common then but who knows). I also used homemade vanilla ice cream instead of store bought – a rich recipe based on classic crème anglaise. The sweet fresh fruit and rich eggy homemade ice cream makes the flavor of each element stand out on its own. Enjoy this summery dessert while the warm weather lasts.

Ingredients:

4 peaches
1 cup sugar
1 cup water
1 teaspoon vanilla extract
1 cup raspberries
1 teaspoon lemon juice
4 teaspoons powdered sugar (depending on sweetness of raspberries)
Vanilla Ice Cream (recipe follows)

Blanch peaches to peel by slicing an X in the skin at the bottom of peaches. Boil 2-3 minutes until skin starts to peel back slightly on peaches. Remove and place immediately in ice water. Once chilled, peel and slice peaches.

Combine the sugar, water, and vanilla in a small saucepan. Bring to a boil and cook 5 minutes. Add peaches and poach gently, spooning hot liquid over them. When tender but not mushy, remove from heat and allow to cool in syrup.

While peaches cool, make raspberry sauce. Puree raspberries with a little water. Push through sieve to remove seeds. Whisk in lemon juice and powdered sugar. Chill.

Scoop vanilla ice cream into cold dishes. Spoon poached peaches and raspberry sauce over ice cream. Serve immediately.

Homemade Vanilla Ice Cream
2 cups heavy cream
2 cups 1 or 2% milk
3/4 cup plus 2 tablespoons sugar
6 large egg yolks
1 vanilla bean or 1 tablespoon vanilla extract

In a medium saucepan, bring heavy cream, milk, and vanilla to a boil over medium low heat – be careful not to let it boil over. Meanwhile beat egg yolks with sugar until pale.

Slowly whisk hot milk cream mixture into egg yolks. Pour back into saucepan. Place over low heat. Stir constantly until mixture thickens and coats the back of a spoon. Be careful not to overheat – eggs will curdle. Strain mixture and chill. Churn in ice cream maker according to manufacturer instructions.