Black Beans in Garlic Sauce

Black Beans in Garlic Sauce

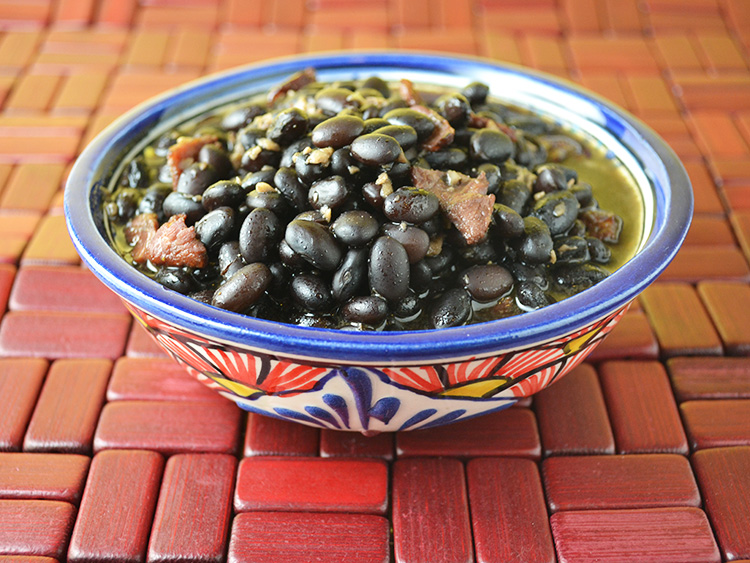
Attention all garlic lovers: this dish is for you. These black beans are more about the garlic than they are about the beans. With a whole head of garlic minced, sautéed, and mixed into cooked black beans – this hearty garlicky dish is perfect for the never-ending cold winter nights. A little cumin adds an ethnic flare and when eaten with white rice, these beans become a fulfilling meal. And then there’s the bacon. As if the garlic black bean combination wasn’t tasty enough, crispy bacon adds a level of smoky flavor.

“The Art of Good Cooking” has a fair number of bean recipes. There are some with black beans, chick peas, white beans, kidney beans, etc. and almost all of them provide instructions for cooking the raw bean instead of canned. I’m not sure if raw beans were just my grandmother’s preference (and less expensive) or if canned beans weren’t as readily available as they are today – maybe a combination of both. I often find that unless you are infusing flavor into the raw beans while cooking them, canned beans are a fast and easy replacement. This recipe is no different. Canned beans can be simply heated in a little broth or water and then added to the garlic sauce as instructed. This side dish or meal then becomes even easier to make on a weeknight when your craving something warm and comforting.

Ingredients:

2 cups black beans
1 head of garlic, separated into cloves, peeled and minced
1/3 lb of bacon, diced
1 teaspoon cumin
1 tablespoon salt
coarsely ground black pepper

If using dry black beans, wash and soak overnight in water. In the morning, place in a deep pot with enough additional water to cover beans. Add a little of the garlic. Bring to a boil, lower heat and simmer until beans are completely tender. Drain beans, reserving some of the liquid for later use. Keep beans warm.

Preheat oven to 325 degrees. Cook bacon in a skillet over low heat until crisp. Remove and reserve. Add remaining garlic to bacon fat and saute over low heat until soft.

Place beans in a casserole. Stir in crisp bacon, sauteed garlic, cumin, salt, and pepper. Add about 3/4 cup of reserved liquid from the beans. Place in oven and bake, covered, for about 30-45 minutes. Serve hot.

Serves 6.

Adapted from “The Art of Good Cooking,” by Paula Peck.

Black Beans with Garlic Sauce

Champagne Chicken

Champagne Chicken

This is not your average chicken dish. It may look fairly ordinary in the photos but this chicken is particularly royal. Drenched in a champagne mushroom sauce, it’s fit for a King…or a special occasion such as New Years. I would recommend making this with leftover champagne after new years but for many of us, “leftover” champagne is usually non-existent. In this case, get the party started early by opening that bottle while cooking new years eve dinner and toast to the chef.

This recipe comes from “The Art of Good Cooking” and can easily be halved. Sparkling wine may also be substituted for the champagne, making it a bit more the budget friendly. The chicken is actually cooked in the champagne (or wine) sauce, absorbing its sweet fruity tones. Mushrooms are added and the sauce is then thickened further with egg yolk and cream (substitute half and half if you would like). And since it wouldn’t be a Paula Peck dish without fresh parsley – the sauce is finished with chopped fresh parsley as well as tarragon. Simple yet deliciously rich, this chicken is the perfect side- kick for that champagne toast. Happy New Year!

Ingredients:

1/2 cup unsalted butter
6 chicken legs, skinned
6 chicken thighs, skinned
1/2 cup chopped shallots
3 tablespoons flour
1/4 teaspoon dried tarragon
salt and pepper
2 cups champagne or sparkling wine (approximately)
1/2 lb mushrooms, sliced and sauteed 2 tablespoons butter
1 cup heavy cream or half and half
3 egg yolks
1/4 cup chopped parsley
1 tablespoon chopped fresh tarragon

Melt butter in a broad heavy pan over medium heat. Add chicken legs and thighs and sauté slowly, turning frequently, until chicken loses its pink color on the outside. Add shallots and continue to sauté until they are soft. Remove chicken and keep warm.

Stir flour into pan. Cook for a few minutes over low heat, stirring constantly. Add dried tarragon, salt, and pepper. Remove from heat and whisk in champagne. Return chicken to sauce. Cover and simmer about 20 minutes, until chicken is just tender and juices run clear when pierced with a fork. Remove chicken pieces to a platter and keep warm.

Add sauteed, sliced mushrooms to sauce. If sauce seems thin, raise heat to reduce it a little, while stirring, being careful not to scorch the sauce. Remove from heat.

Whisk cream and egg yolks together. Stir this mixture into sauce. Replace over low heat, stirring constantly, until sauce thickens a little more. Add tarragon and half the parsley. Taste for seasoning and pour over chicken.

Adapted from “The Art of Good Cooking,” by Paula Peck.


Chocolate Mousse

Chocolate Mousse

This recipe was a long time coming. For what seemed like a fairly straight forward and simple chocolate mousse, it took more testing and modifications than most of the other recipes I’ve posted here from “The Art of Good Cooking.” I eventually settled for a more traditional mousse approach, similar to what I was taught at The International Culinary Center. I then put my own spin on it by adding marscarpone cheese to the whipped cream. This really isn’t necessary and the mousse is delicious without it, but I like the contrast of the semisweet chocolate with the rich whipped cream. It’s an addition I learned from a chef I once worked with and it adds to the recipe’s overall velvety texture.

So what was the issue with the original recipe that required so much modification? Basically, it says to just serve the meringue chocolate mixture with whipped cream, when really a large amount of whipped cream should first be folded into the chocolate mixture. Then it should be served with a dollop of the remaining whipped cream. Without this step, the mousse tends to take on too much of a foamy feel and can easily fall flat. The ratio of egg white-chocolate-whipped cream was another challenge but as long as all three are combined, it’s hard to go horribly wrong. From there you can make whatever adjustments you see fit: take out the marscarpone, use bittersweet chocolate instead of semisweet, add a few tablespoons of brewed espresso, take out the cognac or liqueur – the list goes on. Just remember to serve with extra whipped cream, it’s one of the best parts.

Ingredients

8 ounces semisweet chocolate chips
6 egg whites
1/2 teaspoon salt
1/3 cup sugar
3 tablespoons liqueur (Grand Marnier or Cognac)
1 teaspoon vanilla extract

Whipped Mascarpone Cream
2 cups heavy cream
1/4 cup sugar
1 teaspoon vanilla extract
2/3 cup mascarpone cheese

Prepare whipped mascarpone cream by beating cream until slightly thickened. Gradually add sugar until thick and stiff. Beat in vanilla and mascarpone just until combined. Chill until ready to use.

Melt chocolate over hot water in a double boiler.  Cool slightly.

While chocolate cools, add salt to egg whites and beat until soft peaks are formed. Gradually beat in sugar and continue to beat until very stiff and meringue loses its graininess. Beat in liqueur and vanilla.

Fold about 1/4 of the meringue into chocolate to lighten. Fold chocolate mixture into remaining meringue. Add 1 1/2 cups whipped mascarpone cream and fold until just combined. Pour in individual dishes and chill for 1 hour. Serve with remaining whipped mascarpone cream.

Serves 6.

Curried Macaroni Salad

Curried Macaroni Salad

My on-going quest to conquer bland mayo-based picnic salads has now lead me to macaroni salad. Not only is this curried version packed with healthy farm-fresh vegetables and savory flavors, it’s barely recognizable as that drab slop we call macaroni salad, usually doused in mayo. This is a good thing. If you are a mayo lover, you can always add a bit more mayo for that saucy texture but as it stands, the curry powder combined with the parsley and scallions makes this simple pasta salad unexpectedly flavorful.

Like most others in my possession, this recipe was written 50 years ago. It seems surprisingly innovative – curry powder, chutney, and multiple fresh vegetables don’t sound like they belong in a macaroni salad born in the 1960’s. But that creativity has proven to be one of my grandmother’s legacies. Just recently, one of her good friends recalled my grandmother’s love of Indian food (she loved all types of international foods). This is one of a few recipes in “The Art of Good Cooking” that contains curry powder or some sort of ingredient that we often associate with Indian food. And just like the others, the amount of curry powder (or spices used) must be adjusted because apparently they were much weaker in those days (2 tablespoons per pound of pasta!).

The last addition I would like to call your attention to is the chutney or relish. I’m not 100% sure what she referred to as chutney in those days or how many different kinds there were but I’m sure it was nothing like the variety we have now. I love the addition of chutney but be careful when choosing what type to use. That spicy red pickled mango chutney might not be the best option but a green cilantro chutney is delicious (reduce from ½ cup to just a few tablespoons though). Plain relish also works well but it’s not as exciting or perhaps “international” as my grandmother may have intended.

This recipe can be easily halved.

Ingredients:

1 lb elbow macaroni, cooked in boiling salted water until tender, then drained
1 cup mayonnaise
1 tablespoon curry powder
1/8 cup wine vinegar
1 cup thinly sliced radishes
1 small green pepper, diced
3/4 cup thinly sliced, peeled, seeded cucumber
1 cup chopped scallions
1/2 cup finely chopped celery
1 cup chopped parsley
2/3 cup finely sliced carrots
1/2 cup sweet relish or chutney
salt and pepper

Rinse macaroni in hot water and keep warm.

Combine mayonnaise, curry powder and wine vinegar in a small bowl, and pour over warm macaroni. Add remaining ingredients; toss gently. Allow to come to room temperature.

Note: Bits of tuna fish or smoked meat may be added to this dish to make it more substantial.

Adapted from “The Art of Good Cooking,” by Paula Peck.

Gazpacho

image

There are few soups that can get away with being cold. As a favorite of this small group, Gazpacho often outshines the others as the most typical cold soup.However, I believe it’s really just an excuse to eat soup on a hot summer day. Since tomato is the star of this famous Spanish specialty, August is the perfect time for a homemade batch. Garden fresh bold red tomatoes are juicy and flavorful, making them the ideal candidate for this simple soup.

This is a combination of two recipes: the Gazpacho recipe from “The Art of Good Cooking” and an unpublished recipe I found titled “Ann Thayer’s Gazpacho.” Each recipe is perfectly fine on its own but I wanted to combine the two as a tribute to the friendship between my grandmother and the late Ann Thayer. Ann was one of the few friends of my grandmother that I knew as a child and consistently visited on trips to NYC before I lived here. She met my grandmother in one of James Beard’s cooking classes and in her words “saw that Paula could cook circles around everyone else in the class” and immediately paired up with her. Although Ann was never apart of the famous “cooking world” of journalists and chefs like Beard, Craig Claiborne, and Andre Soltner that my grandmother often entertained, she was one my grandmother’s closest friends and stood by her side through her sickness and eventual death.

The main difference between the two recipes is the amount of liquid and bread used. The unpublished recipe blends pieces of bread into the base along with the tomatoes and vegetables. I decided to skip the bread because I just don’t think it’s necessary. If your tomatoes are ripe and your vegetables fresh and crisp, they should easily be the focus of this classic farm fresh chilled soup.

Ingredients

1 small cucumber, seeded and diced
1 onion, chopped
1 green bell pepper, seeded and diced
6 large ripe tomatoes, peeled and diced – see note
2 cloves garlic
4 tablespoons tarragon wine vinegar
1 cup vegetable stock
1/4 cup extra virgin olive oil
salt, pepper, and a pinch of dried marjoram

Toppings
peeled, seeded, diced cucumber
finely chopped onion
seeded , diced green pepper
garlic seasoned croutons

Combine all ingredients in a large bowl. Pour into blender and blend until smooth (this may need to be done in batches). Taste for seasoning and correct. Place in refrigerator and chill. Serve as cold as possible with toppings.

Serves 6

Grilled Princess Pound Cake and Peaches with Whipped Cream

Grilled Princess Pound Cake with Roasted Peaches
This lengthy recipe title requires a bit of explanation. For starters, you may be wondering why this is a “princess” pound cake and not just a regular pound cake. I wish I could answer this question but it just so happens that “Princess Cake” is the title of this cake recipe in “The Art of Fine Baking.” In an introduction to this recipe, my grandmother mentions that this is a replacement for ordinary pound cake but why she calls it a Princess Cake remains a mystery. My guess is that it somehow refers to the light fluffiness of the cake, which is made with just egg whites and not yolks, like her regular pound cake recipe. I actually prefer the airiness of this cake to the more dense pound cake. It also works well in this strawberry shortcake-like dessert.

I tend to struggle to find summer recipes in both “The Art of Good Cooking” and “The Art of Fine Baking” as well as my grandmother’s unpublished recipes. This may be because she spent most summers traveling through France and eating at all the best restaurants (don’t we all wish we could?). The lack of what we now consider seasonal recipes, requires me to be a bit more creative. In this case, I wanted to take advantage of the sweet summer peaches (with a few apricots) that have premiered at the farmers markets and are becoming more prominently displayed. The simpler version of this dish is to just grill the peaches and serve over sliced pound cake with a dollop of whipped cream. Nothing wrong with that. I just decided to take it to the next level by grilling the pound cake and mixing the fruit with a little brown sugar, balsamic vinegar, and chopped mint. This marinade along with juices of fruit produce a caramelized sauce that drips off the fruit after it has been grilled and is delicious on the pound cake (which is basically toasted). It might be fancier to replace the whipped cream with mascarpone but the contrast of flavors and textures of the fruit and cake alone need nothing more than the lightness of sweetened whipped cream to bring it all together.

Ingredients:

Princess Pound Cake
1/2 cup butter
1 1/3 cup all purpose flour
1/2 teaspoon vanilla extract
4 large egg whites
pinch salt
1/8 teaspoon cream of tartar
3/4 cup sugar

1/2 cup heavy cream, whipped with 1-2 tablespoons sugar and 1/2 teaspoon vanilla
4-5 Grilled Peaches (or Apricots) – see note

Preheat oven to 350 degrees. Grease a 9 x 5 x 3 loaf pan and dust with flour.

Cream butter and half the flour until light and fluffy. Add vanilla.

Beat egg whites with salt and cream of tartar until they hold soft peaks. Add sugar, a tablespoon at a time, beating well after each addition. Beat whites at least 5 minutes or until they are very firm.

Quickly stir 1/4 of beaten egg whites into creamed butter-flour mixture. Pour mixture back over remaining egg whites. Fold genly together while sprinkling in remaining flour. Be careful not to overmix.

Pour into prepared pan. Bake about 45 minutes or until cake is golden brown and pulls away from the sides of the pan.

Note: For balsamic marinade, mix cut fruit with 2-3 tablespoons balsamic vinegar, 3-4 tablespoons brown sugar, and 1-2 tablespoons chopped mint. Measurements will depend on the sweetness of the fruit. Marinate for 15 minutes before grilling.

Vegetable Frittata

Vegetable Frittata by Paula Peck


There are a couple different ways to make a frittata. You can put it straight into the oven casserole style, or you can start it on the stove and move it to the oven. Either way produces that delicious eggy goodness. In this unpublished Paula Peck recipe, the oven only approach is suggested. However, I found that the stove-to-oven method works equally well here and allows for a one pot meal (so to speak).  Just saute the veggies in an a large oven proof saute pan and once soft, add the eggs. When the eggs begin to set, drizzle a little olive oil around the edge (this is optional but helps reduce sticking) and put it in the oven.

Just like the cooking method, the selection of vegetables can also vary. Local asparagus is abundant right now so this seemed like an obvious choice. Broccoli, green beans, potato, tomato, or even cauliflower would be tasty as well. With just a few substitutes, this regular vegetable frittata can become a fancy “Spring” or “Summer” frittata – ready for its brunch debut.

Ingredients:

2lbs small zucchini cut a bit less than 1/4″ thick
3 tablespoons olive oil
1 cup thinly sliced celery (or asparagus cut in 1/2″ pieces)
1 cup sliced green pepper
1 cup green onion, chopped
2 cloves garlic, finely minced
8 eggs
1 teaspoon salt
1/2 teaspoon white pepper
1/2 teaspoon thyme
1/4 cup heavy cream
3/4 cup parmesan cheese

Preheat oven to 325 degrees. Heat oil in a large skillet. Add zucchini and asparagus (if using). Saute, turning frequently until golden and tender.

Grease a 9 inch ceramic dish or its equivalent. Combine celery (if using), green peppers, onions, and garlic. Place a third of the mixture on the bottom of greased dish. Sprinkle with salt and pepper. Make a layer of sauteed zucchini on top, then another layer of vegetables, seasoning, and finally another of sauteed zucchini.

Beat eggs, adding cream, Parmesan, thyme, salt, and pepper. Pour over vegetables. Bake  for 30-45 minutes or until egg is set. Cut into wedges to serve.

Serves 5-6


Gluten-Free Chocolate Cake Ring

GF Chocolate Almond Cake Ring

Yes, Paula Peck made a gluten-free cake. She may not have realized it since gluten-free diets were unheard of 50 years ago but this cake recipe qualifies for the popular health trend. Ground almonds are used instead of flour, resulting in a nutty texture and nutritious flavor. If it weren’t for the number of eggs (I said it was gluten-free not vegan), and the lovely chocolate whipped cream frosting, this cake could almost pass as healthy. Whipped cream flavored with vanilla extract and cocoa powder makes a surprisingly delicious frosting. It can also be stabilized using gelatin (see whipped cream frosting recipe for Chocolate Velvet Cake). As you can probably tell from the photo, I might have gone a little heavy on this whipped delight – having a little cake with my chocolate whipped cream :)

I’ve been fairly busy with various projects lately so I haven’t been posting or writing as much. I hope to be up to speed soon but wanted to share this past-meets-present quick GF delight.

Ingredients:

6 eggs
2/3 cup sugar
1 teaspoon vanilla extract
1 cup finely ground almonds or almond flour
7 tablespoons dark, unsweetened cocoa powder
1/3 cup unsalted butter, melted and cooled to lukewarm
4 tablespoons cognac

Chocolate Whipped Cream Frosting
2 cups heavy cream
3-4 tablespoons sugar
3-4 tablespoons cocoa powder
1 teaspoon vanilla extract

Preheat oven to 350 degrees. Grease a 9-inch tube pan.

In a large bowl, stir eggs and sugar together for 1 minute. Set bowl on a saucepan of warm water and heat, stirring constantly. When eggs are warm, beat them until they are cool, fluffy, and tripled in bulk. Beat in vanilla.

Combine ground nuts with cocoa. Sprinkle on top of beaten eggs. Fold in gently, adding the cooled melted butter at the same time. As soon as there is no further trace of butter, pour batter into prepared pan.

Bake 50-60 minutes or until top of cake is springy. Let ring cool before removing it from pan. Sprinkle with cognac.

While cake cools, whip heavy cream until thickened. Add sugar, cocoa, and vanilla while continuously beating until cream is stiff. Frost cake liberally.

Adapted from “The Art of Fine Baking,” by Paula Peck.

Honey Orange Bread Twist


Honey Orange Twist by Paula Peck

I’m not much of a morning person. But if something tasty is waiting for breakfast, it makes waking up early a bit easier. I don’t necessarily mean eggs and bacon, or stacks of pancakes, though they can be potentially motivating as well. I find comfort in knowing that there is a simple, but delicious breakfast bread just waiting to be toasted and smothered with honey. Healthy? No. Promotes cheerfulness? Yes! Not to mention a perfect complement to that morning coffee.

There are many breads in “The Art of Fine Baking” and I hope to one day make my way through all of them. This particular bread, like many others, uses a base recipe that my grandmother managed to turn into many different bread and pastry variations. With its layers of orange and honey, this braided beauty struck me as a spring-ish sweet bread and a lovely light breakfast. Sliced almonds and walnuts add a slight crunch and the candied orange peel is a sweet citrus contrast to the buttery bread. Best served warm or toasted and a little extra honey never hurt :)

Ingredients:

Orange Honey Filling
1/2 cup butter, softened
Zest of 1 orange
2/3 cup honey

1 recipe Basic Coffee Cake Dough
1/4 cup melted butter
2/3 cup finely crushed walnuts
1/2 cup diced candied orange peel
1 cup golden raisins
1 egg yolk mixed with 1 teaspoon heavy cream 1/2 cup sliced almonds

Preheat oven to 350 degrees. Grease two 9x5x3 loaf pans. Cream together butter, zest, and honey for Orange Honey Filling.

Roll dough into a large square, 1/4 inch thick. Brush with melted butter. Spread thinly with Orange Honey Filling. Scatter crushed walnuts, candied orange peel, and raisins over dough. Roll up jelly-roll style. With a rolling pin, press filled dough down to a thickness of 1 inch. Divide flattened dough lengthwise to make three long strips. Cut in half to make 6 shorter strips. Braid cut strips together to make 2 loaves.

Fit each loaf into a greased pan. Let rise until dough doubles in bulk. Brush with egg yolk mixture and scatter almonds over loaf twists.

Bake in preheated oven about 45 minutes, or until golden brown.

Yield: Two Loaves

Homemade Whole Wheat Bread with Honey Nut Cinnamon Butter

Whole Wheat Bread with Honey Nut ButterFinally a new post! I was busier than expected for most of February and though this sounds like it might be a good excuse for not posting in three weeks, I admit to have fallen victim to the is-it-spring-yet lack of motivation. There are many great winter recipes throughout my grandmother’s books but surprisingly, this simple whole wheat sandwich bread is what pulled me out of my slump. It’s hard to beat warm fresh bread and butter, even in it’s most basic form.

I’m far from an expert but I’ve played around enough with bread to know that whole wheat breads are more difficult than white breads. They often don’t rise as well, or they come out dense due to the lack of gluten. Even those with only 50% whole wheat flour can be tricky. This is why I am so impressed with this recipe. Rising/proofing was not a problem and the bread came out fluffy and not crumbly (also a potential issue with homemade sandwich bread).

I like to think of this bread and butter combination as a joint effort. This whole wheat bread recipe comes from my grandmother’s book,”The Art of Fine Baking.” While the Honey Nut Cinnamon Butter is my own recipe. I figured they would go nicely together but was surprised by such a perfect match. The bread, though rich with flavor from the whole wheat flour and a bit of molasses, is not sweet. It’s complimented by the nutty honey butter that adds both texture and that missing touch of sweetness. With such a killer combination, it’s hard not to eat half a loaf right from the oven – but that’s ok because the whole wheat flour makes it healthy, right? Let’s just pretend…

Whole Wheat Bread with Honey Nut Cinnamon Butter

Ingredients:

4 packages of dry yeast
2 tablespoons salt
1 tablespoon sugar
3 tablespoons dark molasses
2 1/4 cups lukewarm milk or water
3-4 cups all purpose flour
3-4 cups whole wheat flour
3 tablespoons unsalted butter
1 recipe Honey Nut Cinnamon Butter

Grease two 9x5x3 loaf pans.

Combine yeast with salt, sugar, molasses, and milk. Add enough flour to make a stiff dough. Add soft butter. Knead, adding more flour if necessary, until dough is smooth and elastic – about 10 minutes.

Place dough in bowl. Flour lightly. Cover and let rise in a draft free place until it has doubled in bulk (30-45 minutes). Punch down dough and knead briefly to remove all air. Divide mixture in half. Mold dough into two compact loaves which are higher and rounder in the centers. Place in greased pans, filling them 2/3 full. Cover and let rise until dough reaches tops of pans.

While dough is rising for the second time, preheat oven to 425 degrees. Bake on lowest rack in oven 30-40 minutes or until loaves are golden brown. Immediately remove bread from pans and cool on rack.

Makes 2 Loaves

Adapted from the “The Art of Fine Baking,” by Paula Peck.

Whole Wheat Bread by Paula Peck