Strawberry Shortcake

Strawberry Shortcake

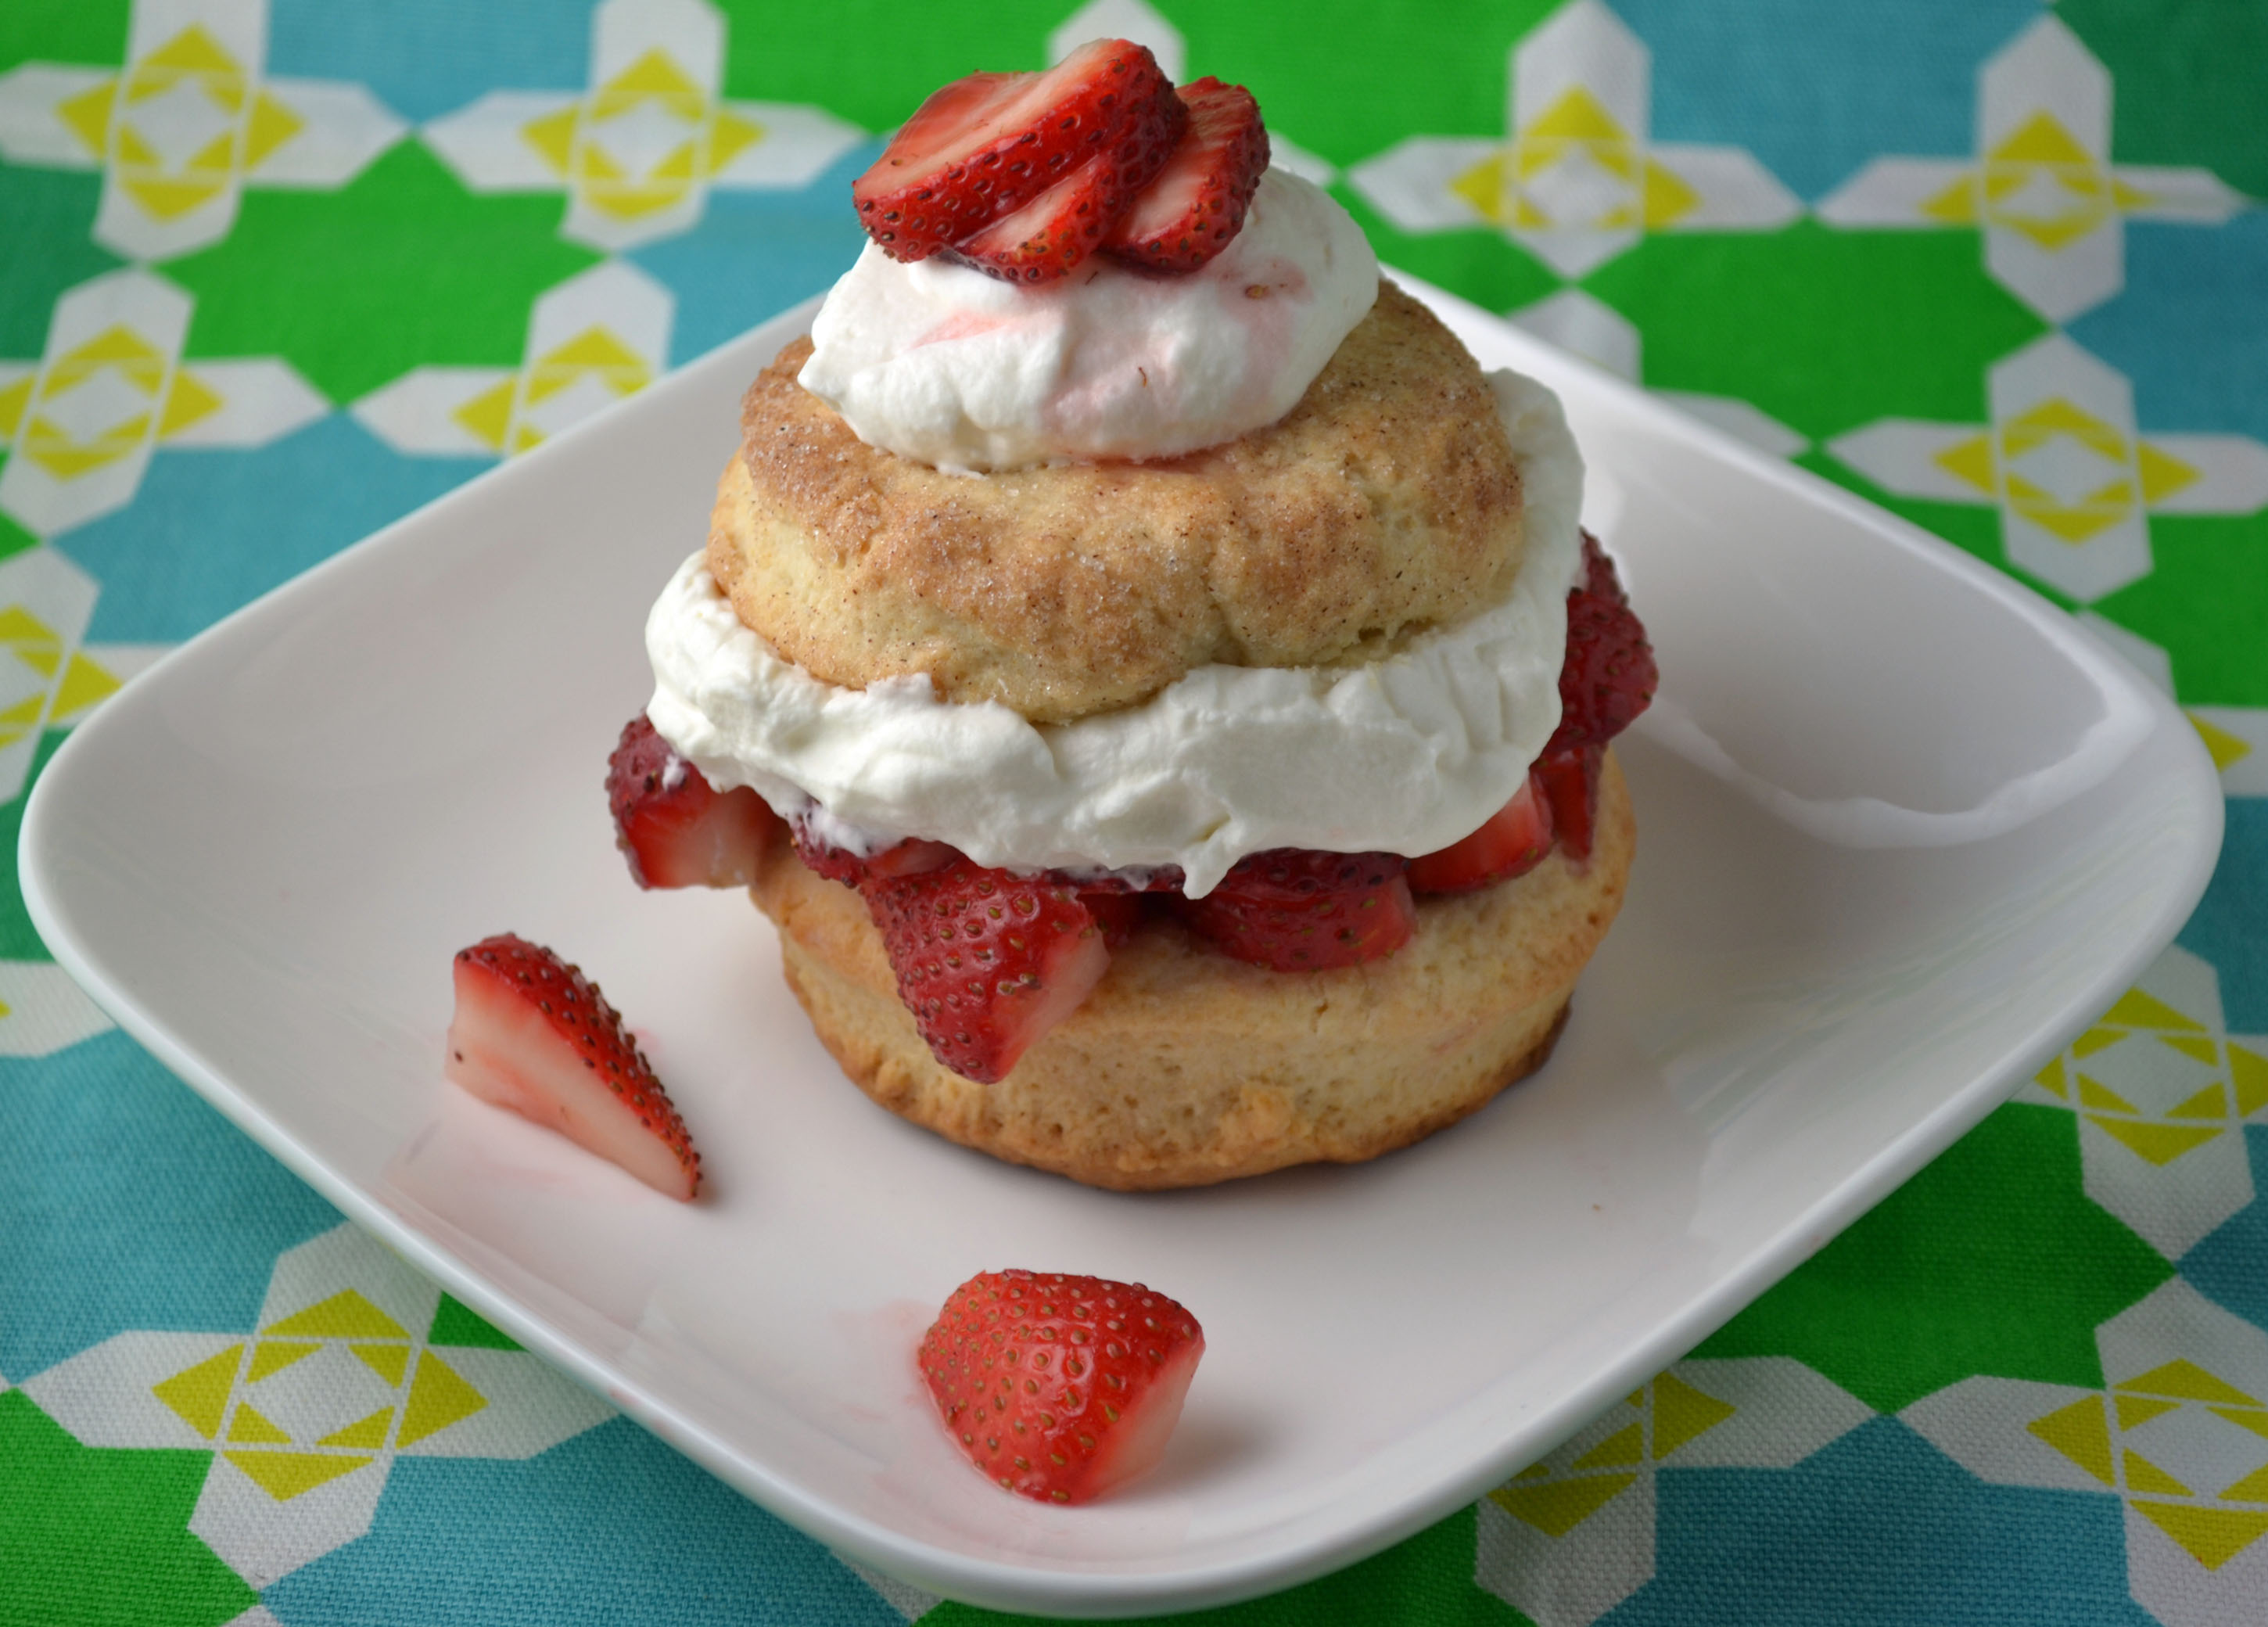
It’s berry season here in the Northeast and the first local strawberries have arrived. Smaller and juicier than the California variety that are available year round, these berries are delicious on their own but even tastier in the all-American classic, Strawberry Shortcake. Until now, my limited experience with strawberry shortcake consisted of pound cake (also excellent) and not the traditional shortcake, a sweetened biscuit that acts as the vehicle for the berries and cream. It’s clear that the density and texture of real shortcake changes this dessert entirely, creating a rich and substantial end to any meal.

This is another “friends of Paula Peck” recipe. It is adapted from a Blueberry Shortcake recipe in “John Clancy’s Favorite Recipes,” by John Clancy as well as “The James Beard Cookbook,” by James Beard. As mentioned in other posts, John Clancy was a friend and colleague of my grandmother and also a restaurant owner and chef instructor. James beard was of course…James Beard, amazing chef and mentor to my grandmother (amongst other famous chef such as Julia Child). The main difference between the two shortcake recipes is the use of vegetable shortening in the James Beard recipe. Though it provides a flakier pastry, I don’t usually keep shortening around and prefer to use butter. Both recipes contain instructions for one large shortcake to be eaten in slices like regular cake. I prefer individual shortcakes – making more of a personalized presentation and allowing you to put together just a few cakes at a time and save some for the next day. The last adaptation I made is the addition of vanilla extract to the macerated strawberries. While adding sugar to the strawberries, a touch of vanilla goes a long way and makes them even more fragrant and sweet. How can you go wrong with strawberries, cake, and cream?

Ingredients:

Strawberries
1 lb strawberries, hulled
2 tablespoons granulated sugar
1/2 teaspoon vanilla extract

Shortcake
3 cups all-purpose flour
3 1/2 teaspoons double-acting baking powder
1 1/2 teaspoons salt
4 tablespooons granulated sugar
8 tablespoons unsalted butter, cut into small pieces
1 1/4 cups heavy cream
1 tablespoon softened butter
cinnamon sugar (optional)

Whipped Cream
1/2 cup heavy cream, whipped with 1-2 tablespoons sugar and 1/2 teaspoon vanilla

Slice strawberries and mix with both sugar and vanilla extract. Refrigerate for 15-30 minutes.

Preheat oven to 400 degrees. Grease or cover a large baking sheet with parchment paper. Sift the flour, baking powder, salt, and sugar into a large bowl. Add the butter and with your fingers rub the ingredients together until they turn into coarse, separate pieces. Stir in the heavy cream with a wooden spoon and mix until a soft dough is formed.

Turn dough out onto a lightly floured board and knead it just 1 minute. Divide the dough, making 4 portions. Divide the 4 portions, making one of each of the portions a little larger than the other. Roll the larger portions into rounds 1/2 inch thick and place them on a cookie sheet. Spread the 1 tablespoon of softened butter on top. Roll the second piece of dough into rounds a little less than 1/2 inch thick and roll sides and top in cinnamon sugar (if using). Place them on top of the larger pieces. Bake on the middle shelf of the preheated oven for 20 minutes or until firm.

Remove the top layers of the cakes and spread strawberries on the bottom layer. Dollop whip cream on top and replace top layer. Add more whipped cream and strawberries on top layer.

Serves 4.

Crème Brûlée

Creme Brulee


Crème brulee is one of those semi-fancy French-American desserts that often seems too pretentious to make at home. This rich custard, also known as burnt cream – a reference to its hard caramelized top layer, is not as fussy to make as it looks. Those familiar with crème brulee may think you need those cute little kitchen blow torches to make it properly. A blow torch is definitely more fun but not necessary. This dessert was around long before anyone determined a blow torch was the best way to caramelize the sugar on top of the cream. I can’t imagine my grandmother using a blow torch in the 1960’s, when she did the majority of her cooking and baking. Although this is not her recipe, it was published around the same time period in 1961 in “The New York Times Cookbook,” by friend and colleague, Craig Claiborne.

So what can you use instead of a blow torch? The broiler, of course. The texture may not be as perfect but a similar sugary glass-like shell can be achieved. Shallow ramekins (unlike the ones shown here) will also help the cooking process. They simply allow the crème to bake faster and provide more surface area for caramelization. Blow torch or not, that first spoonful of the crispy burnt caramel with rich vanilla crème will make the few extra steps to make this impressive dessert, well worth it.

Ingredients:

3 cups heavy cream
6 tablespoons sugar
6 egg yolks
2 teaspoons vanilla extract
1/2 cup light brown sugar

Preheat oven to 300 degrees.

Heat cream over boiling water (in a double boiler) and stir in sugar. Beat the egg yolks until light and pour the hot cream over them gradually, stirring vigorously. Stir in the vanilla and strain the mixture into ramekins.

Place the dishes in a pan containing one inch of hot water and bake until a knife inserted in the center comes out clean, or 35 minutes. Do not over-bake. The custard will continue to cook from retained heat when it is removed from the oven. Chill thoroughly.

Before serving, cover surface with brown sugar. Set the dishes in a pan with cracked ice and put under the broiler until sugar is brown and melted. Serve immediately.

Serves 6-8.


Devils Food Cake with Meringue Frosting

Chocolate Devils Food Cake with Meringue Frosting

There is something magical about meringue. The process of whipping liquid egg whites into a sugary pillow-like mass is not just satisfying, but fun. From cookies and marshmallows to frosting recipes such as this, there are multiple uses for shiny sweet meringue. Despite whatever the intended purpose, I can’t seem to resist dipping my fingers into the bright soft fluff and eating most of it before it makes it out of the mixing bowl.

This meringue frosting recipe, inspired from “The Art of Fine Baking,” is really just a basic Italian Meringue: the egg whites are “cooked” by beating in a water sugar mixture that has been heated to soft ball stage (238 degrees). This process creates an extra shiny thick meringue, which is all the more irresistible. Butter can also be added to create a meringue buttercream. I skipped this step because I personally don’t think the frosting needs butter. The greasy addition also makes it much easier for the meringue to break down and create a soggy mess.

But enough about meringue, let’s talk cake. I know I need to be more open minded but whenever I make a cake, it usually has a chocolate component. In this case, the cake itself is chocolate since the meringue frosting is not. I also took it one step further and added melted chocolate to a small amount of the frosting for a chocolate surprise in the middle layer. This of course is optional. The cake is a Red Devils Food Cake recipe that I adapted from “The New York Times Cookbook“ by Craig Claiborne, a good friend of my grandmother. It’s a basic chocolate cake with just the right amount of moistness. Paired with the meringue frosting, it becomes impressive and indulgent. I dare you to eat just one slice.

Ingredients:

Devils Food Cake
1 3/4 cup sifted cake flour
1 1/2 cups granulated sugar
1/3 cup cocoa powder
1 1/4 teaspoons baking soda
1 teaspoon salt
1/2 cup vegetable oil
1 cup milk
2 eggs
1 teaspoon vanilla extract

Meringue Frosting
1 cup sugar
1/2 cup water
1 tablespoon corn syrup
3 egg whites
pinch salt
1 teaspoon vanilla extract

For the cake:

Preheat oven to 350 degrees. Grease the bottoms of two 9-inch layer cake pans, line with waxed paper or parchment paper and grease the paper.

Sift together flour, sugar, cocoa, soda, and salt. Add the oil and 2/3 cup of the milk and mix. Beat two minutes. Add remaining ingredients and beat two minutes longer.

Turn the batter into the prepared pans and bake on the lower shelf of the oven until the cake springs back when pressed lightly in the center, 30-35 minutes.

Cool the cake in the pan five minutes. Turn out on rack, remove paper, and frost as desired.

For the meringue frosting:

Combine 2/3 cup of sugar with water and corn syrup in a saucepan. Stir over low heat until sugar is completely dissolved. Raise heat and boil syrup without stirring until a candy thermometer reads 238 degrees, or a few drops of syrup form a soft ball in cold water.

While syrup is cooking, beat egg whites with pinch of salt until they form soft peaks. Gradually beat in vanilla extract and remaining sugar, a little at a time, until whites are firm. Pour boiling syrup in a fine stream over whites, beating constantly. Continue beating until completely smooth and stiff. Cool.

Cats Tongue Cookies

Cats Tongue Cookies Langue du Chat

It’s funny how a simple butter cookie can inspire such nostalgic memories. As a child, Cats’ Tongues or Langues du Chat was one of the first recipes I tried from “The Art of Fine Baking.” Although I enjoyed piping the buttery dough onto baking sheets, I didn’t really understand this plain cookie. Perhaps my taste buds were too accustomed to the corn syrup filled treats that were so readily available. Or maybe I just didn’t try these delicious little bites while they were still hot and fresh from the oven (by far the best time to eat them). Whatever the reason, it wasn’t until my father shared his memories of my grandmother making them that I really began to enjoy and appreciate this simple sweet treat. However, the addition of chocolate didn’t hurt either.

Cats’ tongues cookies were the go-to cookie in Paula Peck’s kitchen. She would often make them for my father and uncle, who as children, eagerly watched as she piped the skinny pencil thin drops of dough onto a baking sheet. Fascinated with the pastry bag, my father often begged to try it and on the occasion that my grandmother relented, he promptly made a big mess of cookie dough and whatever baking sheet or other kitchen equipment/utensils it came in contact with. Once the cookies finally made it out of the oven, they were consumed by fist full.

After whipping up a batch of these in under 30 minutes, I now see why they were a popular treat in my grandmother’s kitchen. Not only are they easy to make, it’s hard to stop eating them. This recipe is fairly large and can be easily halved but if you don’t finish them while fresh and hot, dip the cooled cookies in chocolate. The chocolate adds a twist to the original plain cookie, making these buttery delights irresistible to all of us choco-holics.

Ingredients:

1/2 cup sugar
1/2 cup butter
3 egg whites
1 cup sifted flour
pinch salt
1/2 teaspoon vanilla extract
melted chocolate for dipping (optional)

Preheat oven to 400 degrees. Grease and flour baking sheets or line with parchment paper.

Cream butter and sugar. Beat in egg whites, a little at a time, beating well after each addition. Fold in flour, salt, and vanilla. Fit a pastry bag with a large star tube and fill bag with 2/3 of the cookie batter. On prepared baking sheets, pipe pencils of batter about 2 inches long. Leave one inch between cookies for spreading.

Bake about 7 minutes or until edges of cookies are golden brown. Centers should remain light. Remove cookies from baking sheets at once. Once cool, dip in melted chocolate (if using).

Yield approximately 50

Cats Tongues

Rice Pudding

Rice Pudding

Comforting and easy, rice pudding is a classic winter treat. It’s often considered a dessert but I usually find myself making a big a batch and eating it for breakfast throughout the week. Maybe not the healthiest breakfast option, but it somehow makes more sense than eating it after dinner. This creamy pudding is not only simple but also budget friendly. You probably already have most of the ingredients. With just basics like rice, milk, eggs, and sugar – you can make a delightful rice pudding in under 30 minutes. There are, of course, variations that have slightly fancier additions. This version from “The Art of Good Cooking” dessert section includes vanilla extract, cinnamon, nutmeg, orange zest, and raisins. These ingredients add tasty layers of flavor but can be considered optional.

I had to make a few more revisions to this recipe than normal. I don’t think it was tested as much as some of the other recipes in my grandmother’s cookbook. It may have been added last minute to fill space among the other somewhat random selection of recipes that make up the dessert section. Most of my revisions are in the measurements. Like most Paula Peck recipes, the ingredients themselves are a delicious combo.

Ingredients:

2 1/2 – 3 cups whole milk
1/2 cup long grain rice
1/4 cup granulated sugar
1/4 teaspoon orange zest
1 teaspoon vanilla extract
2 egg yolks
1/4 cup raisins
1/4 teaspoon each: cinnamon and nutmeg
1/4 teaspoon orange zest for sprinkling (optional)

Heat milk and keep it warm. Add about 2 1/4 cups of the warm milk to rice in a deep pot. Cook over low heat, stirring frequently. From time to time, add more milk, as rice absorbs it. When the rice is entirely cooked, it should be in a very light creamy sauce.

Stir in sugar, orange zest, and vanilla. In a small bowl, break up yolks with a fork. Whisk in about a 1/4 cup of liquid from the rice to temper the egg yolks. Add egg yolk mixture to pudding. Replace over low heat, stirring constantly until slightly thickened ( it will thicken more when it cools).

Remove from heat and stir in raisins. Sprinkle with cinnamon, nutmeg, and orange zest (optional).

Serves 4-6.

Adapted from “The Art of Good Cooking,” by Paula Peck.

Chocolate Roll

Chocolate Roll

This is basically a Bûche de Noël. I refrained from calling it that for two reasons. The first is that my grandmother never referred to it as such. Probably because she was technically Jewish but also because my grandfather was somewhat anti-holiday. The second reason is that most Buche de Noel has meringue mushrooms and/or other decorations that make it look like a log – all tasty but a fair amount of extra work when we all know the cake is the real star of the show.

Although three separate components make up this cake, each is fairly quick and the assembly is simple. My grandmother’s multi-purpose Chocolate Pastry (sponge cake) is the base of the cake. Made with melted semi-sweet chocolate and meringue, it melts in your mouth even before the filling and frosting are added. Basic whipped cream flavored with cocoa powder makes up the filling. The roll is perfectly delicious with just the cake and filling but to take it up a notch, I frosted it with another versatile Paula Peck recipe: Mocha Buttercream. I might be addicted to this stuff. It’s so easy to make and the coffee deepens the chocolate flavor, making it bold and rich. The final chocolate roll is moist and chocolaty, the perfect dessert to end Christmas dinner or even just to satisfy a serious chocolate cake craving.

Ingredients:

Cake
1 recipe Chocolate Pastry

Filling
1 cup heavy cream
2 tablespoons granulated sugar
1 teaspoon vanilla extract
2 tablespoons cocoa powder, sifted

Frosting
1/2 recipe Speedy Mocha Buttercream

For the filling:

Whip heavy cream in an electric mixer. When cream begins to thicken, gradually add sugar, vanilla, and cocoa powder.

To assemble the chocolate roll:

Place chocolate pastry on a sheet of wax paper large enough to extend at least 1 inch on all sides and dusted with cocoa powder. Spread pastry with filling. Lifting one long side of the wax paper, roll pastry inward. Continue to lift wax paper while pastry rolls up, jelly-roll style. Roll will crack, but cracks will be covered with frosting. Twist wax paper firmly around chocolate roll to help give it shape. Frost cake with mocha buttercream.

Adapted from “The Art of Fine Baking,” by Paula Peck.

Old Fashioned Gingerbread with Orange Scented Whipped Cream

Gingerbread with Orange Whipped Cream

Gingerbread goes hand in hand with the holidays. Its spicy warmth is irresistible on those cold winter nights in front of the fireplace or admiring the Christmas tree. We often associate gingerbread with cookies or even houses these days, but it actually takes many different forms – often depending on its European origin. This cake form is now considered particularly old fashioned. The recipe is adapted from “The James Beard Cookbook” and when it was published in 1959, James Beard was already describing it as truly old fashioned – which means it’s pretty darn old. However, classics such as these are timeless and good food never gets old especially if the ingredients and preparation remain simple.

I couldn’t resist adding a twist to the whipped cream, a must-have on top of each steaming hot piece. The cinnamon and cloves get along famously with citrus so a touch of fresh zest along with the juice of an orange, balances the spicy sweet flavors of this understated holiday specialty. My grandmother used whipped cream in many of her desserts. She actually has a page in her baking book devoted to how to make, flavor, and stabilize it. I like to think of this combination of gingerbread and flavored whipped cream as a joint recipe among two accomplished friends (James Beard and my grandmother, Paula Peck).

Ingredients:

Gingerbread
1 cup molasses
1/2 cup unsalted butter
2 1/3 cups all purpose flour
pinch salt
3/4 teaspoon baking soda
1 teaspoon ginger
1 teaspoon cinnamon
1/4 teaspoon ground cloves
1 cup sour cream

Orange Scented Whipped Cream
1 cup heavy cream
2 tablespoons sugar
1/2 teaspoon vanilla extract
1 teaspoon fresh orange juice
1 teaspoon orange zest

For the Gingerbread:

Preheat oven to 350 degrees and grease an 8×8 cake pan.

Put molasses and butter in a saucepan and heat until they boil. Sift the flour, salt, ginger, cinnamon, and ground cloves. When the butter and molasses are slightly cooled, add sour cream and then stir in spices and flour. Pour into prepared baking pan and bake 30-40 minutes or until a cake tester or toothpick comes out clean. Serve warm with a large dollop of orange scented whipped cream.

For the Whipped Cream:

Whip heavy cream in an electric mixer. When cream begins to thicken, gradually add sugar, vanilla, and orange juice. Fold in orange zest.

Gingerbread recipe adapted from “The James Beard Cookbook,” by James Beard.

Gingerbread with Orange Scented Whipped Cream

Apple Cranberry Pie

Apple Cranberry Pie

It started out as an apple pie – classic and simple. Then I added cranberries, followed by orange zest and spices. Before I could stop myself, a festive deep dish apple cranberry pie had been created. It turns out it’s a great way to use up those extra cranberries from Thanksgiving while creating a dessert fit for the next holiday party. Like a few other recipes I’m working on for the holiday season, this is not from the Paula Peck archives. The cream cheese pie crust recipe is from the cookbook, “John Clancy’s Favorite Recipes” by John Clancy, a chef and friend of my grandmother from the same 1970’s + era. With just his name scribbled across a few of my grandmother’s unpublished recipes, I know little about John Clancy. I’ve heard that his strength was baking more so than cooking, and I assume he met my grandmother through James Beard, with whom he taught cooking classes. In addition to a handful of cookbooks and his work as a teacher, he was also a restaurateur- owning a successful restaurant in Greenwich Village.

Since the original cream cheese pastry recipe is for one 9-inch shell, I doubled it to fit this double crusted pie. For those of you concerned about the additional dairy and fat from the cream cheese, my grandmother’s rich tart pastry would also work well (not that it’s anymore diet friendly though). The pastry crust creates a fragile shell around the filling which is jam packed with tender apples and juicy cranberries that are liberally sweetened to balance the tartness of the fruit. Spiced with cinnamon and just a pinch cloves and nutmeg, this pie will fill your home with the sweet aroma of the holidays.

Ingredients:

Cream Cheese Pastry (double crust)
3 cups all-purpose flour
1/2 teaspoon salt
2 tablespoons sugar
1 1/2 sticks (12 tablespoons) unsalted butter
6 ounces of cream cheese

Filling
3 lbs apples (honey crisp or granny smith work well)
1 1/2 cups fresh cranberries
1 1/4 cups granulated sugar
1 teaspoon orange zest
1/2 a lemon
1/2 teaspoon cinnamon
Pinch cloves and nutmeg
1/4 cup all-purpose flour
2 tablespoons cold unsalted butter, cubed
milk (for brushing)

For the pie crust:

Combine the flour, salt, and sugar with an electric mixer. Add butter and cream cheese and mix on medium speed until the ingredients are well blended. Form dough into a disk and chill 30 minutes.

Cut disk in half and roll out half the dough into a round about 1/8 inch thick (chill remaining half until ready to use). Transfer dough to a 9-inch pie plate. Press the dough against the sides and bottom and trim edges, leaving a 1/2 inch overhang. Chill the pie shell for 30 minutes.

While the pie shell chills, prepare the filling:

Peel and slice apples 1/4 inch thick. Rub apples with half of a lemon to stop them from browning while you slice them. In a large bowl, combine the apples with the cranberries, sugar, orange zest, spices, and flour.

Roll out remaining pastry into a large round about 1/8 inch thick. Transfer filling into chilled pie shell and dot with butter. Roll the pastry onto a rolling pin and unroll over filling. Trim edges and pinch together top pastry with the overhang from the pastry shell. Chill pie for 15 minutes.

Preheat oven to 400 degrees. Brush the pie with a little milk and sprinkle with sugar. Cut 4-5 steam vents (about 2 inches long). Bake 40 min – 1 hour or until apples are tender when a toothpick or cake tester is inserted into the pie.

Cream Cheese Pastry recipe adapted from “John Clancy’s Favorite Recipes,” by John Clancy.

Mocha Torte

Mocha Torte

The holidays are good excuse to eat cake. Personally, I will eat cake anytime anywhere, but for those of us that are a bit more health conscious, an actual reason or occasion maybe required to eat cake. Although fancy holiday flavors like ginger, pumpkin, and apple maybe the more obvious choice – sometimes you just want something rich and chocolaty to finish of that holiday meal. This mocha torte fits the bill. With a layer of apricot preserves, it resembles the famous Viennese Sacher Torte that my grandmother worked so hard to perfect later in her career. However, these cake layers are composed of Paula Peck’s famous genoise and then smothered with a velvety mocha buttercream that is so good it’s hard not to eat by spoonful. And unlike the Sacher Torte, which is finished with a chocolate glaze, this torte is garnished with semi-sweet chocolate discs that melt in your mouth.

You may be thinking that this cake sounds like a lot of work. Afterall, making a cake can be somewhat of daunting task. There are, of course, ways to simplify the process. You can always skip the chocolate rounds and you can even skip the apricot preserves (the chocolate/fruit preserves combination tends to lack in popularity with younger generations these days). No need to worry about pastry bags or making a mess with a piping bag, the cake can simply be frosted with a spatula. The mocha buttercream with its hint of coffee that brings out the chocolate flavor in the moist cake, will speak for itself.

Ingredients:

1 recipe (two 9-inch layers) Chocolate Genoise
1/4 cup cognac (optional)
2/3 cup apricot jam or preserves
1 1/2 cups Speedy Mocha Buttercream
16 thin 2-inch chocolate rounds (recipe follows)

Sprinkle cake layers with cognac, if using. Sandwich them together with apricot jam or preserves. Spread sides and top smoothly with buttercream, reserving some for decoration.

Arrange chocolate rounds next to each other flat against side of torte. Save 3 chocolate rounds to cut into quarters (optional). Set quarters flat in the butter cream around the top of the cake. Decorate the torte with remaining buttercream pressed through a medium star tube.

Chocolate Rounds

6 ounces semi-sweet chocolate
1 teaspoon vegetable shortening

Melt chocolate over hot water. Stir in shortening. Spread chocolate thinly on cooky sheet lined with wax paper or parchment paper. Chill in refrigerator or freezer for a few minutes or until chocolate just begins to set.

Cut out rounds using a cookie cutter or the top of a water glass. Place back in refrigerator until chocolate is completely firm. Peel chocolate off paper.

Adapted from “The Art of Find Baking,” by Paula Peck

Mocha Torte Slice

Crackled Chocolate Drops

Chocolate Crackled Drops

A simple chocolate cookie can be the perfect crave-worthy treat. Using ingredients you probably already have on hand, this recipe is quick, easy, and best of all chocolaty. I still get excited about making recipes by my grandmother that contain chocolate. With the number of recipes in “The Art of Fine Baking,” the chocolate ones are surprisingly few and far between. Much of her baking from the early 1960’s was European inspired. Classics like Genoise, French-style Fruit Tarts, Strudel, and Danish Pastry allowed little room for chocolate. Also, chocolate with varying degrees of cocoa butter content were not nearly as accessible at the time as they are now. I like to think that as the popularity of chocolate and its availability grew, my grandmother would have eventually come up with a book full of chocolate recipes to die for. Her Brownie recipe has always been a favorite and in my opinion these crackled chocolate cookies aren’t far behind.

The majority of this recipe is just chocolate and ground almonds. The original recipe called for grated almonds, which most of us don’t have time for. If you prefer a lighter, fluffier cookie and your purse strings are a bit looser, you can use Almond flour. The high egg yolk content then keeps the center of the cookie moist and chocolaty. As the smell of melted chocolate and almonds permeates your kitchen, these crackled drop cookies will barely make it out of the oven before they’re half gone.

Ingredients:

8 oz semisweet chocolate
8 egg yolks
1/2 cup sugar
1 teaspoon vanilla extract
1 cup ground almonds or almond flour
7/8 cup sifted flour pinch of salt

Preheat oven at 350 degrees. Grease and flour a baking sheet (or line with parchment paper).

Melt chocolate over over a double boiler. While chocolate is melting, beat egg yolks and sugar together until light and fluffy. Add vanilla. Stir in melted chocolate, grated almonds, and flour mixed with salt.

Drop or pipe small rounds of batter on prepared cookie sheet, leaving 1 inch between cookies. Bake about 25 minutes, or until cookies are crackled and dry.

Yield: about 30

Adapted from “The Art of Fine Baking,” by Paula Peck.