Apple Strudel

Apple Strudel

I always look forward to apple season. It gives me a chance to continue testing the many apple recipes in “The Art of Fine Baking.” The sweet smell of crisp juicy apples baked in any kind of buttery vessel is hard to resist. With previous posts on unconventional apple desserts like Apple Cheese Cake Puff, Bavarian Apple Pancake, Sauteed Apple Cake, and Apple Roll, I figured it was time to introduce a classic.

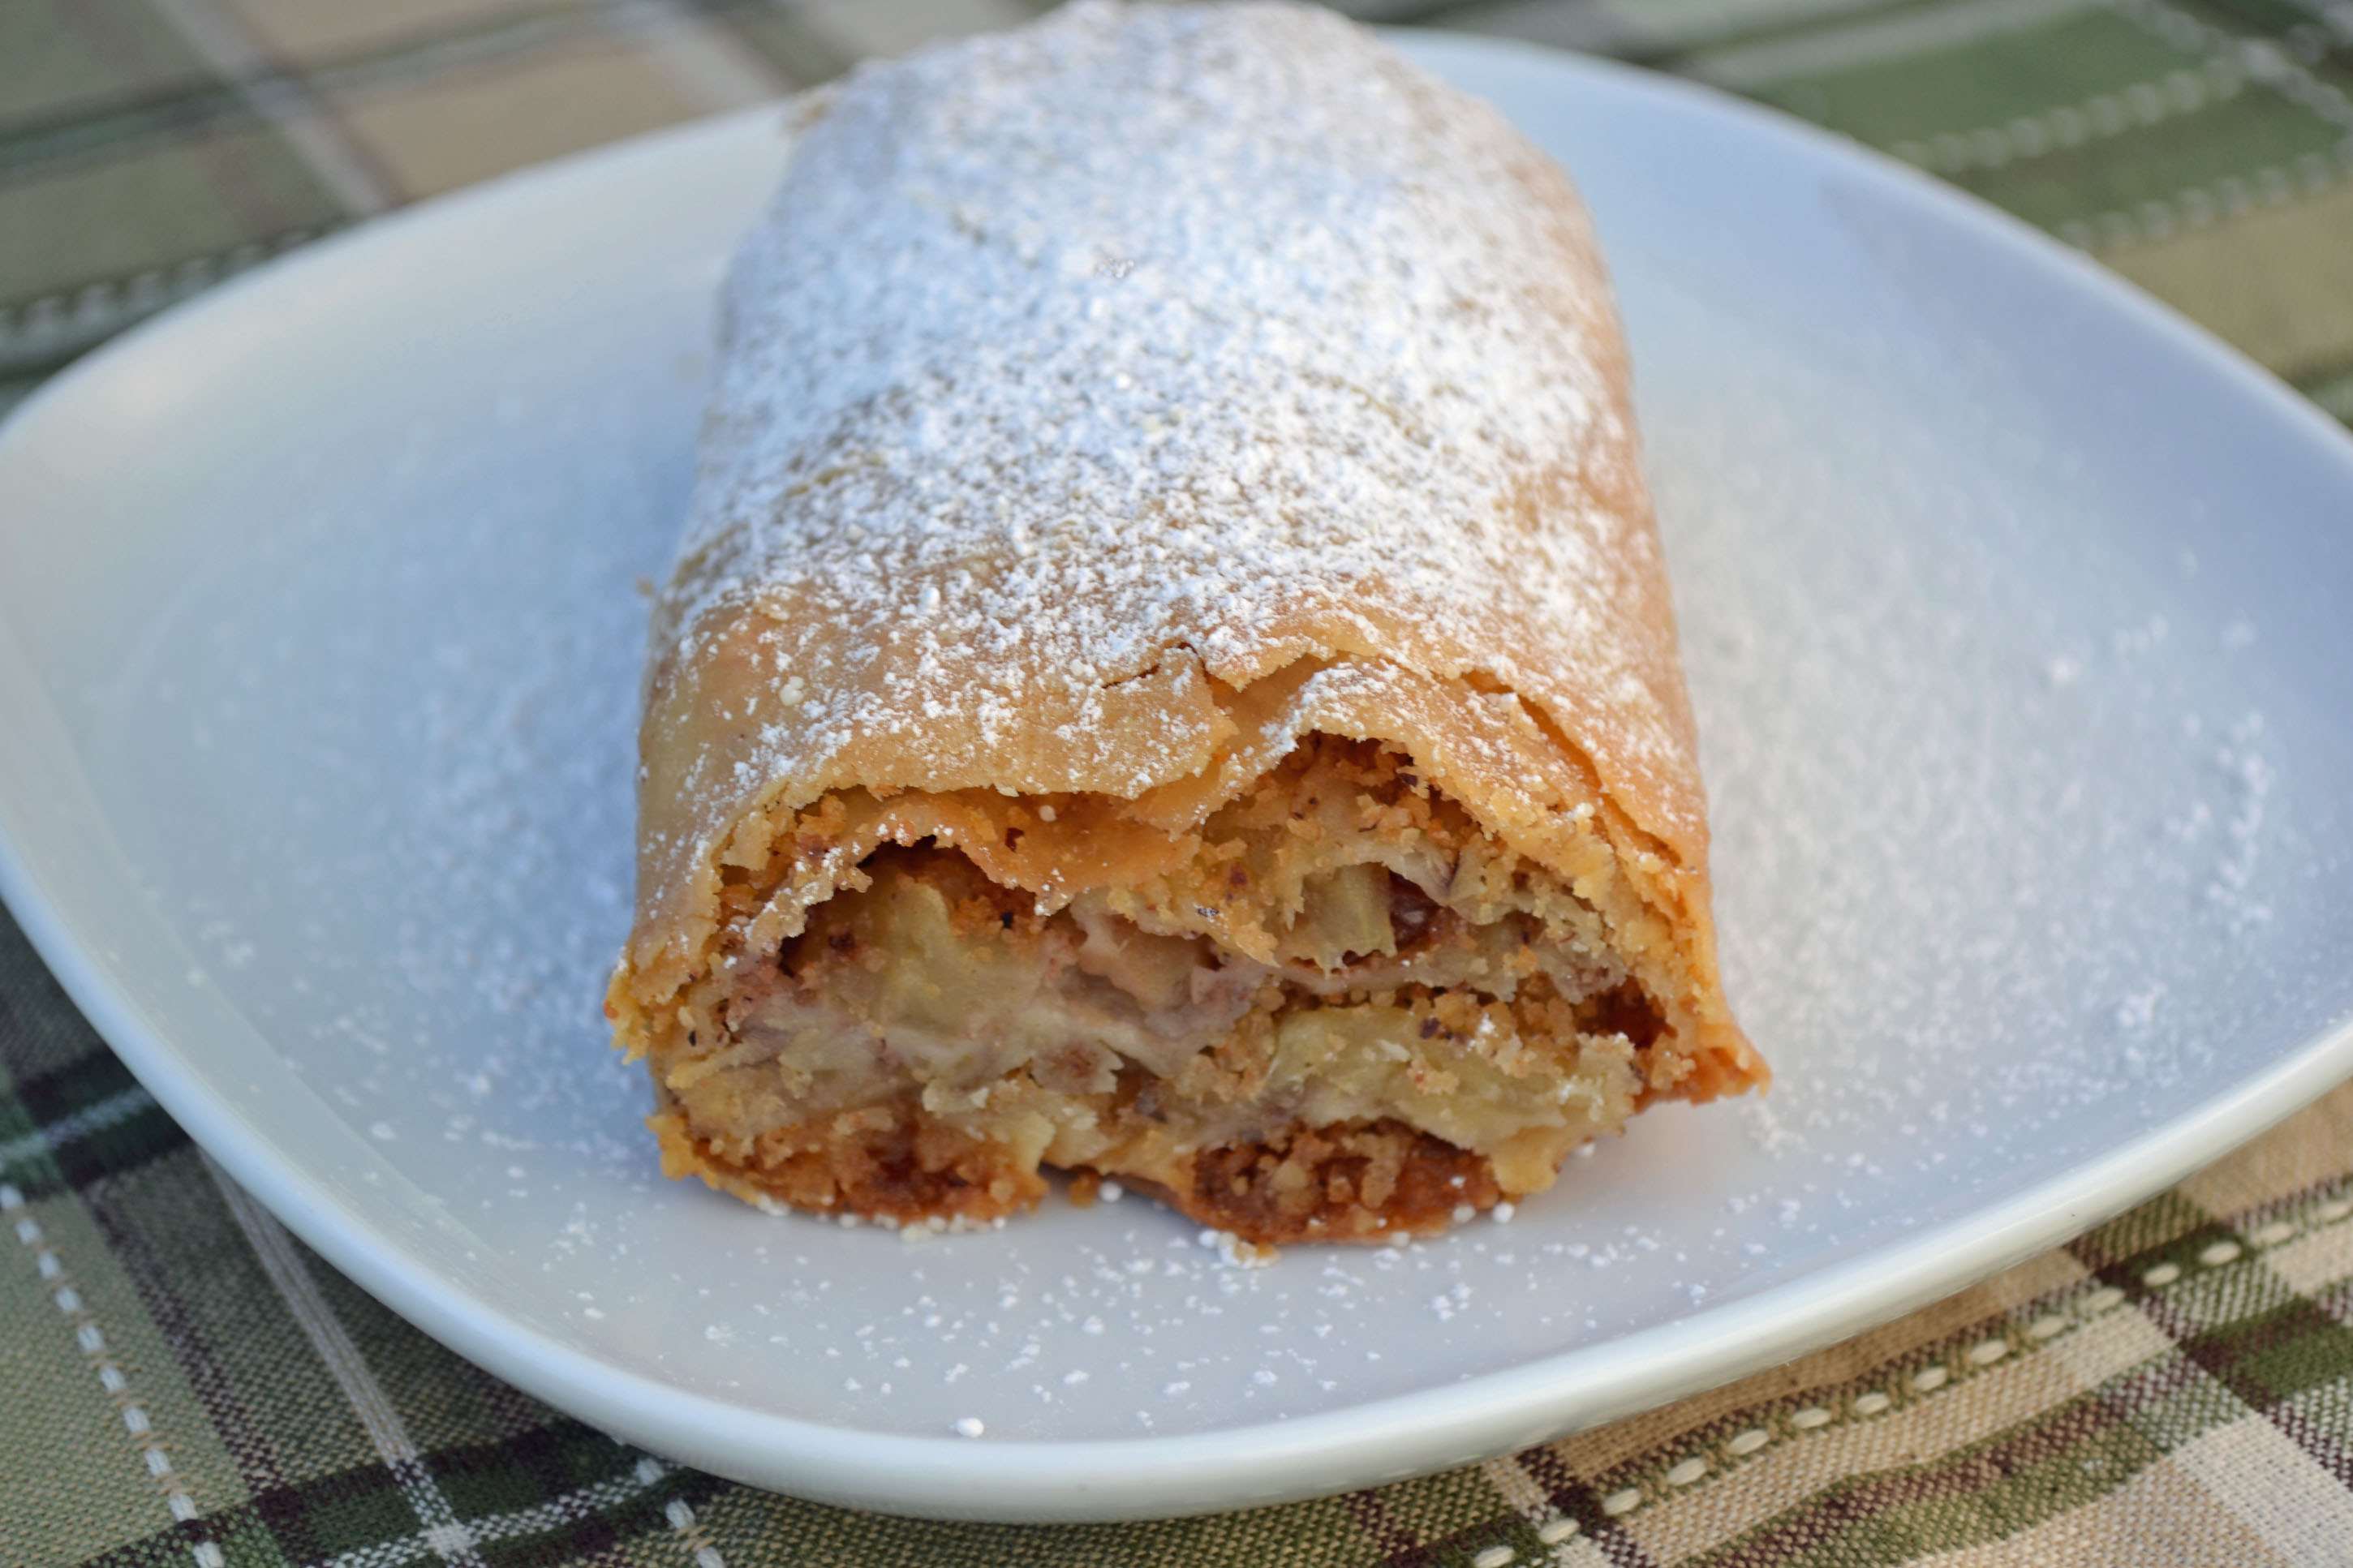
Old fashioned Strudel is fairly well-known but somewhat out of style and awaiting a comeback. Frequently confused with Streusal  – the crumbly topping – Strudel is often said to have originated in Austria. It can be savory or sweet and is differentiated from other pocket style pastries by the characteristic paper-like pastry layers rolled around its filling. Apple is one of the most common strudel fillings and this version pulls out all the stops with cinnamon sugar, raisins, and ground walnuts.

Much like Puff Pastry and Danish Pastry (which I have yet to tackle), Strudel has always been a bit daunting for me. The idea of attempting to stretch the dough without destroying it seemed frustrating. I’m happy to report that it is much easier than I anticipated. Based on the introduction provided in her book and the number of strudel filling recipes, it appears my grandmother spent a fair amount of time perfecting it (along with James Beard). Her thoughts and instructions are some of the best I’ve found, including on the internet, so I’ve provided them in the basic Strudel dough recipe.

Ingredients:

Stretched basic Strudel dough
½ – 1 cup butter, melted
2 cups fresh bread crumbs sauteed lightly in butter
½ cup ground walnuts
4 cups peeled, sliced apples
1 cup raisins
1 teaspoon lemon zest
2/3 cup cinnamon sugar
powder sugar for dusting

Brush strudel dough generously with melted butter. Sprinkle all over with sauteed bread crumbs and ground walnuts. Place a 2-inch strip of sliced apples along one end of dough.

Brush apples with butter and sprinkle with raisins, lemon zest, and cinnamon sugar. Fold in flaps of dough at sides of filling. Brush them with butter. Lift up end of cloth nearest filling and make the dough fold over apples. By raising cloth, continue to roll up apple filling until it is completely enclosed in the sheet of dough. Roll loosely.

Transfer strudel to lightly greased baking sheet, making a horse shoe shape if it is too long for the pan. Bake in a 350 degree oven for about 1 hour, basting occasionally with melted butter until strudel is golden brown. Dust with powdered sugar. Serve slightly warm

Brush remaining dough all over with melted butter.

Hunter Almond Cake

Hunter Almond Cake

This classy almond cake hides many secrets. For starters, the original recipe from “The Art of Fine Baking” is ambiguously titled just “Hunter Cake.” What is “Hunter Cake” and where does it come from? Your guess is as good as mine. Although I tried researching this mysterious cake title, I found little that resembled this recipe (think camouflage frosted cake with various fondant animals and rifles).

Other secrets of this cake lie within the ingredients. At first glance, a cake without flour may sound like a recipe for a rock. However, as my grandmother showcased in her gluten-free chocolate cake ring recipe, moist light cakes are not only possible without white flour, but delicious. Grated almonds act as a replacement for white flour but provide more flavor and protein. Although I’ve previously used ground almonds as a substitute for grated, they seem to weigh the cake down a bit and make it slightly heavier. But who really has time to grate over 3 cups of almonds? Enter almond flour. This nutty flour is essentially grated almonds and makes recipes like these a whole lot easier. You will pay for it though – almond flour runs $10-$15 per lb.

With all this talk about a moist light cake, you may be wondering how much butter or oil is needed. The answer is none. No butter, oil, or shortening of any kind is used. The secret of this fluffy cake lies within the egg yolks and stiffly beaten egg whites. Both the cake itself and the topping contain egg whites and although the topping is much like a meringue, it takes on a totally different texture with addition of the grated almonds. The finished moist cake layered with tart jam and almond meringue topping reminiscent of frangipane, will not only surprise you but keep you guessing.

Ingredients:

1 3/4 cups unblanched almonds or 2 cups almond flour
1 teaspoon grated lemon zest
1 teaspoon vanilla extract
6 egg yolks
3 egg whites
2/3 cup sugar
1/2 cup raspberry jam (or other tart jam of your choice)

Topping
3 egg whites
2 teaspoons lemon juice
1 teaspoon vanilla extract
1/2 cup sugar
1 1/4 cups unblanched almonds or 1 1/3 cups almond flour

Preheat oven to 350 degrees. Grease the bottom of a 9-inch spring form pan. Finely grate unblanched almonds (if using instead of almond flour).

Add lemon zest and vanilla to egg yolks. Stir lightly with a fork to break them up.

Beat egg whites until they form soft peaks. Add sugar, a little at a time, beating well after each addition, until whites are very stiff, about 5 minutes in all.

Pour egg yolks over whites. Sprinkle almond flour or grated almonds over them. Fold gently together. Pour into prepared pan and bake 30-40 minutes until cake is lightly browned and springy when gently touched.

Begin preparing topping when cake has backed about 20 minutes: Grate unblanched almonds, if using. Combine egg whites, lemon juice and vanilla. Beat until egg whites hold soft peaks. Add sugar, a tablespoon at a time, beating well after each addition, until whites are very stiff, about 5 minutes in all. Fold in grated almonds or almond flour.

Remove cake from oven and quickly spread top with a thin layer of raspberry jam. Spread half the topping over jam and press remaining topping through a pastry bag fitted with a large star tube.

Replace cake in oven on a high rack. Bake 30-40 minutes longer or until top is golden brown and set. Cool cake in pan.

Adapted from “The Art of Fine Baking” by Paula Peck.


Blueberry Tart

Blueberry Tart

Fruit tarts are abundant in “The Art of Fine Baking.” They are some of the most seasonal recipes throughout the book and as the high season for blueberries approaches (though a bit late this year), it seemed like an obvious choice for this classy summer dessert. It’s also the only time of year that blueberries are affordable enough to make a whole tart full of them. Frozen just will not do and for those of us berry addicts, this tart is a delicious delivery method for these healthy bursts of juice.

We made a fair number of fresh fruit tarts with blueberries in culinary school, but none quite like this. In addition to my grandmother’s exceptional rich tart pastry dough (lemon zest and hard boiled egg yolks are key), a quick pseudo jam is made with half of the fresh blueberries and then combined with the remainder. This not only adds an additional layer of texture and flavor, but also a sweetness that can help balance out any berries that maybe slightly under ripe. With all this decadence, a layer of pastry cream maybe overkill. But I can’t seem to resist the urge to add the sweet cream with a touch of almond paste, even if only so that I can eat the leftovers with just a spoon. The star of the show though, remains the blueberry tart – with each ingredient perfectly distinguished in every bite.

Ingredients:

1 recipe rich tart pastry dough
4 cups blueberries
3/8 cup sugar
zest and juice of 1/2 a lemon
1/2 teaspoon cinnamon
1 recipe pastry cream (optional)

Grease a 9-inch tart ring and place on a baking sheet lined with parchment paper. Roll pastry dough an 1/8 inch thick and line tart ring. Chill.

Preheat oven to 350 degrees. Place chilled pastry in oven, taking it directly from freezer or refrigerator so it is as cold as possible. Prick bottom all over with a fork. Prick 3-4 times during first 10 minutes of baking to prevent bottom of pastry from puffing up. If sides of pastry should sink down during first 10 minutes of baking, simply press them back with a fork. Bake for a total of 25 minutes, or until shell is golden brown.

In a heavy saucepan, combine 1 1/2 cups blueberries, sugar, lemon zest and juice, and cinnamon. Cook over low heat, stirring until sugar is dissolved. Raise heat and boil rapidly about 8 minutes or until blueberries thicken and acquire the consistency of jam. Cool.

Combine raw blueberries with cooked jam, mixing gently. Spread a thin layer of pastry cream (if using) on the bottom of the baked tart shell. Combine raw blueberries with cooled jam, mixing gently. Spoon into tart shell.

Adapted from “The Art of Fine Baking,” by Paula Peck

Old Fashioned Cheesecake (strawberries optional)

Cheesecake by Paula Peck


There’s a lot to say about cheesecake but very little that’s really necessary. I was surprised to find this fairly traditional style cheesecake recipe in “The Art of Fine Baking.” It’s not one of my grandmothers well-known recipes and seemed a bit out of place amongst the fancy tortes and cakes. As summer approached, I decided I would try this basic recipe and top it with the fresh strawberries that are now in season and grown locally. My only issue was that the original recipe called for “Zwieback” crackers in the crust. I had no idea what these were and not only did they sound a bit ancient to me, I almost thought they were made up (my grandmother’s maiden name was Zweier, an unlikely coincidence). After a little research, I discovered that Zwieback crackers was a cracker toast often marketed by Gerber and Nabisco as a baby biscuit. It appears that these were discontinued about 4-5 years ago. There are a few homemade recipe versions available online but I opted to replace the Zwieback crackers with good old graham crackers. Since ground pecans or walnuts make up half the crust, the graham crackers don’t take away from the crust’s integrity. That unique rich nutty flavor still gives this cheesecake that little special Paula Peck spin.

Note: The baking instructions below have been modified from the original recipe. If a crack-free cheesecake is preferred, bake the cheesecake in a water bath which will allow it to bake more slowly. Simply place the spring-form pan in tin foil and ensure foil is folded up the sides (this protects the cake from any water that could leak through). Pour hot water around the foil lined cheesecake.

Ingredients:

1 package Graham Crackers, made into crumbs (or Zwieback!)
1 cup finely grated walnuts or pecans
1/3 cup butter, melted
1 cup granulated sugar
1 1/4 lbs soft cream cheese
1/4 teaspoon salt
1 1/2 teaspoons vanilla extract
1 teaspoon lemon zest
4 eggs, separated
1 cup heavy cream, whipped
1/2 cup sifted flour

Strawberry Topping
1 lb strawberries, hulled and sliced
1/4 sugar

Preheat oven to 325 degrees. Lightly grease the bottom and sides of a 9-inch spring-form pan. Combine graham cracker crumbs, grated nuts, melted butter, and 2 tablespoons sugar. Mix with fingertips until ingredients are blended. Spread the crumb mixture on the bottom of the spring-form pan. Press down firmly.

Mix the cream cheese with half the remaining sugar, salt, vanilla, and lemon zest. Beat in egg yolks. Beat egg whites until they hold soft peaks. Add the remaining sugar a tablespoon at a time, beating well after each addition. Beat until very firm. Pour whipped cream on top of stiffly beaten egg whites. Add cream cheese mixture and sprinkle flour on top. Fold together gently.

Pour in prepared pan and back for 45-60 minutes or until cheesecake is firm but still slightly jiggly in the center. Remove from oven and allow to cool 30-60 minutes before chilling fully in the refrigerator.

While cheesecake is chilling, make strawberry topping by combining sugar with the strawberries. Cover and chill for at least 1 hour.

Spoon strawberry topping over chilled cheesecake right before serving.

Adapted from “The Art of Fine Baking”

Sour Cream Custard Cherry Tart

Sour Cream Cherry Tart

Like the many cake recipes in “The Art of Fine Baking,” I’ve barely scratched the surface of the tart recipes. Now that summer berries are on the horizon, you will see more tarts from me soon. So simple in flavor, tarts are a lovely (and classy!) way to emphasize fresh seasonal fruit. When I started seeing cherries at the fruit stands on the streets here in NYC a few weeks ago, I was inspired to make this easy custard tart. The only time consuming part of this recipe is pitting the cherries. Sometimes I still think my fingers may be a little too pink.

I prefer to make the tart shell from scratch. My grandmother’s rich tart pastry recipe is exceptional (especially the lemon zest) but to further simplify this recipe, a store bought shell can be used. The star of this tart is really the cherries (not the custard), so make sure to use fresh sweet ones. Frozen or canned will ruin both the texture and taste of the tart. Cherry fans are sure to appreciate this elegant end to that first summery meal.

Ingredients:

1 recipe rich tart pastry
3 eggs
1/3 cup sugar
3/4 cup sour cream
1/2 teaspoon vanilla extract
2 cups pitted sweet cherries

Line a 9-inch tart ring with rich tart pastry. Chill, preferably in the freezer, for at least 1 hour. Preheat oven to 350 degrees.

Beat eggs with sugar, sour cream, and vanilla. Arrange pitted cherries in unbaked tart shell. Pour egg mixture over them. Bake about 45 minutes on the lowest rack of the oven, or until the custard is firm and the tart is brown. Serve chilled.

Adapted from “The Art of Fine Baking,” by Paula Peck.

Sour Cream Cherry Tart Slice

Lemon Cake Logs

Lemon Cake Logs by Paula PeckI’ve barely scratched the surface of lovely cakes and buttercreams that “The Art
of Fine Baking” has to offer. I’ve resigned myself to slowly working my way through
these lavish chapters since this is where some of Paula Peck’s best work lies. I
would like to go in order, but the intricacy of some of these recipes is
more than my schedule can allow for on a regular basis. This is partly why I
happened to select this recipe. It’s fairly straight forward and can be
completed in a few short hours, possibly less. Also, lemon seemed like an ideal
choice as we make our way through spring and the days grow warmer.

Unlike a traditional 9 inch round cake, you can get pretty sloppy when creating these little logs and they’ll still turn out cute and tasty. You don’t have to worry
much about ensuring the buttercream looks smooth or that cake crumbs don’t
stick to it. That’s the beauty of using sponge cake. Few crumbs and you can just slap on
the buttercream and roll it up. You can choose to frost both ends of the logs or
just one. Again, the buttercream doesn’t have to be perfect since it acts as a
glue for the sliced almonds. Crush the sliced almonds slightly for a refined look and dip slices of lemon in sugar for a sweet and sour garnish. No one has to know how simple this perfect party dessert was to make.

Ingredients:

1 basic sponge cake with 1 teaspoon lemon zest folded into the batter before baking
1 1/2 cups lemon buttercream
1 cup sliced almonds, slightly toasted
vanilla sugar (optional- see note)

Cut sponge roll in half to make 2 long rectangles. Spread each thinly with lemon buttercream. Roll up jelly-roll style, making 2 long, thin rolls. Trim ends. Cut into 2-inch lengths. Spread the ends of each roll with the remaining buttercream. Dip ends into almonds. Dust with vanilla confectioners sugar, if using.

Note: Vanilla Sugar can be made by burying 3 or 4 vanilla beans in a canister containing 1 lb of granulated sugar or confectioners sugar.

Yield 8-10

Lemon Cake Log

Jelly Doughnuts

Jelly DoughnutsYes, Paula Peck made doughnuts. It may come as a surprise but this recipe is actually in “The Art of Fine Baking,” tucked away in the unsuspecting “A few breads, many coffeecakes” section. It’s a classic recipe with a base dough reminiscent of brioche. Who needs the jam filling? Warm fried dough dipped in sugar is enough to satisfy even the pickiest doughnut fanatics. And speaking of doughnut fanatics, it seems the once convenience store breakfast treat, often put in the same category as Dingdongs and Twinkies, has come full circle. Doughnuts have become a culinary art form (of some sort). Specialty bakeries are popping up all over, serving both traditional doughnuts as well as creative delights such as Peanut Butter and Jam, Tres Leches, and Green tea doughnuts (check out Doughnut Plant here in NYC). Chefs are now throwing around words like Bombolone and Beignet, which despite sounding fancy, are simply the Italian and French words for Doughnut. Even Saveur magazine recently did an article on the “Americas 50 Best Donuts“. It all comes down to one thing: one way or the other, we can’t resist fried dough glazed or dipped in sugar.

This is a versatile recipe and can be made with or without the jam filling. Try filling the warm doughnuts with Nutella and you may never find a better doughnut.

Ingredients:

2 packages dry yeast
2 tablespoons sugar
1 teaspoon honey
1 teaspoon salt
1 cup warm milk
1 egg
2 egg yolks
1 teaspoon lemon zest
3-4 cups all purpose flour
1/4 cup soft unsalted butter
vegetable oil for frying
1 1/2 cups jam
vanilla sugar (or cinnamon sugar) – see note

Mix yeast with sugar, honey, milk, eggs, egg yolks, and zest. Add enough flour to make a medium-soft dough, working in soft butter at the same time. Knead well until dough is smooth and elastic. Place dough in bowl. Dust lightly with flour. Cover bowl and place in a draft free place until dough doubles in bulk.

After dough has risen, punch it down and allow it to rise a second time.

Shape doughnuts by pinching off egg-size pieces of dough and forming each into a smooth, slightly flattened ball. Place on a well-floured towel and let balls rise until doubled in size.

While doughnuts are rising, pour at least an inch and half of vegetable oil in a heavy bottomed saucepan and heat to 375 degrees. Drop doughnuts into fat, 2 or 3 at a time and fry until undersides are a deep golden brown. Turn and fry until the other sides are also well browned, about 5 minutes in all.

Remove and drain on paper towels. When doughnuts are cool, fill them by squirting jam into their centers with a long, narrow pastry tube. Dust with vanilla sugar.

Note: Vanilla Sugar can be made by burying 3 or 4 vanilla beans in a canister containing 1 lb of granulated sugar or confectioners sugar.

Yield: 3 dozen

single

Florentines

Florentines by Paula Peck

I’m no expert in making Florentines but it’s hard to go wrong with these gooey chewy chocolate dipped cookies. I realize they should probably be crispier, thinner, maybe rounder, and more even. But I’m not complaining. A cookie recipe that my father remembers my grandmother making, he confirmed that these turned out how she intended. Candied orange peel is the special ingredient that makes these different from many Florentine recipes that use grated orange zest. It maybe a little harder to find, but candied orange peel is what will definitely win over those orange-chocolate lovers. Not a orange-chocolate fan (I’m not particularly crazy about it myself)? Try candied ginger and you’ll have a whole different cookie.

A note about this recipe: those of you who are foolish ambitious enough to try to replace the shortening in this recipe with coconut oil, feel free but just make sure you use a very a mild one. Otherwise, the results are..lets just say, less than ideal. I would recommend skipping the shortening all together and just using melted chocolate as is.

Ingredients:

1/2 cup sugar
1/3 cup heavy cream
1/3 cup honey
2 tablespoons unsalted butter
1/4 cup candied orange peel, finely chopped
1/2 cup sliced almonds
3 tablespoons sifted flour
8 ounces semisweet chocolate, chopped
1 tablespoon vegetable shortening

Preheat oven to 400 degrees. Grease baking sheets well.

Combine sugar, cream, honey, and butter in a heavy saucepan. Stir over low heat until sugar is dissolved. Raise heat and boil without stirring until soft-ball stage (a ball forms when a bit of mixture is dropped into cold water) or until mixture registers 238 degrees on a candy thermometer. Cool slightly.

Stir in orange peel, nuts, and flour. Drop small rounds of batter on the prepared cookie sheets, leaving at least 2 inches between each cookie. Flatten each cookie with a fork dipped in milk (if necessary). Bake 8-10 minutes or until cookies are golden brown. They will spread while baking. Therefore, immediately upon removing them from the oven, pull each one back into the shape of the round with a greased 3-inch cookie cutter. Using a cutter will ensure their final roundness.

When cookies are firm, remove from cookie sheet and finish cooling on a rack. Melt chocolate in a double boiler. Stir in shortening. Coat underside of each cookie thinly with melted chocolate. Place in refrigerator long enough to set chocolate.

Yield: approximately 16

Adapted from “The Art of Fine Baking,” by Paula Peck

few

Scandinavian Christmas Cookies

This festive cookie recipe from “The Art of Fine Baking” was actually recommended by a few of you readers. Lightly spiced but with a brightness from the lemon zest, they are the perfect alternative for ginger cookies. Cut them in whatever shapes you like and eat them with or without icing. This versatile cookie can be served for dessert, with tea, as a fix for that sudden sugar craving, or even left out with a glass of milk for Santa. I may just have to make this a new holiday baking tradition.

Ingredients:

1 cup unsalted butter
2/3 cup brown sugar
1/3 cup light corn syrup
2/3 cup maple syrup or honey
1 teaspoon grated lemon zest
1 teaspoon dark rum
4 1/2 cups sifted all purpose flour
1 teaspoon salt
1 teaspoon baking soda
1 teaspoon ground ginger
1/2 teaspoon cloves
1 teaspoon cinnamon
frosting or icing of your choice (optional)

Cream butter with sugar. Add syrups, lemon zest, and rum. Mix well. Add flour mixed with salt, baking soda, and spices. This should make a soft dough.
Chill dough until firm enough to roll.
Preheat oven to 350 degrees. Grease and flour baking sheets.
On a well-floured cloth, roll dough very thin (less than 1/8 inch, if possible). Cut into desired shapes. Transfer cookies to baking sheets with a spatula. Bake 8-10 minutes, or until cookies are puffed and lightly browned. Cool and frost (if using icing or frosting).

Yield: approximately 9 dozen

Sauteed Apple Cake

When I found this recipe nestled in the puff pastry and strudel section of “The Art of Fine Baking,” the end result seemed difficult to visualize and definitely wasn’t what I expected from a recipe with the title “Sauteed Apple Cake.” I therefore had to try it. Layers of flaky puff pastry hold buttery sautéed apples and a giant dollop of sweetened whipped cream with a crunch of almond ties it all together. I don’t think I’ve ever seen anything quite like it.

As shown in the photos, I chopped the apples in fairly large pieces so that they wouldn’t become too mushy during the saute process. However, I actually think the finished cake benefits from slightly smaller pieces or just slices, because it holds together better. The taste, of course, isn’t affected either way and is reminiscent of apple pie.

I made the flaky puff pastry (or “puff paste” as it is referred to in the book) layers from scratch…yes, from scratch. Homemade Puff Pastry is pretty much unheard of today. It’s very time consuming and it also makes you very aware of how much butter you are consuming when eating something as simple as a turnover or palmier. I actually enjoyed the process of repeatedly rolling the dough to create the butter layers. The resulting pastry tastes richer and a little more pure than those made with frozen puff pastry. However, such a lengthy process isn’t for everyone and this recipe can be made easily using the frozen version for this same unique twist on a cake.

Ingredients:

1/2 recipe Homemade Puff Pastry or two sheets frozen puff pastry
2 egg whites mixed with
2 teaspoons water
1/4 cup granulated sugar
1/4 cup sliced almonds

Sauteed Apple Filling
3 lbs tart apples – such as granny smith- peeled, cored, and sliced or coursely chopped
1/3 cup butter
1/4 cup sugar
1/2 teaspoon cinnamon
1 teaspoon lemon zest

Preheat oven to 350 degrees.

If using homemade puff pastry, roll out pastry slightly less than 1/8 inch thick. Trim edges. Divide into two 8 inch squares and 4 strips 1/2 inch wide. Place squares on baking sheet. Brush one square with egg white mixture and arrange strips along edges to make a border. Chill both squares. Just before baking, brush plain square with egg white mixture. Sprinkle it with granulated sugar and sliced almonds. Bake 30-40 minutes until golden brown.

While pastry bakes, make apple filling: In a large skillet, saute chopped apples with butter over medium heat. Sprinkle apples while they cook with sugar, cinnamon, and lemon zest. Turn occasionally with a spatula to lightly brown apples on all sides. Do not stir or apples will become mushy. When they are tender or lightly browned, remove from heat.

Pile apples into baked shell. Fit sugared square on top. Serve warm with whipped cream.
To re-warm: place in 300 degree oven for 15 minutes.

Serves 4