Asparagus au Gratin


Asparagus au Gratin

As asparagus floods the farmers markets, Spring is quickly turning into summer. This seasonal vegetable along with arugula, are often a few of the first signs of warmer weather yet to come. Now, with the abundance of fresh summer produce within reach, it’s time to end Asparagus season with a bang. Asparagus au Gratin is a rich decadent dish that sounds a little fancier than it really is. Think cheesy asparagus…or better yet: Mac & Cheese (minus the Mac).

It may seem like a shame to take a healthy vegetable like asparagus and make it somewhat unhealthy. Many French dishes have a knack for doing this but once you taste them, you forget why you were ever concerned in the first place. This is one of those dishes. Another delightful recipe adapted from “The New York Times Cookbook” by my grandmother’s friend and dear colleague, Craig Claiborne. Cheddar and Parmesan cheeses are added to a simple béchamel style sauce and then layered with barely cooked fresh green asparagus spears. A quick browning in the oven blends the two together and gives this dish the final touch. Perfect as a side dish for grilled meat, chicken, or even fish – this gratin is a crowd pleaser. And don’t worry, your beach body diet can wait an extra day…

Asparagus au Gratin

Asparagus au Gratin

Ingredients

1/4 cup unsalted butter
1/4 cup all purpose flour
1 3/4 cups chicken broth
1/4 cup light cream
3/4 cup grated Cheddar cheese
1/2 cup Parmesan cheese
salt and pepper
36 asparagus spears

Instructions

Cook asparagus in a large pot of boiling, salted water until just barely tender. Strain and set aside.

In a saucepan, melt the butter, add the flour and stir with a wire whisk until well blended. Meanwhile bring the chicken broth and cream to a boil and add all at once to a butter-flour mixture, stirring vigorously with the whisk until the sauce is thickened and smooth. Add the cheeses, salt and pepper, and stir until cheeses melt.

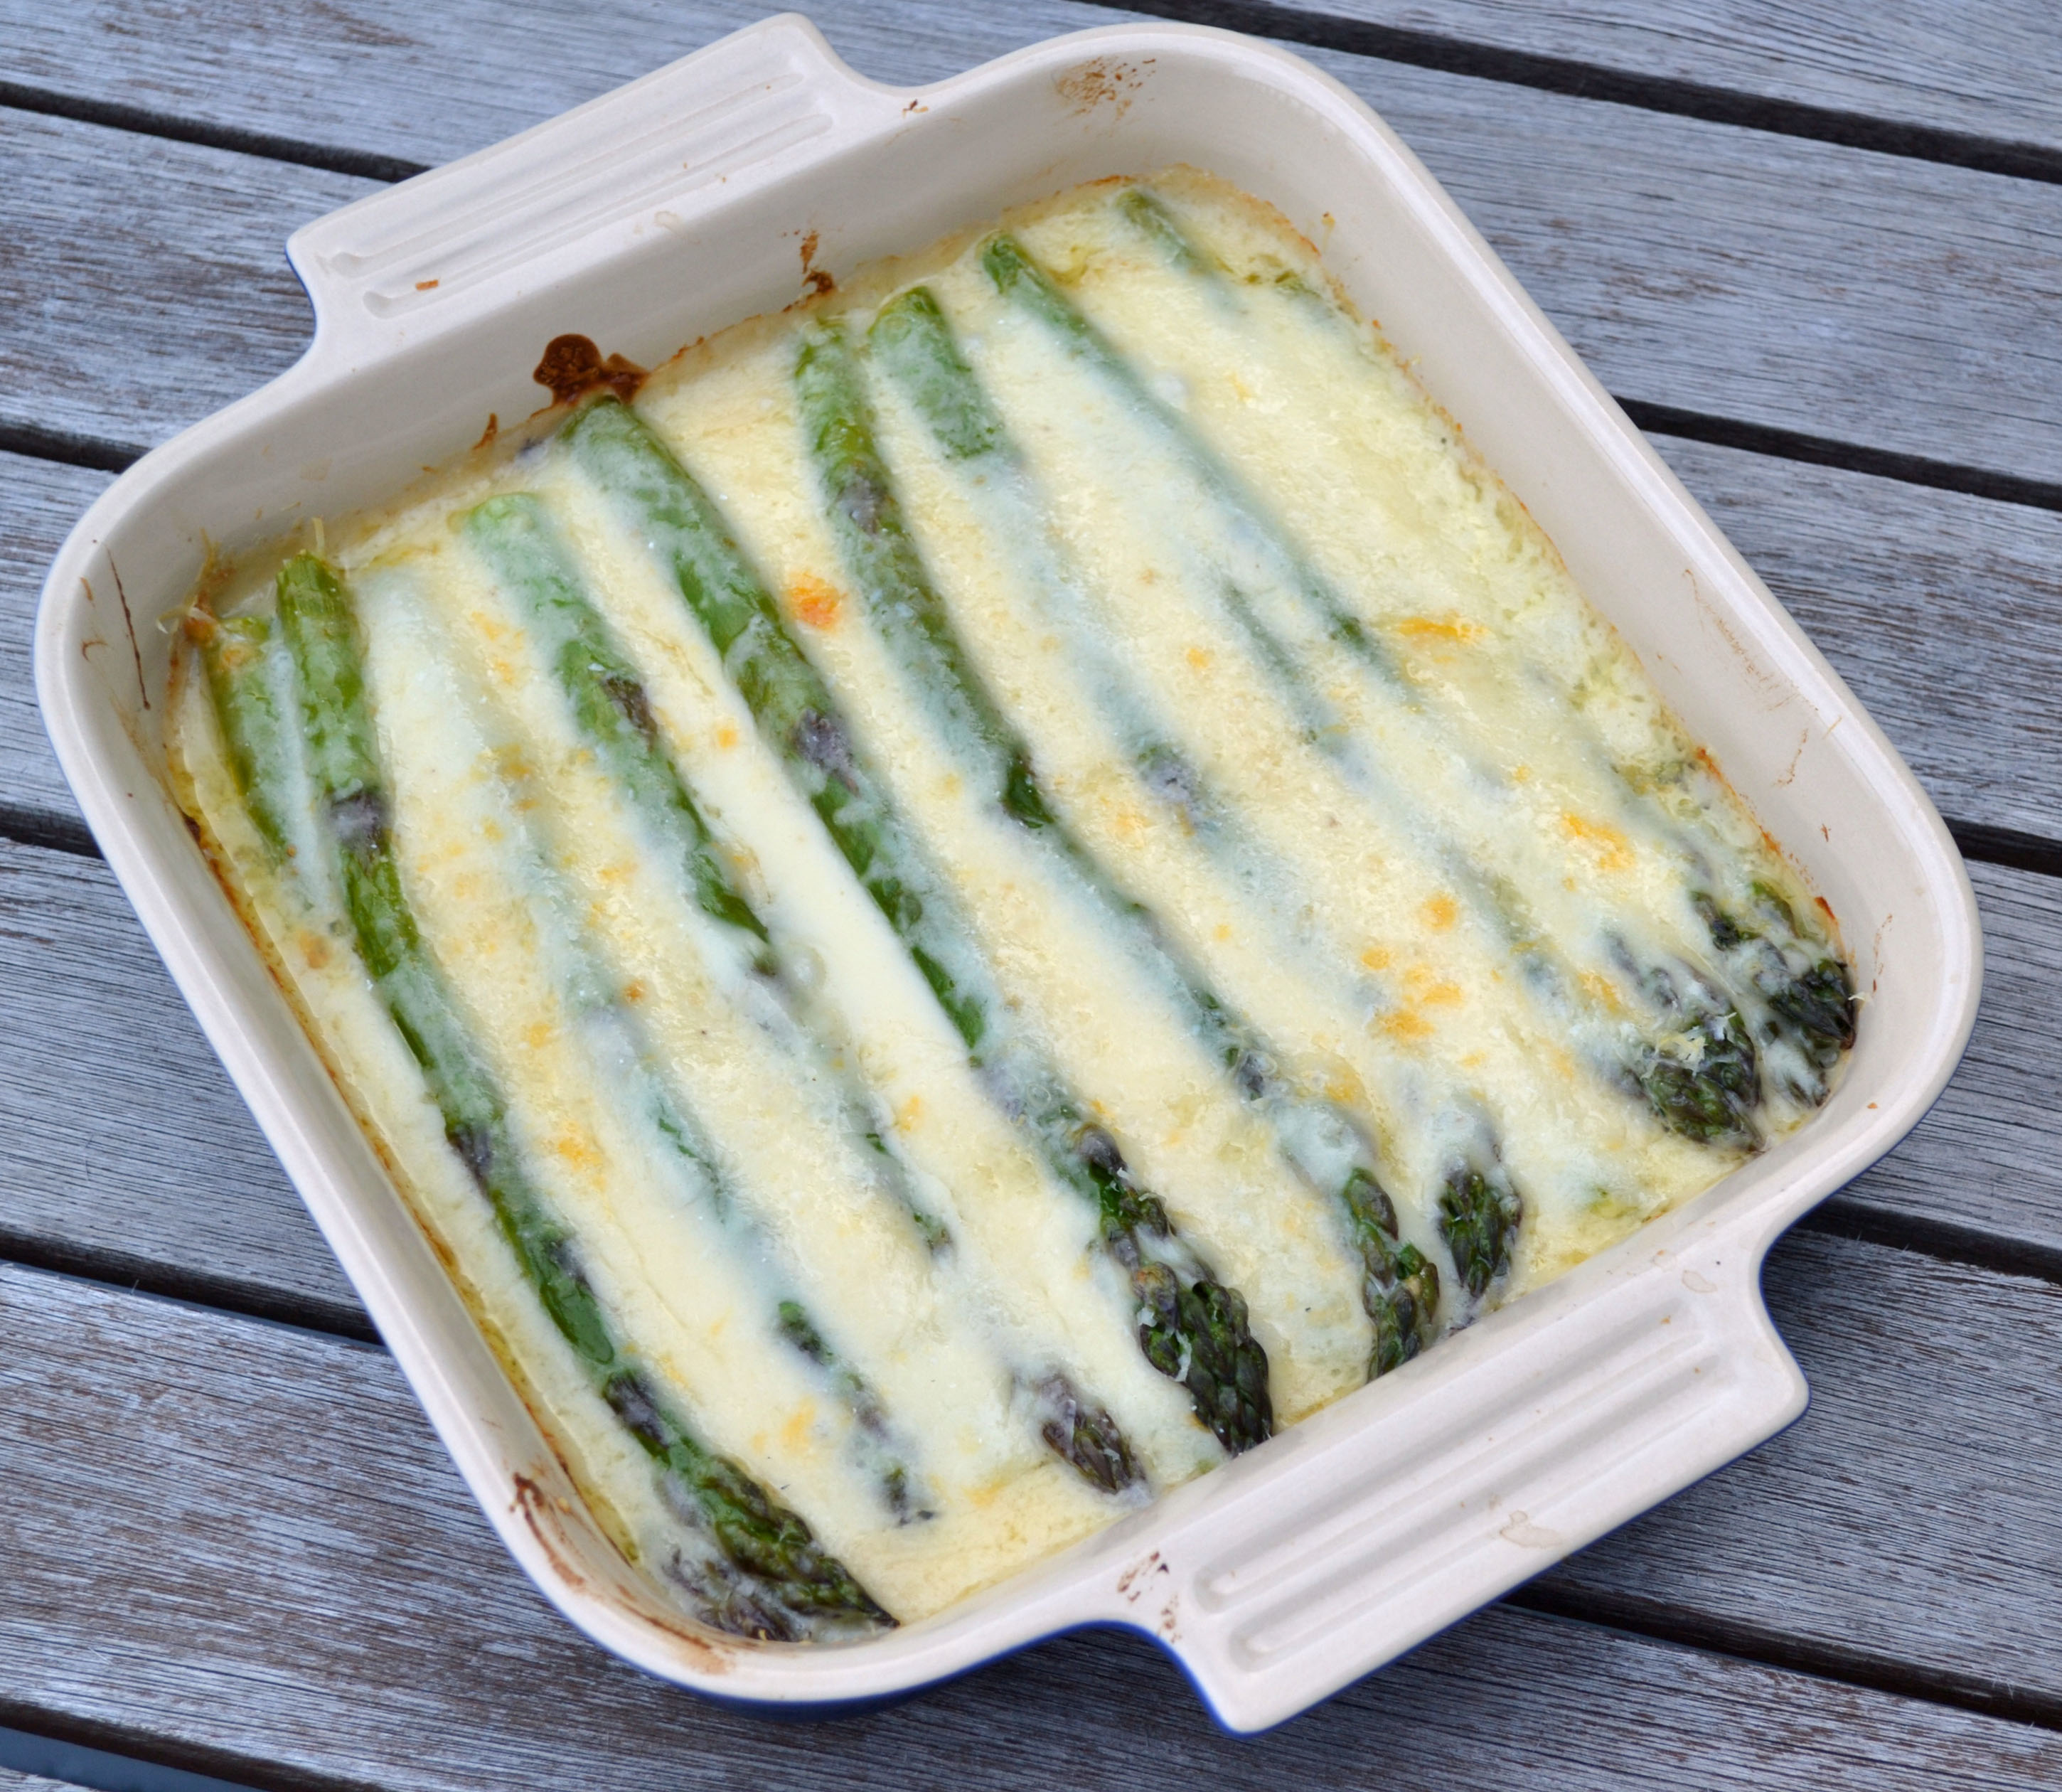
Place alternate layers of sauce and asparagus in a buttered casserole, ending with a layer of sauce. Sprinkle with additional Parmesan cheese and brown quickly under a preheated boiler or bake in preheated oven at 450 degrees for 5 minutes.

Adapted from “The New York Times Cookbook,” by Craig Claiborne.

Grilled Swordfish Skewers

Grilled Swordfish Skewers

After what seemed like a never-ending cold snowy winter in the Northeast, grilling season is finally here. Lucky for us, “The Art of Good Cooking” by my grandmother, Paula Peck, has many barbecue recipes I have yet to share. Similar to this Grilled Swordfish recipe, most are in the form of skewers – one of my favorite ways to grill. There is nothing revolutionary about this grilled skewer recipe but it’s simple and delicious. The marinade, which consists of garlic, olive oil, soy sauce, lemon, salt, and pepper, is just light enough to bring out the fresh clean taste of not only swordfish, but any seafood (check out the shrimp shown in this photo). With its meaty firm texture, swordfish is one of the few fish that can actually hold up to being cut into chunks, skewered, and grilled. Like all fish, it’s important not to overcook it – no one enjoys chunks of rubber.

Grilling can be challenge here in NYC. For the authentic grilling experience, the only options are the park or the roof deck or backyard of a wealthy friend. I usually end up doing most of my grilling out of town on vacation. However, the limited grilling options in NYC never stopped my grandmother. Although all of her grilling recipes can be converted to the oven or broiler, she grilled right in her Harlem kitchen. She would set up the grill plate on the stove and fan the smoke out the window, as best she could. The neighbors definitely didn’t appreciate this and I doubt she could get away it now. An actual grill (particularly charcoal) will produce a more flavorful result. But by marinating the fish for 2-3 hours and following the proper cooking times, juicy garlicky swordfish will become a favorite whether broiled, baked, or grilled. Don’t forget the grilled vegetables and fruit– my favorites are bell peppers, grape tomatoes, eggplant, and pineapple!

Ingredients:

2 lbs swordfish steak
3 cloves garlic, finely minced
1/4 cup olive oil
3 tablespoons lemon juice
1 tablespoon soy sauce
salt and pepper

Lemon Parsley Sauce (for serving)
6 tablespoons lemon juice
6 tablespoons olive oil
1/2 cup chopped parsley

Dry fish well on paper towels. Cut into 1 1/2 inch chunks.
Combine garlic, olive oil, lemon juice, and soy sauce. Place swordfish in a bowl and pour mixture over the chunks. Marinate in the refrigerator for at least 3 hours, turning occasionally.

Thread chunks on skewers. Broil, preferably over charcoal, turning occasionally, until swordfish is lightly brown all over. Season with salt in pepper.

Mix together sauce ingredients and spoon over skewered swordfish.

Serves 4-5.

Adapted from “The Art of Good Cooking,” by Paula Peck.

Classic Baked Lasagna

Lasagna No RicottaUntil recently, I’ve made very few lasagnas in my life. It always seems like a long process for an average, everyday pasta dish that appears on the menu at almost every red-sauce Italian restaurant. But this lasagna has changed my mind. I give credit to the absence of one of the most common ingredients in lasagna: ricotta cheese. I don’t have a particular problem with ricotta. The crumbly, almost grainy like texture doesn’t bother me like it does some people. I even thought I liked it in lasagna but that was before I tried replacing the ricotta with a basic béchamel sauce. The simple French sauce made of butter, flour, and milk (or cream) is often used as the base for many other sauces (like the cheesy sauce in baked mac & cheese). In lasagna, the béchamel sauce adds an unexpected smooth creaminess to the dish without making it overwhelmingly rich.

This lovely classic was adapted from John Clancy’s Cookbook, “John Clancy’s Favorite Recipes.” Another talented friend of my grandmother, John Clancy was a chef and restaurateur who like my grandmother, was mentored by James Beard. He later opened his own culinary school and authored a number of cookbooks. Although he was known for his fish and seafood recipes (and baking recipes in his inner circle), this lasagna recipe is exceptionally tasty. I did, however; make some modifications. The original recipe instructions state to cook the tomato sauce for 4 hours. Who has that kind of time?! I’m sure it might make a more flavorful sauce but a tasty one can be made in under 30 minutes and then allowed to simmer while the pasta and béchamel are prepared. Instead of a combination of ground veal, pork, and beef – which I’m sure is delicious – I decided to keep it simple by just using beef (ground turkey could also be used). And lastly, I added cheese! A sprinkle of parmesan on top was just not enough so I added both grated parmesan and mozzarella between each layer. Ricotta lover or not, this classic lasagna will quickly become your favorite and replace that tomato sauce-drenched version from the local mediocre Italian restaurant.

Ingredients:

Meat Sauce

4 tablespoons olive oil
1 1/2 lbs ground beef
1 cup finely chopped onion
6 cloves of garlic, minced
2 tablespoons tomato paste
2 – 28 oz cans crushed tomatoes
1 1/2 teaspoons dried oregano
1/2 cup fresh basil, shredded or chopped (or 1 1/2 teaspoons dried)
salt and pepper

Bechamel Sauce

3 cups light cream
4 tablespoons unsalted butter
6 tablespoons flour
1 teaspoon salt
1/4 teaspoon white pepper
1/8 teaspoon nutmeg

1/2 lb lasagna noodles
1 cup Parmesan cheese
1/2 lb shredded mozzarella (or one 8 ounce package)

For the meat sauce:

In a large, heavy skillet, heat the oil until it is very hot. Add ground beef and brown, breaking up meat with a fork or spatula. Drain fat. Stir in onion and garlic and saute until translucent. Season with salt and pepper. Add tomato paste and cook a minute longer. Add the crushed tomatoes, oregano, dried basil (if using fresh, wait to add until right before building lasagna), and salt and pepper to taste. Bring to a boil then reduce to a simmer. Continue to simmer while preparing the bechamel and lasagna noodles.

Heat the water for the lasagna noodles and cook according to package instructions while preparing the bechamel. A tablespoon of oil can be added to the water to help prevent the noodles from sticking. Cook until just slightly resilient to the bite.

For the bechamel sauce:

Place the light cream in a small saucepan. Heat cream until hot and set aside.

Melt the butter in a heavy 1 quart saucepan, add the flour, and stir until smooth. Whisk in hot cream and place the saucepan over high heat, bringing the sauce to a boil and whisking constantly. When the sauce is very thick, lower the heat and cook for an additional 3 minutes. Add the salt, pepper, and nutmeg. Remove from heat and set aside.

To assemble lasagna:

Preheat oven to 350 degrees.

Spread a thin layer of the meat sauce on the bottom of a 9 x 12 x 3 inch casserole. Spread about 1/4 of the bechamel sauce on top. Add a 1/4 of the Parmesan and mozzarella. Add a layer of pasta on top. Repeat layering three more times, ending with meat sauce bechamel and cheese.

Bake in a preheated oven until lasagna is bubbling hot, about 30 minutes. Remove from oven and allow to cool 5 minutes before serving.

Adapted from “John Clancy’s Favorite Recipes,” by John Clancy.

Black Beans in Garlic Sauce

Black Beans in Garlic Sauce

Attention all garlic lovers: this dish is for you. These black beans are more about the garlic than they are about the beans. With a whole head of garlic minced, sautéed, and mixed into cooked black beans – this hearty garlicky dish is perfect for the never-ending cold winter nights. A little cumin adds an ethnic flare and when eaten with white rice, these beans become a fulfilling meal. And then there’s the bacon. As if the garlic black bean combination wasn’t tasty enough, crispy bacon adds a level of smoky flavor.

“The Art of Good Cooking” has a fair number of bean recipes. There are some with black beans, chick peas, white beans, kidney beans, etc. and almost all of them provide instructions for cooking the raw bean instead of canned. I’m not sure if raw beans were just my grandmother’s preference (and less expensive) or if canned beans weren’t as readily available as they are today – maybe a combination of both. I often find that unless you are infusing flavor into the raw beans while cooking them, canned beans are a fast and easy replacement. This recipe is no different. Canned beans can be simply heated in a little broth or water and then added to the garlic sauce as instructed. This side dish or meal then becomes even easier to make on a weeknight when your craving something warm and comforting.

Ingredients:

2 cups black beans
1 head of garlic, separated into cloves, peeled and minced
1/3 lb of bacon, diced
1 teaspoon cumin
1 tablespoon salt
coarsely ground black pepper

If using dry black beans, wash and soak overnight in water. In the morning, place in a deep pot with enough additional water to cover beans. Add a little of the garlic. Bring to a boil, lower heat and simmer until beans are completely tender. Drain beans, reserving some of the liquid for later use. Keep beans warm.

Preheat oven to 325 degrees. Cook bacon in a skillet over low heat until crisp. Remove and reserve. Add remaining garlic to bacon fat and saute over low heat until soft.

Place beans in a casserole. Stir in crisp bacon, sauteed garlic, cumin, salt, and pepper. Add about 3/4 cup of reserved liquid from the beans. Place in oven and bake, covered, for about 30-45 minutes. Serve hot.

Serves 6.

Adapted from “The Art of Good Cooking,” by Paula Peck.

Black Beans with Garlic Sauce

Chinese Spare Ribs

Chinese Spare Ribs

We often think of spare ribs in the summer, thrown on the grill and eaten with corn on the cob or cole slaw. However, Chinese spare ribs have a sweet and salty warmth that make them perfect for the winter. Marinated in a mixture of soy sauce, garlic, rice wine vinegar, and Chinese five spice powder, these ribs are baked in the oven and basted until almost charred but still gooey and tender.

There are many different methods for baking ribs. Some recommend boiling the ribs prior to baking to extract some of the fat.  In “The Art of Good Cooking,” my grandmother recommends steaming the ribs in tin foil in the oven before baking and basting the ribs. Other methods indicate marinating the ribs and putting them directly in the oven, similar to what I’ve done here. The cut of meat may help determine what method to use. If the ribs are particularly fatty, they will be greasy so either boiling or steaming them will help produce a leaner tasting rib without a fatty residue.

Although my grandmother didn’t specialize in Asian food, there are a few recipes hidden throughout her book. Her original Chinese BBQ sauce recipe can be found in the spare ribs section along with Hawaii BBQ sauce and Mexican BBQ sauce. I decided that the Chinese sauce needed a bit more attention so I made a few modifications. To get the full texture and flavor that Chinese spare ribs deserve, I added the Chinese five spice powder and rice wine vinegar to the sauce as well as a step to marinate the ribs. On these crazy winter days, juicy flavorful ribs are worth the extra effort.

Ingredients:

1/2 cup soy sauce
1 tablespoon rice wine vinegar
2 teaspoons minced fresh ginger
2 cloves of garlic, minced
2 tablespoons sugar
1/4 teaspoon Chinese five spice powder
1/2 teaspoon ground black pepper
2 lbs beef or pork spare ribs

Mix together all ingredients in a shallow dish and add ribs. Turn to coat. Cover and marinate in the refrigerator for 1 hour.

Heat oven to 350 degrees. Place a baking rack on a rimmed baking sheet or roasting pan lined with foil. Remove ribs from marinade and place on rack, meat side up. Reserve marinade. If space permits, pour water half-way up the sides of the pan (make sure the water does not touch the ribs). Bake 30 minutes and baste with reserved marinade. Bake another 30 minutes and raise heat to 450 degrees. Baste the ribs then bake another 20-25 minutes until glazed and tender, basting once after 10 minutes.

Adapted from “The Art of Good Cooking,” by Paula Peck

Brussels Sprouts with Bacon

Brussels Sprouts with Bacon closeThese Brussels sprouts might be just an excuse to eat bacon but with Thanksgiving upon us, they are also the perfect side dish for that traditional Turkey. This is not a Paula Peck recipe but rather an adaptation from “The James Beard Cookbook” by her good friend and mentor James Beard. Although Brussels sprouts are more popular now than ever, it seems people either love them or hate them. If you hate them, than you probably haven’t tasted those that are cooked right. These bright green bulbs can be bland and mushy when overcooked but are tender with almost crunchy light leafy layers when cooked correctly. A little bacon doesn’t hurt either.

With just a few additions, this recipe is the perfect example of the important culinary concept of balancing fat, acid, sweet, and salt. The fat is the bacon (obviously) plus a finishing of butter…just a tablespoon. The sweet is both the brussel sprouts themselves as well as a pinch of sugar. The acid is a squeeze lemon juice at the end and the salt is the seasoning combined with some of the saltiness of the bacon. Ok so I didn’t say this is healthy but at least we are eating vegetables!  Even those friends or family members that “never eat green things” will be back for seconds. This dish might also be in the running to outshine that drab dry turkey and stuffing. Now I’ve gone too far…Happy Thanksgiving.

Ingredients:

1 lb or 1 quart Brussels Sprouts
6 slices bacon
2 tablespoons butter
2 tablespoons grated onion or shallot
pinch (large) sugar
1 tablespoon or a squeeze of fresh lemon juice
salt and pepper to taste

Trim the stems close to the sprouts and remove any discolored leaves. Soak the sprouts for 15-20 minutes in water with 1 teaspoon salt. In a medium pot, pour enough water to cover the brussels sprouts and add 1 teaspoon salt. Bring water to a boil and add sprouts. Do not cover. Cook gently for 5 minutes until sprouts turn bright green and are just barely tender when pierced with a fork.

While brussls sprouts cook, fry the 6 slices of bacon in a large skillet. When crisp, remove and chop. Drain off all but 2 tablespoons of the bacon fat. Heat the skillet over medium heat. Add 1 tablespoon butter and 1 tablespoon grated onion. Return chopped bacon to the pan and add the cooked, drained brussels sprouts. Add sugar and saute until brussels sprouts are tender. To finish, add 1 tablespoon grated onion, squeeze lemon juice, and season with salt and pepper to taste.

Adapted from “The James Beard Cookbook,” by James Beard.

Brussels Sprouts with Bacon

Veggie Stuffed Eggplant – Imam Bayeldi

Stuffed Eggplant


Catching the tail end of eggplant the season, this eye-pleasing dish showcases the juicy late summer (or fall) vegetarian favorite. I previously posted a couple of my grandmother’s vegetarian dishes. Paula Peck was not known for cooking vegetables and when she did, there were often whole sticks of butter or cups of olive oil involved. As a veggie lover though, I’ve managed to revise some of these dishes so that the flavor is maintained, but with less fat. In this case, the eggplant is stuffed with a fragrant mixture of garlic, onion, celery, tomato puree and herbs. These flavors soak into the eggplant as it roasts with just enough olive oil to keep it moist. The resulting succulent meaty flesh will make you forget that you’re eating an almost guilt-free and healthy dish.

So what does this strange recipe title “Imam Byaldi” have to do with eggplant? Well according to my grandmother’s introduction to this recipe in “The Art of Good Cooking,” the old Armenian title means “’the Holy Man fainted’- of shock because the eggplant tasted so good!” Ok so nobody is going to faint when they eat this stuffed eggplant, but it is pretty tasty.

Ingredients:

4 small eggplants
1/3 cup olive oil
2 large onions, chopped
1 green pepper, chopped
6 cloves garlic, chopped
1 cup chopped celery
1/2 cup chopped celery leaves
1/2 cup chopped parsley
1/2 cup tomato puree
1/4 teaspoon crumbled bay leaf
1/2 teaspoon oregano
2 teaspoons chopped fresh mint
1/2 teaspoon sugar
salt and pepper to taste

Cut eggplant lengthwise into halves. Salt cut sides generously and let stand for about a 1/2 hour (this draws out the bitterness from the eggplant).

Preheat oven. Rinse eggplants and dry with paper towels. Brush cut sides with some olive oil. Place eggplants on a baking sheet, cut side up. Bake until centers are soft and lightly browned.

While the eggplants are baking, prepare the following stuffing: sauté onions, green pepper, celery, and garlic in remaining olive oil until vegetables are soft but not brown. Add chopped celery leaves and parsley. Stir until leaves are wilted, then add tomato puree and herbs. Add sugar then salt and pepper to taste. Cook a few more minutes. Set stuffing aside until needed.

When eggplants are tender, allow them to cool so they can be easily handled. Raise oven heat to 350 degrees.

With a small knife, make an incision lengthwise, down the center of the cut side, being careful not to cut all the way through the eggplant. With your fingers, press soft pulp away from the incision on the 2 long sides so that a good-sized hollow is formed. Fill the hollows with the prepared filling, using a spoon.

Arrange stuffed eggplants on the baking sheet. Sprinkle with additional olive oil if filling looks dry. Bake for 45 minutes, basting with olive oil as necessary.

Note: To speed up this recipe, cut eggplant 1/2 inch thick and after it has been baked until tender, place slices of eggplant in a casserole. Arrange them alternately with the stuffing. Bake 30-40 minutes.

Ceviche

Ceviche by Paula Peck

Happy Cinco de Mayo!
Those of us that like ceviche, usually love it. We recognize fresh fish as a special treat that requires so little cooking that the acid of lime juice can be used without any heat at all. This traditional Mexican dish is not only appropriate for this Cinco de Mayo holiday but also for spring – to get in the mood for summer.

I’ve written previously about my grandmothers exceptional Mexican recipes, many of which she learned while cooking in Mexico. This ceviche recipe definitely falls into that exceptional category. However, there are two very important aspects of this dish that can make or break it. The fish, which is marinated in lime juice for 3-4 hours, must be extremely fresh. Do not use frozen or anything that smells even the slightest bit fishy (ironically fresh fish should always have a clean smell, never fishy). Otherwise, you will be able to taste that fishiness all throughout the finished dish.

The other important aspect is the hot pepper. I recommend Serrano or even Jalapeño but as many of you may know, the heat of each pepper can vary. For this reason, stay away from using the seeds and add the pepper last, a little at a time, while combining and tasting.

My grandmother served this ceviche (while it was a work in progress) at one of her many dinner parties with James Beard and Craig Claiborne. My father was the designated dishwasher for these parties and he could always tell if a particular dish was well-liked by the leftovers on the plates that came back in the kitchen. Despite the lovely plating (in red cabbage cups), the ceviche came back virtually untouched on every plate. It turns out the hot pepper she used was so spicy that it made the dish inedible. Needless to say, my grandmother was mortified. However, this happens to the best of us and she definitely perfected the ceviche after that incident (and before it was published in “The Art of Good Cooking”). It is now by far the best ceviche I’ve ever had.

Note: Any combination of fish maybe used. I prefer to use just scallops and fish and skip the shrimp but I’ve listed the fish proportions as noted in the cookbook.

Ingredients:

1/3 lb fresh bay scallops or sea scallops
2/3 lb shelled, cleaned shrimp
1/3 lb striped bass, halibut or other firm white fish
1 cup lime juice
1 onion, sliced
1 small green bell pepper, diced
1 small hot pepper, minced
2 cloves garlic, minced
2 cans pimentos, minced (optional)
2 teaspoons chopped fresh cilantro
2 cornichons or small dill pickles
salt and pepper to tast
1 teaspoon sugar
1/2 cup white vinegar
1 large avocado

Cut all seafood into tiny pieces. Combine in a bowl. Pour lime juice over seafood. Caver bowl and place in refrigerator for 3-4 hours or until seafood has changed color and looks cooked. Drain the lime juice from the seafood.

Combine all the remaining ingredients-except avocado- in a separate bowl. Taste. The mixture should be quite well seasoned-slightly sweet and spicy. Pour over drained seafood and toss well. Place in refrigerator till serving time. Before serving, peel and dice avocado. Combine with fish mixture.

Serves 6

Adapted from “The Art of Good Cooking.”

Ceviche in avocado shell

Chicken Saltimbocca

Saltimbocca has become somewhat of a classic. Originally Mediterranean, the name Saltimbocca is Italian for “jump in mouth” – a reference to the flavor explosion that takes place while eating this dish. There are varying ways to make saltimbocca. Veal, sage, capers, and sometimes provolone cheese are common ingredients. However, in each scenario the basics remain the same: the chicken or veal is sautéed and prosciutto is always involved (though I see no reason why you couldn’t use ham for a less expensive version). This recipe for Chicken Saltimbocca from “The Art of Good Cooking” happens to include black olives, which is somewhat rare but the beauty of this dish is its flexibility. Though I didn’t add it here, I think roasted red pepper could also make a nice addition to the center filling. The mozzarella is a natural match with the prosciutto and the crunchiness of the breading that soaks up some of the garlic butter is a combination that’s worth it alone – the other ingredients are just a bonus!

Note: the original recipe did not include toothpicks. I find that it’s easier to ensure the filling stays between the two cutlets by securing each package with a couple of toothpicks. Just make sure to take them out after cooking!

Chicken Saltimbocca

Ingredients

6 chicken breasts, boned, skinned, and cut in half (or 12 thin chicken cutlets)
6 thin slices of prosciutto, cut in half
12 pieces of mozzarella cheese, about ½ inch thick rectangles
12 pitted black olives, halved
1 teaspoon ground black pepper
½ cup flour
1 egg
3 tablespoons milk
2 cups bread crumbs of your choice
¼ cup unsalted butter
2 cloves garlic, finely minced
½ cup chopped Italian parsley
toothpicks (optional)
¼ cup butter and ¼ cup olive oil (or enough to cover the bottom of a large skillet to a ¼ inch depth, equal parts)

Instructions

On one side of each breast or cutlet, place a piece of prosciutto, a piece of mozzarella, and two olive halves. Sprinkle with freshly ground pepper. Fold unfilled side over to cover filling, and press edges firmly together to enclose filling or secure with toothpicks.

Flour each package so it is dusted on all sides. Beat egg slightly, adding milk. Dip chicken packages into mixture on both sides. Then dip into bread crumbs. Chill for at least a ½ hour or longer.

Melt ¼ cup butter in a small saucepan. Add half the chopped garlic and parsley. Keep warm until chicken is cooked.

Heat butter and olive oil in skillet with remaining garlic and parsley until fats are hot but not smoking. Place breaded chicken in skillet and turn heat to medium high. Saute chicken quickly, only until golden. Turn once to cook the other side.

Remove to heated serving dish. Remove toothpicks, if using. Pour warm garlic parsley butter on top.

Serves 8-10.

Adapted from “The Art of Good Cooking,” by Paula Peck.

Tzadziki Stuffed Tomatoes

The original title of this recipe from “The Art of Good Cooking” is Danish Stuffed Tomatoes. However, when I tried to research this recipe, I found little on what makes them “Danish.” I decided to lighten the stuffing by using yogurt, making it more about the cucumbers and less about the overbearing amount of sour cream and mayo originally used. It now maybe considered more Greek than Danish since the stuffing is more of a basic tzadziki. Creamy yogurt, garlic, and dill brighten the cucumbers that then add crunch to the soft juicy ripe tomatoes.
This is a tasty little no bake/cook seasonal appetizer or side dish that presents beautifully.

2 hothouse cucumbers
2 teaspoons salt
1 teaspoon sugar
1 teaspoon cracked pepper
1 small garlic clove, minced
1 ½ tablespoons lemon juice
2 cups lowfat yogurt or greek yogurt
2-3 tablespoons chopped dill
6 vine ripe tomatoes

Peel cucumbers and cut in half lengthwise. With a spoon, scoop out seeds and discard them. Slice cucumbers thin. Place in a bowl, sprinkle with salt and place in refrigeration for at least 2 hours. Pour off water which has accumulated and press out any additional water so that cucumbers are dry. Add sugar and pepper and stir.

Combine garlic, yogurt, and lemon juice. Pour over cucumbers and toss lightly, adding half of the dill. Place in refrigerator until needed.

Remove a circle from the stem ends of the tomatoes. Carefully scoop out all the seeds and pulp. Turn the tomato shells upside down on paper towels so that any juice may drain.

Stuff each tomato with the cucumber mixture. Sprinkle remaining dill on top of each tomato.

Serves 6

Adapted from “The Art of Good Cooking.”