Devils Food Cake with Meringue Frosting

Chocolate Devils Food Cake with Meringue Frosting

There is something magical about meringue. The process of whipping liquid egg whites into a sugary pillow-like mass is not just satisfying, but fun. From cookies and marshmallows to frosting recipes such as this, there are multiple uses for shiny sweet meringue. Despite whatever the intended purpose, I can’t seem to resist dipping my fingers into the bright soft fluff and eating most of it before it makes it out of the mixing bowl.

This meringue frosting recipe, inspired from “The Art of Fine Baking,” is really just a basic Italian Meringue: the egg whites are “cooked” by beating in a water sugar mixture that has been heated to soft ball stage (238 degrees). This process creates an extra shiny thick meringue, which is all the more irresistible. Butter can also be added to create a meringue buttercream. I skipped this step because I personally don’t think the frosting needs butter. The greasy addition also makes it much easier for the meringue to break down and create a soggy mess.

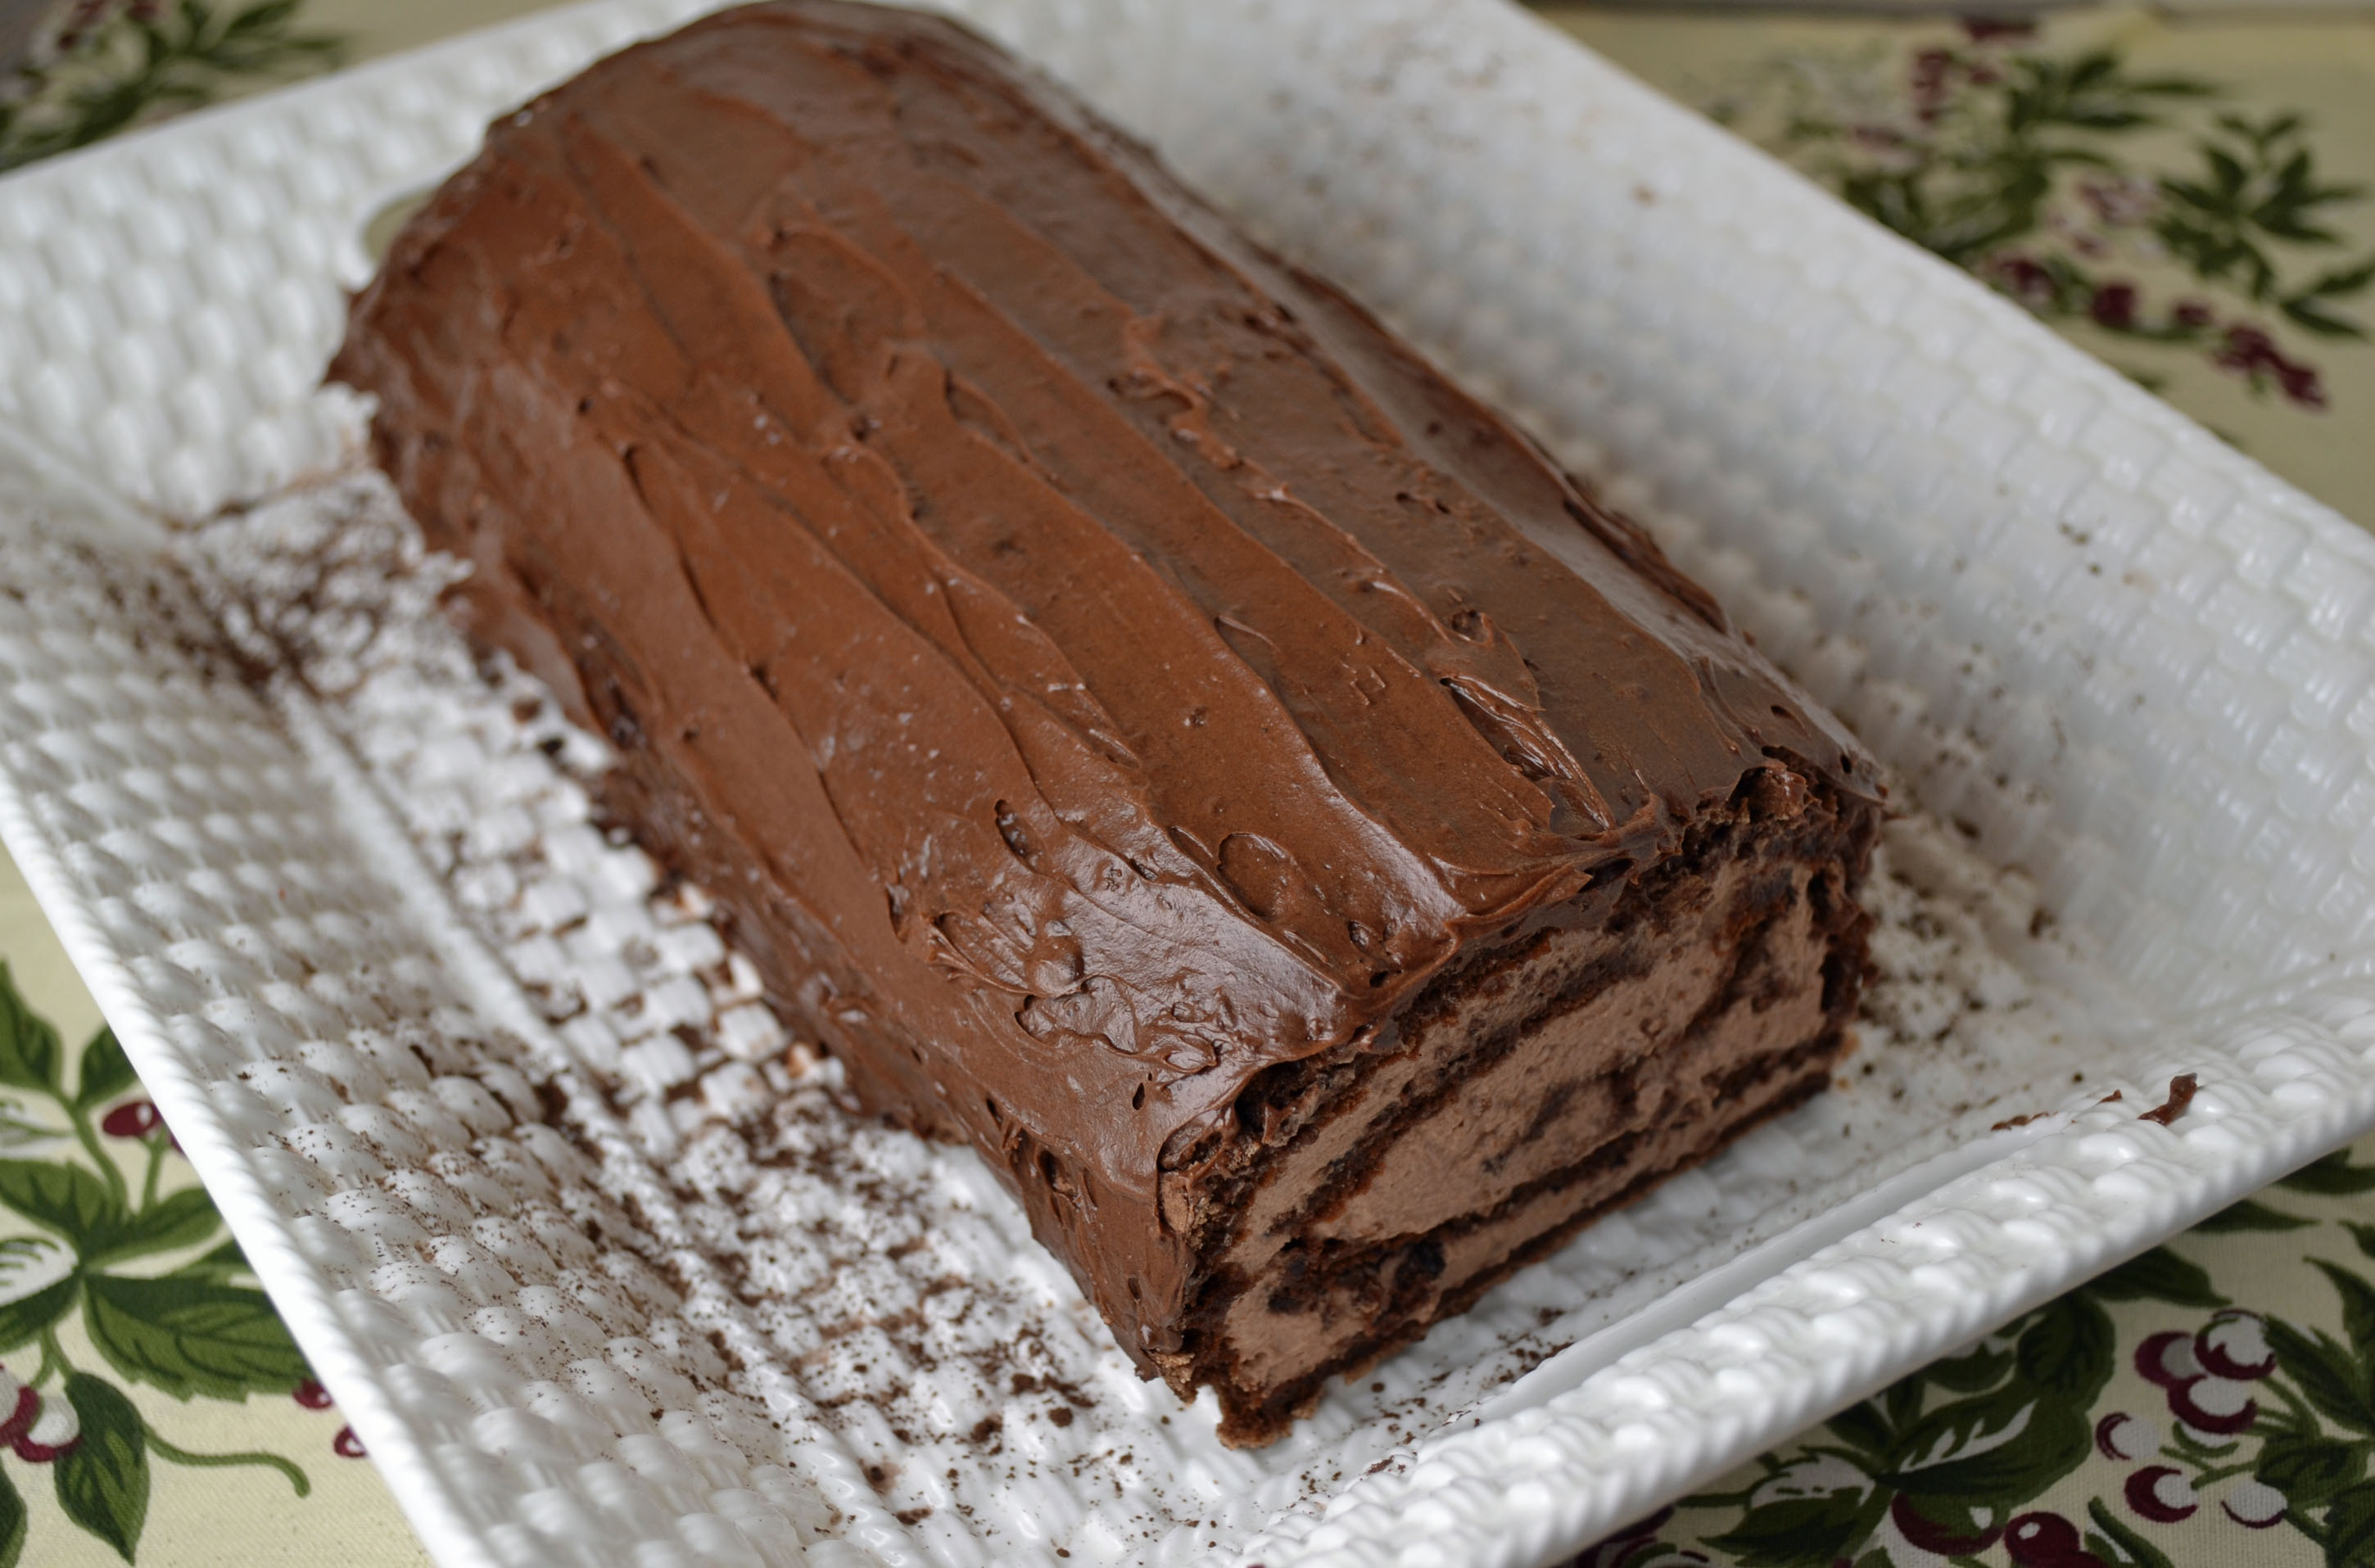
But enough about meringue, let’s talk cake. I know I need to be more open minded but whenever I make a cake, it usually has a chocolate component. In this case, the cake itself is chocolate since the meringue frosting is not. I also took it one step further and added melted chocolate to a small amount of the frosting for a chocolate surprise in the middle layer. This of course is optional. The cake is a Red Devils Food Cake recipe that I adapted from “The New York Times Cookbook“ by Craig Claiborne, a good friend of my grandmother. It’s a basic chocolate cake with just the right amount of moistness. Paired with the meringue frosting, it becomes impressive and indulgent. I dare you to eat just one slice.

Ingredients:

Devils Food Cake
1 3/4 cup sifted cake flour
1 1/2 cups granulated sugar
1/3 cup cocoa powder
1 1/4 teaspoons baking soda
1 teaspoon salt
1/2 cup vegetable oil
1 cup milk
2 eggs
1 teaspoon vanilla extract

Meringue Frosting
1 cup sugar
1/2 cup water
1 tablespoon corn syrup
3 egg whites
pinch salt
1 teaspoon vanilla extract

For the cake:

Preheat oven to 350 degrees. Grease the bottoms of two 9-inch layer cake pans, line with waxed paper or parchment paper and grease the paper.

Sift together flour, sugar, cocoa, soda, and salt. Add the oil and 2/3 cup of the milk and mix. Beat two minutes. Add remaining ingredients and beat two minutes longer.

Turn the batter into the prepared pans and bake on the lower shelf of the oven until the cake springs back when pressed lightly in the center, 30-35 minutes.

Cool the cake in the pan five minutes. Turn out on rack, remove paper, and frost as desired.

For the meringue frosting:

Combine 2/3 cup of sugar with water and corn syrup in a saucepan. Stir over low heat until sugar is completely dissolved. Raise heat and boil syrup without stirring until a candy thermometer reads 238 degrees, or a few drops of syrup form a soft ball in cold water.

While syrup is cooking, beat egg whites with pinch of salt until they form soft peaks. Gradually beat in vanilla extract and remaining sugar, a little at a time, until whites are firm. Pour boiling syrup in a fine stream over whites, beating constantly. Continue beating until completely smooth and stiff. Cool.

Cats Tongue Cookies

Cats Tongue Cookies Langue du Chat

It’s funny how a simple butter cookie can inspire such nostalgic memories. As a child, Cats’ Tongues or Langues du Chat was one of the first recipes I tried from “The Art of Fine Baking.” Although I enjoyed piping the buttery dough onto baking sheets, I didn’t really understand this plain cookie. Perhaps my taste buds were too accustomed to the corn syrup filled treats that were so readily available. Or maybe I just didn’t try these delicious little bites while they were still hot and fresh from the oven (by far the best time to eat them). Whatever the reason, it wasn’t until my father shared his memories of my grandmother making them that I really began to enjoy and appreciate this simple sweet treat. However, the addition of chocolate didn’t hurt either.

Cats’ tongues cookies were the go-to cookie in Paula Peck’s kitchen. She would often make them for my father and uncle, who as children, eagerly watched as she piped the skinny pencil thin drops of dough onto a baking sheet. Fascinated with the pastry bag, my father often begged to try it and on the occasion that my grandmother relented, he promptly made a big mess of cookie dough and whatever baking sheet or other kitchen equipment/utensils it came in contact with. Once the cookies finally made it out of the oven, they were consumed by fist full.

After whipping up a batch of these in under 30 minutes, I now see why they were a popular treat in my grandmother’s kitchen. Not only are they easy to make, it’s hard to stop eating them. This recipe is fairly large and can be easily halved but if you don’t finish them while fresh and hot, dip the cooled cookies in chocolate. The chocolate adds a twist to the original plain cookie, making these buttery delights irresistible to all of us choco-holics.

Ingredients:

1/2 cup sugar
1/2 cup butter
3 egg whites
1 cup sifted flour
pinch salt
1/2 teaspoon vanilla extract
melted chocolate for dipping (optional)

Preheat oven to 400 degrees. Grease and flour baking sheets or line with parchment paper.

Cream butter and sugar. Beat in egg whites, a little at a time, beating well after each addition. Fold in flour, salt, and vanilla. Fit a pastry bag with a large star tube and fill bag with 2/3 of the cookie batter. On prepared baking sheets, pipe pencils of batter about 2 inches long. Leave one inch between cookies for spreading.

Bake about 7 minutes or until edges of cookies are golden brown. Centers should remain light. Remove cookies from baking sheets at once. Once cool, dip in melted chocolate (if using).

Yield approximately 50

Cats Tongues

Streusel Roll

Streusel Roll

As the winter drags on, there’s nothing like warm cinnamon raisin bread with a buttery streusel topping to start the weekend. It’s surprising that I just discovered this recipe in “The Art of Fine Baking.” I usually never miss a good recipe that involves cinnamon and sugar. In this case, the cinnamon and sugar is layered within the bread and the streusel topping becomes arguably the best part. The simple combination of butter, flour, cinnamon sugar, and walnuts create the crumbly topping that I’m now tempted to use on all many other types of baked goods.

There’s something relaxing about making yeast breads from scratch. Kneading the dough to that perfect smooth springy texture is a soothing process. I have used this basic coffee cake dough in other tasty recipes such as Apple Roll, Honey Orange Bread Twist, and even Panettone. It’s a good base recipe but like most yeast breads, it tends to go stale in just a few short days. The best solution for this is to make French toast or bread pudding out of the leftovers. It’s indulgent, I know, but this nutty cinnamon sugar bread with its buttery streusel topping may change how you feel about regular French toast or bread pudding forever.

Ingredients:

1 recipe Basic Coffee Cake Dough
1/3 cup melted butter
2/3 cup cinnamon sugar (see note)
2/3 cup raisins
1 cup finely crushed pecans (walnuts may be substituted)

Streusel Topping
1/3 cup butter
1/2 cup cinnamon sugar
1 teaspoon vanilla extract
1 cup coarsely chopped walnuts
1-1 1/2 cups flour

To make streusel topping: Cream butter and cinnamon sugar. Add vanilla and nuts. Add flour, gradually stirring constantly. Use enough flour to make a crumbly mixture. The more flour added, the smaller the crumbs. Set aside.

Preheat oven to 350 degrees. Grease to 9x5x3 loaf pans. Roll dough in large square, 1/4 inch thick. Brush with most of the melted butter, and sprinkle with cinnamon sugar, raisins,  and crushed pecans. Roll up jelly roll style.

Cut roll evenly into six slices. Fit three slices cut side flat into each pan, squeezing them if necessary. Press slices down in pan so that in rising, they will grow together. Let rise until almost doubled in bulk. Scatter streusel topping generously over each cake. Bake in a preheated oven for 45 minutes or until streusel tops are lightly browned.

Makes two loaves.

Note: Cinnamon Sugar can be made by simply combining 1 cup granulated sugar with 1 tablespoon cinnamon.

Adapted from “The Art of Find Baking,” by Paula Peck.

Black Beans in Garlic Sauce

Black Beans in Garlic Sauce

Attention all garlic lovers: this dish is for you. These black beans are more about the garlic than they are about the beans. With a whole head of garlic minced, sautéed, and mixed into cooked black beans – this hearty garlicky dish is perfect for the never-ending cold winter nights. A little cumin adds an ethnic flare and when eaten with white rice, these beans become a fulfilling meal. And then there’s the bacon. As if the garlic black bean combination wasn’t tasty enough, crispy bacon adds a level of smoky flavor.

“The Art of Good Cooking” has a fair number of bean recipes. There are some with black beans, chick peas, white beans, kidney beans, etc. and almost all of them provide instructions for cooking the raw bean instead of canned. I’m not sure if raw beans were just my grandmother’s preference (and less expensive) or if canned beans weren’t as readily available as they are today – maybe a combination of both. I often find that unless you are infusing flavor into the raw beans while cooking them, canned beans are a fast and easy replacement. This recipe is no different. Canned beans can be simply heated in a little broth or water and then added to the garlic sauce as instructed. This side dish or meal then becomes even easier to make on a weeknight when your craving something warm and comforting.

Ingredients:

2 cups black beans
1 head of garlic, separated into cloves, peeled and minced
1/3 lb of bacon, diced
1 teaspoon cumin
1 tablespoon salt
coarsely ground black pepper

If using dry black beans, wash and soak overnight in water. In the morning, place in a deep pot with enough additional water to cover beans. Add a little of the garlic. Bring to a boil, lower heat and simmer until beans are completely tender. Drain beans, reserving some of the liquid for later use. Keep beans warm.

Preheat oven to 325 degrees. Cook bacon in a skillet over low heat until crisp. Remove and reserve. Add remaining garlic to bacon fat and saute over low heat until soft.

Place beans in a casserole. Stir in crisp bacon, sauteed garlic, cumin, salt, and pepper. Add about 3/4 cup of reserved liquid from the beans. Place in oven and bake, covered, for about 30-45 minutes. Serve hot.

Serves 6.

Adapted from “The Art of Good Cooking,” by Paula Peck.

Black Beans with Garlic Sauce

Chinese Spare Ribs

Chinese Spare Ribs

We often think of spare ribs in the summer, thrown on the grill and eaten with corn on the cob or cole slaw. However, Chinese spare ribs have a sweet and salty warmth that make them perfect for the winter. Marinated in a mixture of soy sauce, garlic, rice wine vinegar, and Chinese five spice powder, these ribs are baked in the oven and basted until almost charred but still gooey and tender.

There are many different methods for baking ribs. Some recommend boiling the ribs prior to baking to extract some of the fat.  In “The Art of Good Cooking,” my grandmother recommends steaming the ribs in tin foil in the oven before baking and basting the ribs. Other methods indicate marinating the ribs and putting them directly in the oven, similar to what I’ve done here. The cut of meat may help determine what method to use. If the ribs are particularly fatty, they will be greasy so either boiling or steaming them will help produce a leaner tasting rib without a fatty residue.

Although my grandmother didn’t specialize in Asian food, there are a few recipes hidden throughout her book. Her original Chinese BBQ sauce recipe can be found in the spare ribs section along with Hawaii BBQ sauce and Mexican BBQ sauce. I decided that the Chinese sauce needed a bit more attention so I made a few modifications. To get the full texture and flavor that Chinese spare ribs deserve, I added the Chinese five spice powder and rice wine vinegar to the sauce as well as a step to marinate the ribs. On these crazy winter days, juicy flavorful ribs are worth the extra effort.

Ingredients:

1/2 cup soy sauce
1 tablespoon rice wine vinegar
2 teaspoons minced fresh ginger
2 cloves of garlic, minced
2 tablespoons sugar
1/4 teaspoon Chinese five spice powder
1/2 teaspoon ground black pepper
2 lbs beef or pork spare ribs

Mix together all ingredients in a shallow dish and add ribs. Turn to coat. Cover and marinate in the refrigerator for 1 hour.

Heat oven to 350 degrees. Place a baking rack on a rimmed baking sheet or roasting pan lined with foil. Remove ribs from marinade and place on rack, meat side up. Reserve marinade. If space permits, pour water half-way up the sides of the pan (make sure the water does not touch the ribs). Bake 30 minutes and baste with reserved marinade. Bake another 30 minutes and raise heat to 450 degrees. Baste the ribs then bake another 20-25 minutes until glazed and tender, basting once after 10 minutes.

Adapted from “The Art of Good Cooking,” by Paula Peck

Rice Pudding

Rice Pudding

Comforting and easy, rice pudding is a classic winter treat. It’s often considered a dessert but I usually find myself making a big a batch and eating it for breakfast throughout the week. Maybe not the healthiest breakfast option, but it somehow makes more sense than eating it after dinner. This creamy pudding is not only simple but also budget friendly. You probably already have most of the ingredients. With just basics like rice, milk, eggs, and sugar – you can make a delightful rice pudding in under 30 minutes. There are, of course, variations that have slightly fancier additions. This version from “The Art of Good Cooking” dessert section includes vanilla extract, cinnamon, nutmeg, orange zest, and raisins. These ingredients add tasty layers of flavor but can be considered optional.

I had to make a few more revisions to this recipe than normal. I don’t think it was tested as much as some of the other recipes in my grandmother’s cookbook. It may have been added last minute to fill space among the other somewhat random selection of recipes that make up the dessert section. Most of my revisions are in the measurements. Like most Paula Peck recipes, the ingredients themselves are a delicious combo.

Ingredients:

2 1/2 – 3 cups whole milk
1/2 cup long grain rice
1/4 cup granulated sugar
1/4 teaspoon orange zest
1 teaspoon vanilla extract
2 egg yolks
1/4 cup raisins
1/4 teaspoon each: cinnamon and nutmeg
1/4 teaspoon orange zest for sprinkling (optional)

Heat milk and keep it warm. Add about 2 1/4 cups of the warm milk to rice in a deep pot. Cook over low heat, stirring frequently. From time to time, add more milk, as rice absorbs it. When the rice is entirely cooked, it should be in a very light creamy sauce.

Stir in sugar, orange zest, and vanilla. In a small bowl, break up yolks with a fork. Whisk in about a 1/4 cup of liquid from the rice to temper the egg yolks. Add egg yolk mixture to pudding. Replace over low heat, stirring constantly until slightly thickened ( it will thicken more when it cools).

Remove from heat and stir in raisins. Sprinkle with cinnamon, nutmeg, and orange zest (optional).

Serves 4-6.

Adapted from “The Art of Good Cooking,” by Paula Peck.

Palmiers

Palmiers by Paula Peck

Sometimes I think my grandmother should have written a book called “101 things to do with puff pastry.” There are at least 20 recipes in “The Art of Find Baking” alone that use this buttery flaky dough. Also known as the elephant ear or palm tree, the classic French Palmier is more versatile than you may think. Instead of rolling the dough in just plain sugar, cinnamon sugar can be used for extra spice.  Also, by folding the dough into the more traditional palmier shape (versus the four-finger), these pastries look similar to a heart and are the perfect accompaniment for that morning cup of coffee on Valentines day.  It may be a bit of a stretch but if Parmesan cheese is used instead of sugar (a far less traditional ingredient), these turn into a delicious game day appetizer for the super bowl. Who knew these simple pastries had so many uses?

The key to a delicious palmier is to make them yourself and eat them fresh. Those sad boxed palmiers you see at the grocery store do not do them justice. Most of us don’t have time for the lengthy process of making puff pastry so store bought puff pastry may be used. As long as you bake them yourself, these snack-worthy pastries will be much better than the often stale, pre-made ones. Since rolling and folding the dough into the palmiers shape may seem daunting or even confusing, I have included the below illustration from “The Art of Fine Baking.” For those of you who are not familiar with this baking book, it’s full of these charming old fashioned illustrations and this one in particular is actually quite helpful. So the next time you have extra puff pastry or are looking for a fun, easy snack – give palmiers a chance. You may be surprised how much you like them.

Ingredients:

Puff Pastry recipe
granulated sugar, cinnamon sugar, or grated Parmesan cheese

Roll out puff pastry in sugar to make a long strip ten inches wide and 1/8 inch thick (if using cheese instead of sugar, roll out pastry in flour). Sprinkle with sugar (or cheese). Determine the center of the strip. Fold each long side inward into thirds, so that two folded halves meet exactly in the center. Then fold halves together to make a compact 6-layer roll. Coat with additional sugar or cheese. Wrap in wax paper and chill for 1 hour.

Palmiers Folding Instructions

Preheat oven to 350 degrees. Cut roll into 1/4 inch slices. Place well apart on ungreased baking sheet. Spread the two halves of each slice slightly so they can expand while baking. Bake about 30 minutes, turning slices over once with a spatula after 25 minutes. Bake until golden brown.

New England Clam Chowder

Clam Chowder

The weather in the Northeast has been quite a roller coaster lately. When it’s cold, it’s really cold. And when it’s warmer, it’s usually raining. New England Clam Chowder is the perfect lunch for either side of the crazy weather spectrum and anything in between. Warm and comforting, a steaming bowl fills you up while giving you a taste of the sea you might be missing.

I found this recipe in buried my grandmother’s stack of unpublished soup recipes. John Clancy’s name was typed neatly in the top corner of the page so I’m assuming this is his recipe or a collaboration of some kind. This chowder is not as thick as what you would expect from a traditional New England Clam Chowder (and definitely not as thick as the nasty stuff in the can). That may be good or bad, depending on your preference. If you prefer a thicker chowder, you can simply start with a roux – add roughly 2 tablespoons butter and 2 tablespoons flour to the pan before cooking the bacon and onion. However, I believe that if you use really fresh clams (right from the shell), you won’t care about the thickness of the soup. The taste of fresh meaty clams with the smoky bacon is enough to keep you going back for more.

Ingredients:

2 dozen chowder clams, shucked and chopped, and their juice
1 8oz bottle of clam juice
1/4 cup bacon, diced
4 cups potatoes, cut in 1/2 inch cubes
1 1/2 cups onion, coarsely chopped
2 cups heavy cream or half and half
3 sprigs thyme
1/2 teaspoon ground black pepper

In a large 3-4 quart saucepan, brown bacon and saute onion until golden. Add all clam juice and bring to a boil. Cook potatoes in mixture for 10 minutes or until they are tender. Add thyme, clams, and cream and simmer for 5-6 minutes (careful not let the soup boil or it may curdle). Season with ground pepper and remove sprigs (once thyme leaves have fallen off).

Serves 6.

Chocolate Roll

Chocolate Roll

This is basically a Bûche de Noël. I refrained from calling it that for two reasons. The first is that my grandmother never referred to it as such. Probably because she was technically Jewish but also because my grandfather was somewhat anti-holiday. The second reason is that most Buche de Noel has meringue mushrooms and/or other decorations that make it look like a log – all tasty but a fair amount of extra work when we all know the cake is the real star of the show.

Although three separate components make up this cake, each is fairly quick and the assembly is simple. My grandmother’s multi-purpose Chocolate Pastry (sponge cake) is the base of the cake. Made with melted semi-sweet chocolate and meringue, it melts in your mouth even before the filling and frosting are added. Basic whipped cream flavored with cocoa powder makes up the filling. The roll is perfectly delicious with just the cake and filling but to take it up a notch, I frosted it with another versatile Paula Peck recipe: Mocha Buttercream. I might be addicted to this stuff. It’s so easy to make and the coffee deepens the chocolate flavor, making it bold and rich. The final chocolate roll is moist and chocolaty, the perfect dessert to end Christmas dinner or even just to satisfy a serious chocolate cake craving.

Ingredients:

Cake
1 recipe Chocolate Pastry

Filling
1 cup heavy cream
2 tablespoons granulated sugar
1 teaspoon vanilla extract
2 tablespoons cocoa powder, sifted

Frosting
1/2 recipe Speedy Mocha Buttercream

For the filling:

Whip heavy cream in an electric mixer. When cream begins to thicken, gradually add sugar, vanilla, and cocoa powder.

To assemble the chocolate roll:

Place chocolate pastry on a sheet of wax paper large enough to extend at least 1 inch on all sides and dusted with cocoa powder. Spread pastry with filling. Lifting one long side of the wax paper, roll pastry inward. Continue to lift wax paper while pastry rolls up, jelly-roll style. Roll will crack, but cracks will be covered with frosting. Twist wax paper firmly around chocolate roll to help give it shape. Frost cake with mocha buttercream.

Adapted from “The Art of Fine Baking,” by Paula Peck.

Oysters in White Wine Sauce

Oysters in White Wine Sauce close

Most of us don’t think about eating oysters during the holidays, or for that matter in winter at all. But here in the Northeast, specifically on the East End of Long Island, oysters are currently at their tastiest. From late November to mid-January, these delicacies are both large and plump – allowing for additional preparation methods.  It’s hard to compete with the fresh sea taste of a raw oyster, but the cold winter weather often demands hot food this time of year. This unpublished recipe for Oysters in White Wine sauce by my grandmother, Paula Peck, is the perfect compromise of a warm comforting dish that still has the fresh flavor of oysters pulled from the water that same day.

Fresh Peconic Bay Oysters in a Lantern Net

Fresh Peconic Bay Oysters in a Lantern Net

My grandmother and her close friend, James Beard, shared similar views regarding fish and seafood. She insisted that fish and seafood must always be fresh and never overcooked – now standard culinary rules that weren’t as common back in the 1960’s. Although she demanded high quality seafood (usually from Citerella in those days), it’s unlikely she ever got to enjoy the level of freshness that the bays of Eastern Long Island can provide.

With my father working with the Southold Project in Aquaculture Training (SPAT)  – a Cornell Cooperative Extension Program in Southold to revitalize the shellfish of Long Island, I’m often spoiled by the superior quality of the oysters I eat when visiting. These amazing mollusks bulk up over the summer in preparation for winter hibernation (and for us to eat them!), making them an excellent candidate for this soup-like dish. Vegetables and herbs are combined with white wine, lemon juice, and olive oil then simmered for an hour until slightly thickened and fragrant. The shelled (fat) oysters are then simply added with all of their juices and quickly poached until just barely tender. The cooked oysters can then be served back in their shells, making them perfect appetizer fit for one of my grandmother’s famous dinner parties for James Beard and Craig Claiborne, as well as your next holiday party.

Ingredients:

1 cup white wine
2 tablespoons lemon juice
3 tablespoons olive oil
1 onion, sliced
1 stalk of celery, chopped
1 clove garlic, minced
8 peppercorns
3 springs fresh thyme
3-4 sprigs parsley
2 dozen oysters, shucked (with juice) – bottom shells reserved
salt
1/4 cup chopped parsley
1 small tomato, finely diced

Combine all ingredients except oysters, salt, chopped parsley, and tomato in a deep heavy saucepan. Bring to a boil. Lower heat, cover, and simmer for one hour.

Add oysters and their juice. When liquid begins to simmer around edges of pot, turn off heat (no more than 4-5 minutes). Season with salt to taste.

To serve, remove each oyster with slotted spoon into reserved shells (or small bowls). Spoon some of the sauce and vegetables into shells. Sprinkle with diced tomato and chopped parley. Garnish with slices of lemon.

Oysters in White Wine Sauce