Viennese Cookie Pockets

Viennese Pockets


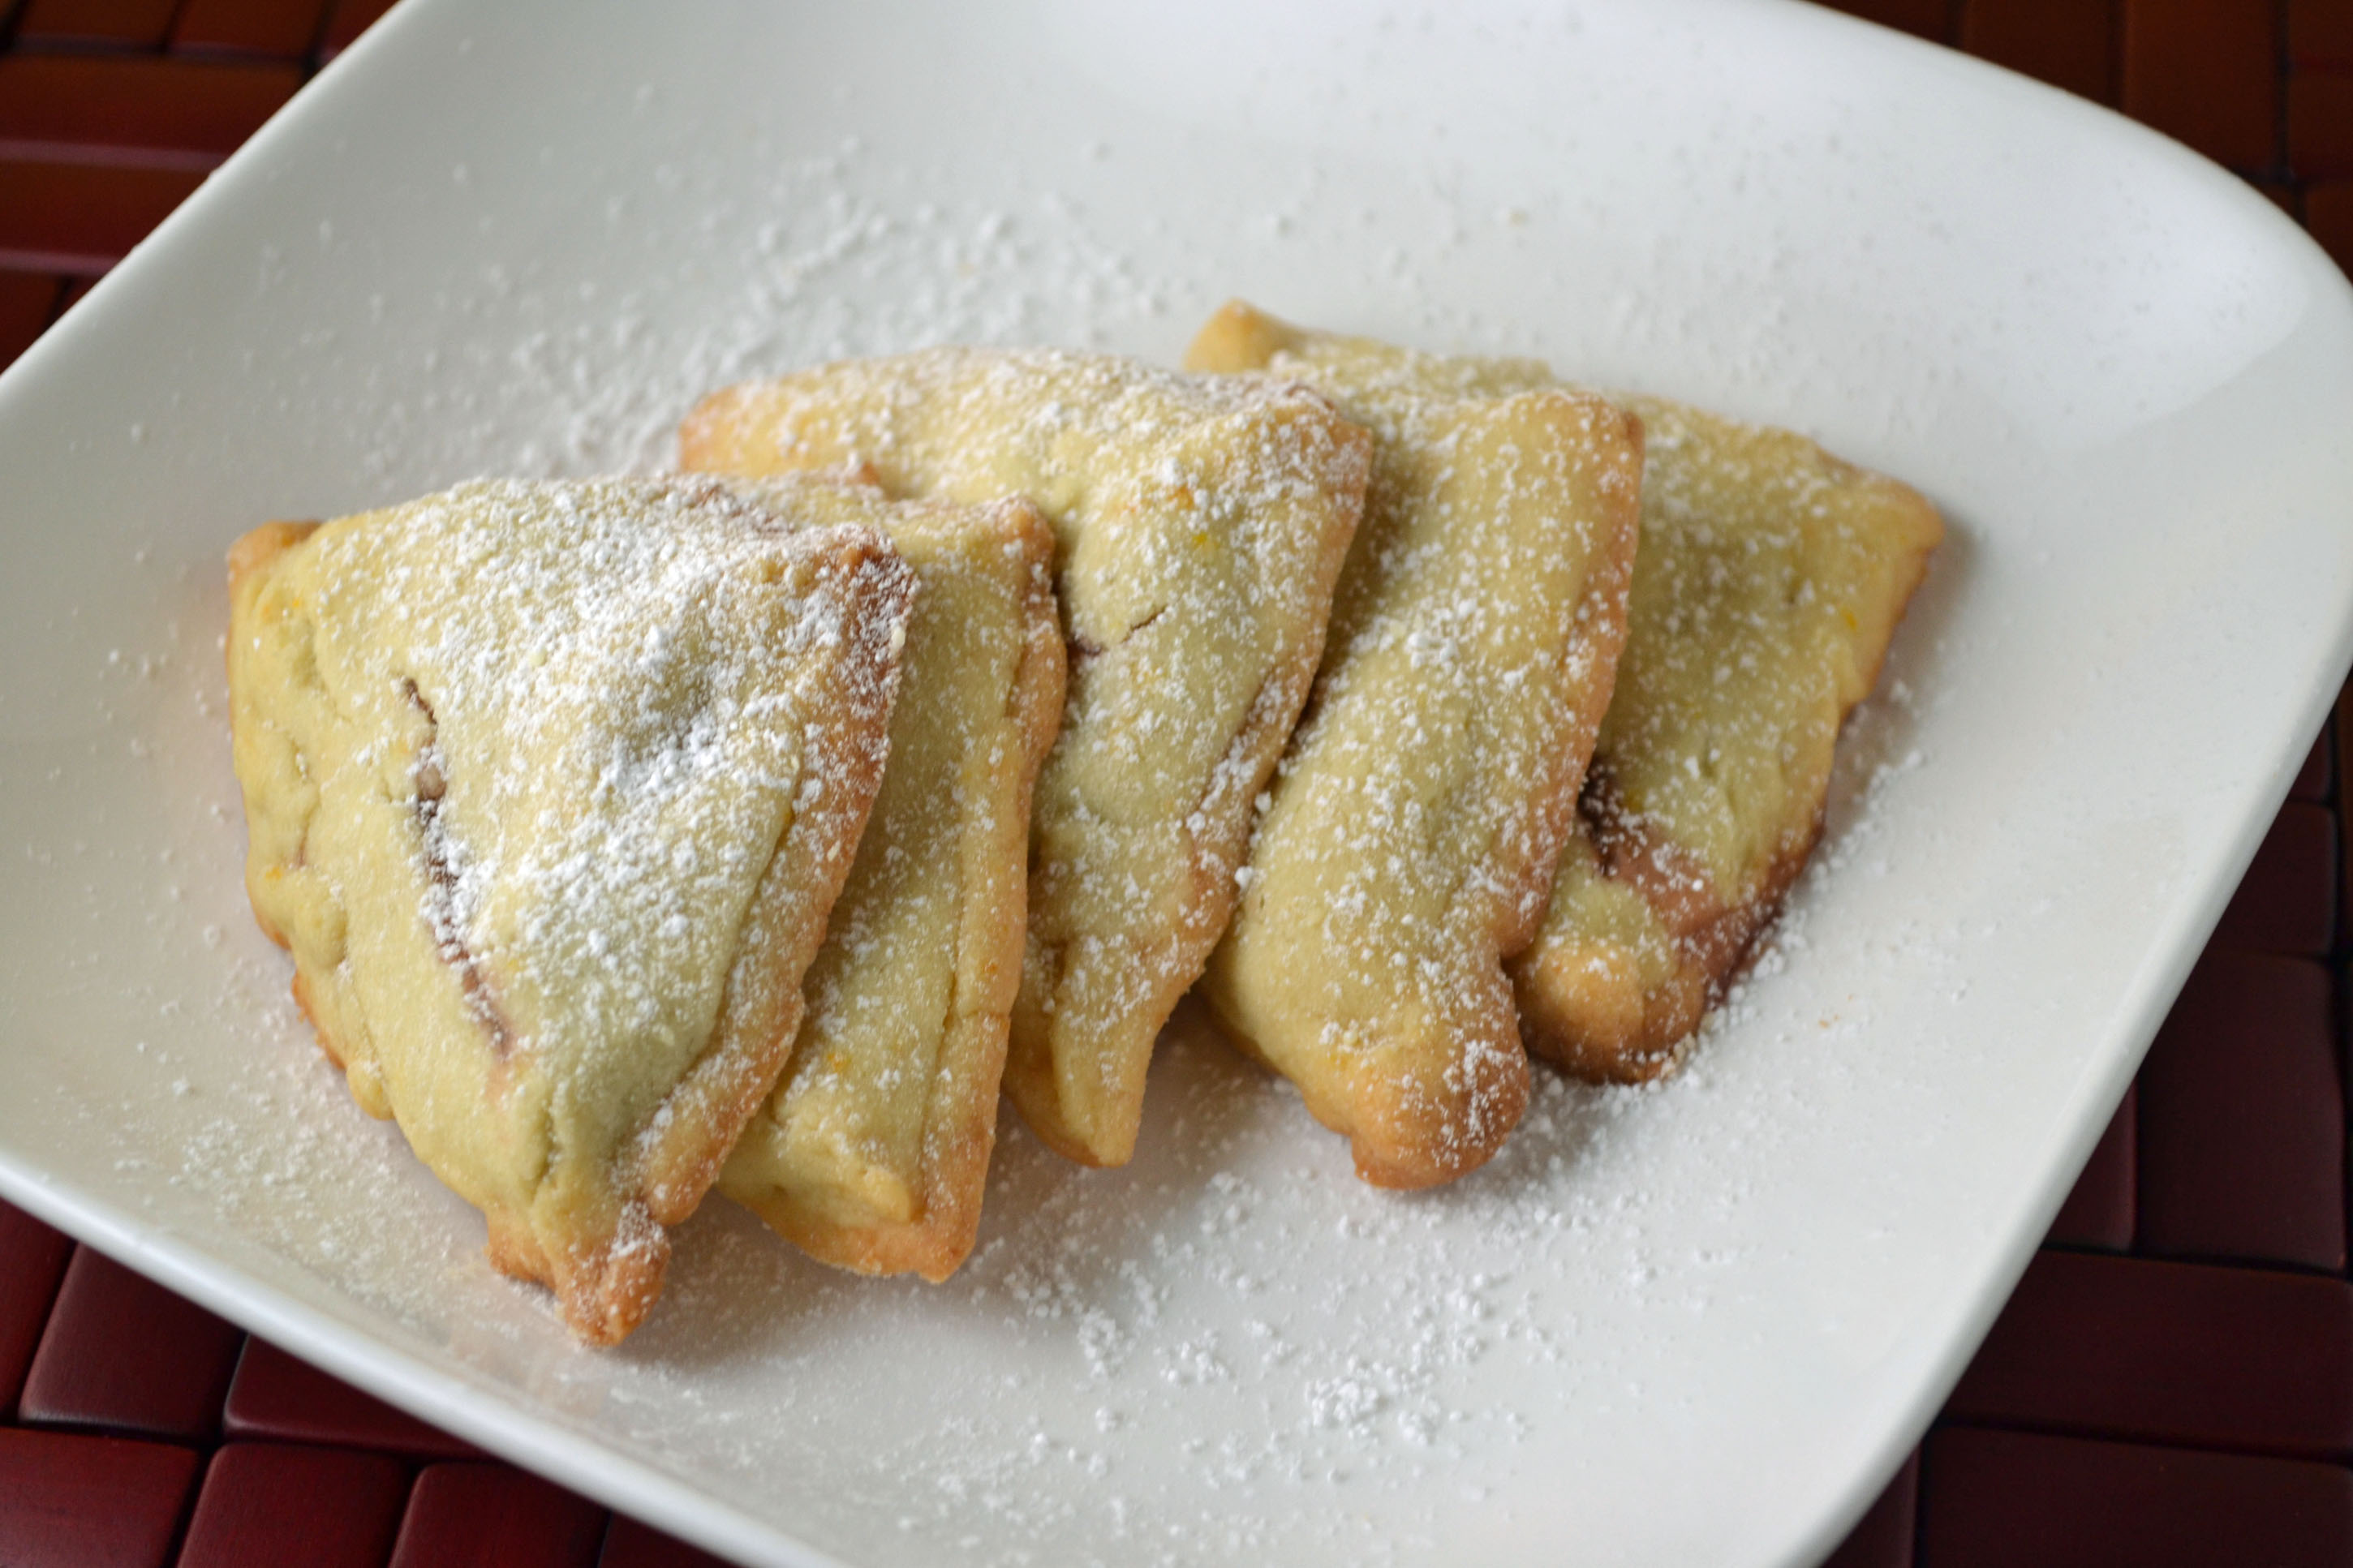
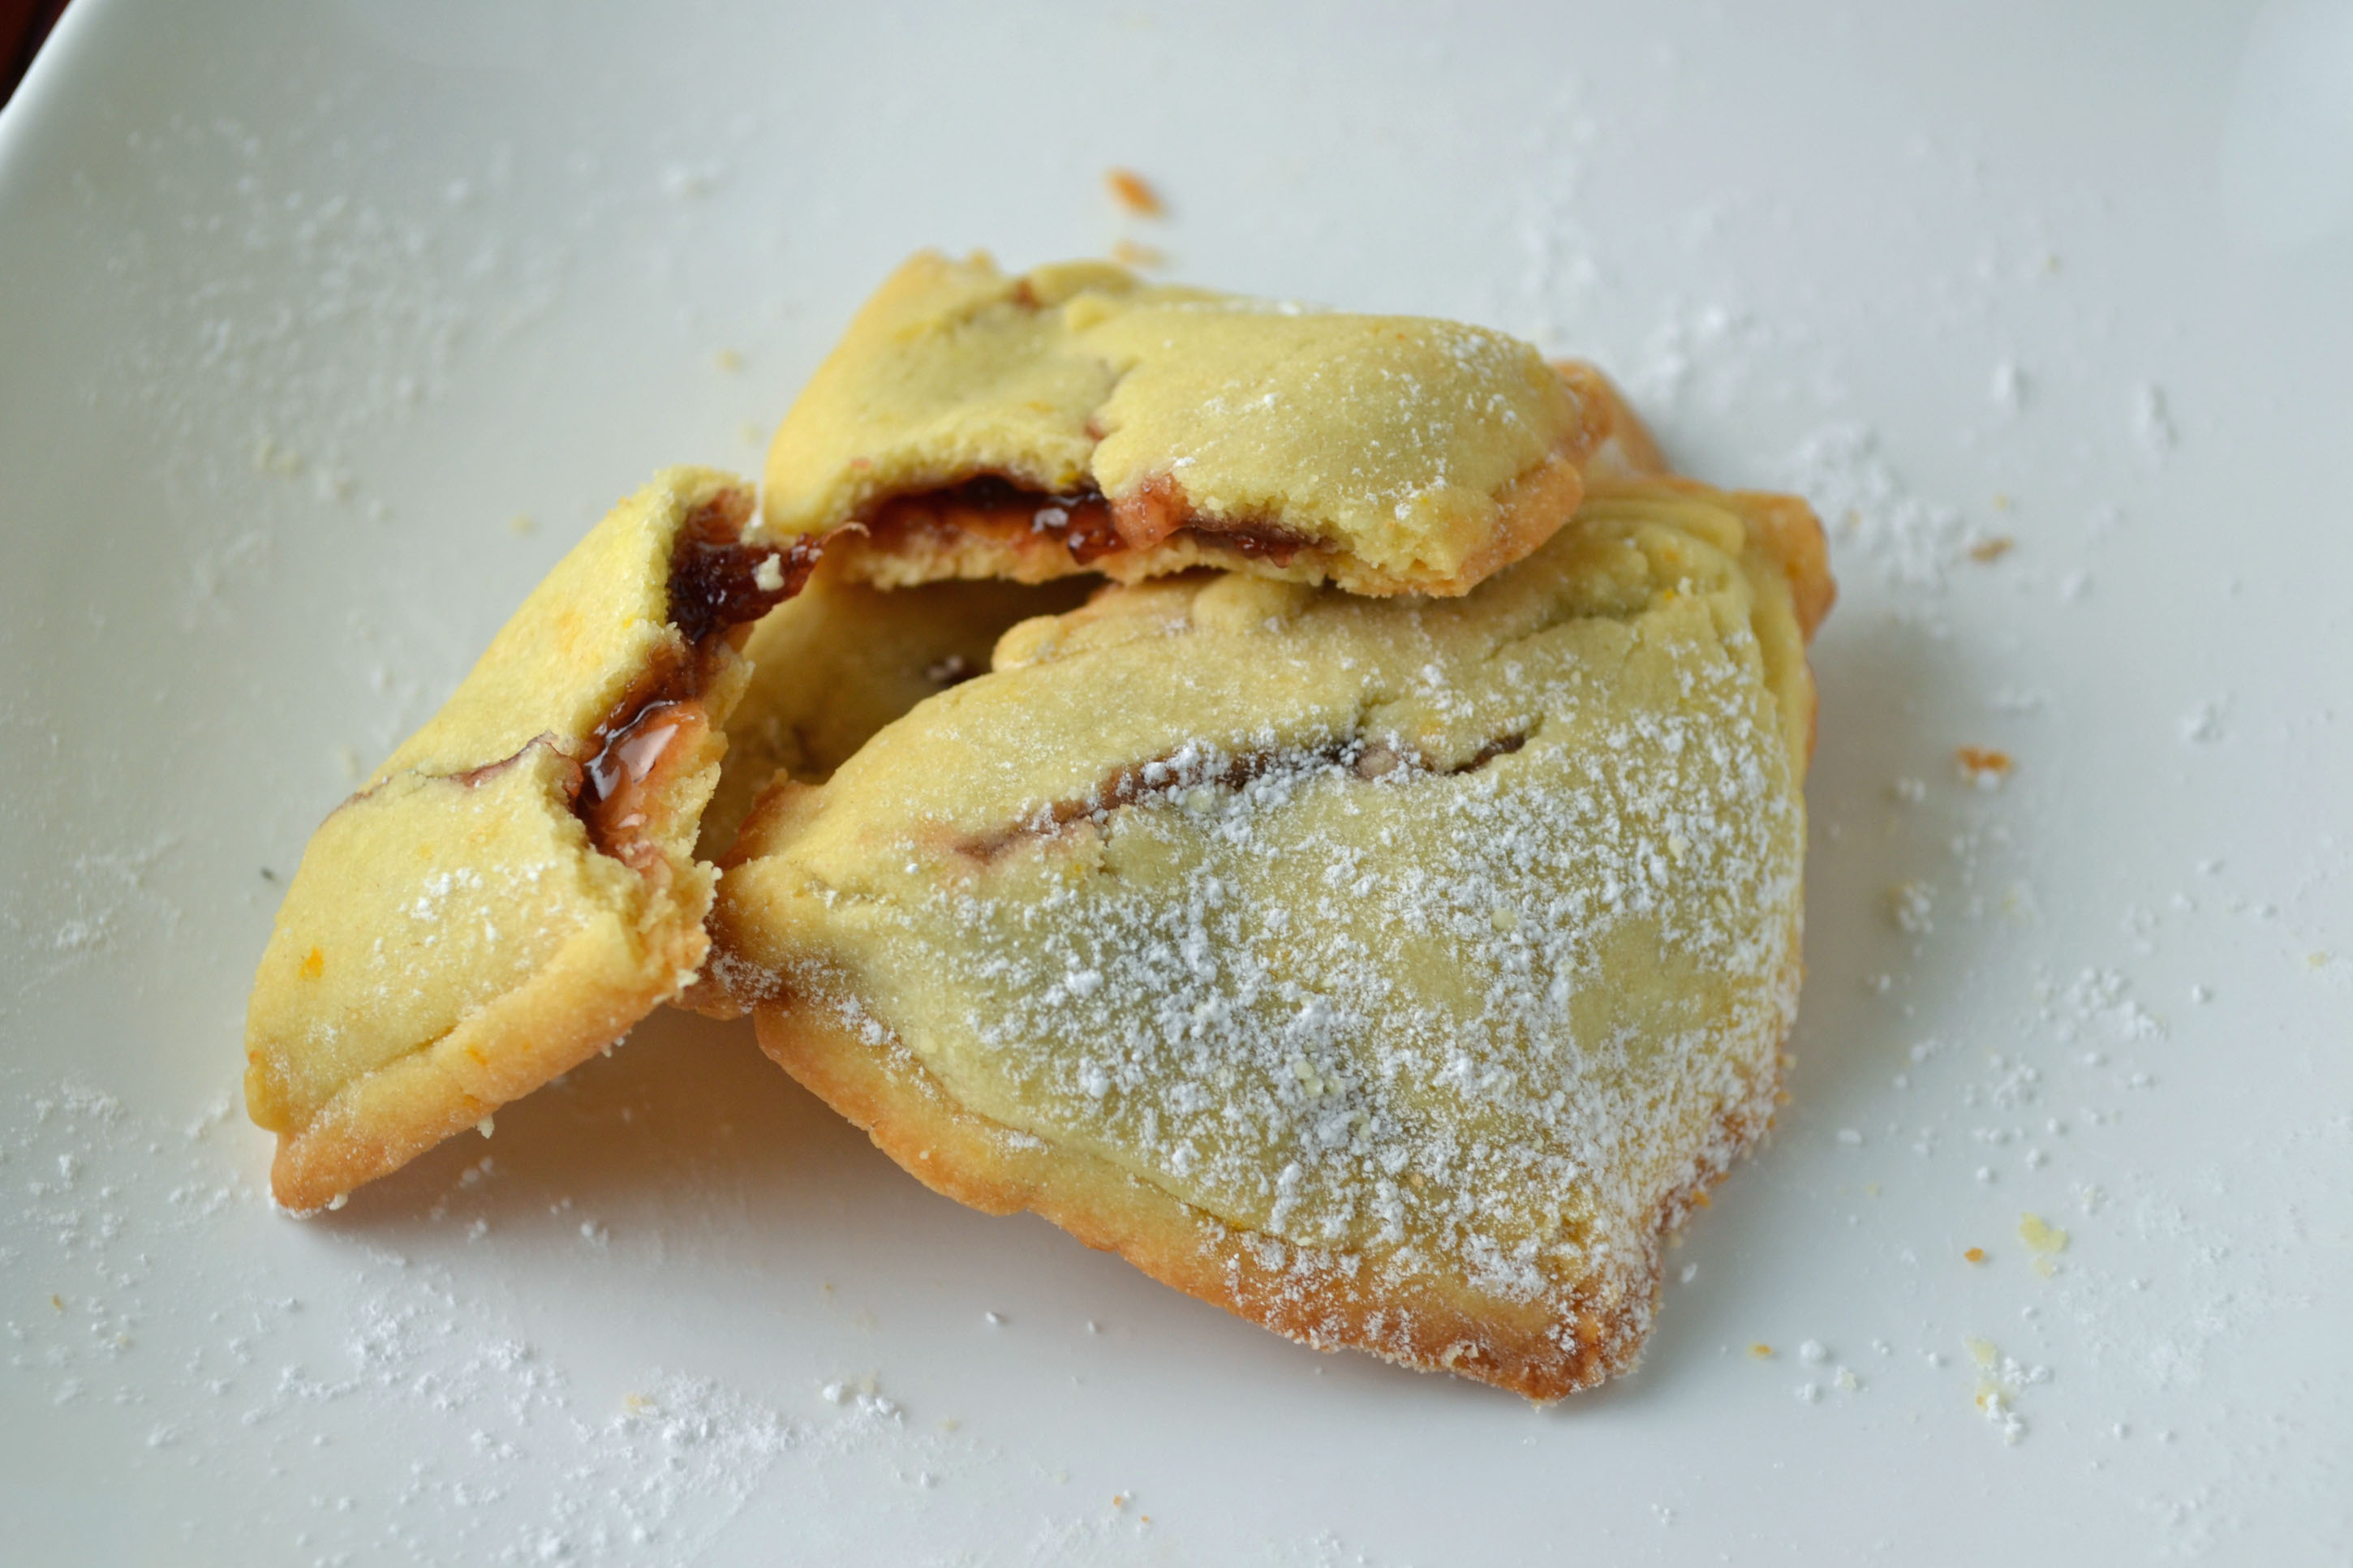
It appears my grandmother went through a serious Austrian Dessert phase at one point. Her book,“The Art of Fine Baking,” includes recipes for Strudel, Mocha Torte (similar to the famous Sacher Torte), Linzer Slices, and these cute little pocket cookies. I find that Austrian Desserts have two major commonalities: fruit and lots of butter. Strudel for example, is basically sheets of thin butter rolled with the filling, usually fruit such as apples or cherries. Strudel is one of the few desserts that doesn’t use jam or preserves. These cute little pockets are similar to many other popular Viennese desserts where the fruit jam is the star – or so it seems. As a chocolate lover, I actually tried filling these with Nutella to add some excitement. In the end, I preferred the strawberry jam version because it pairs so well with the buttery lemon scented dough.

I like to think of these cookie pockets as turnovers with less commitment. They’re smaller than turnovers and the soft crumbly exterior is much more of a cookie than a pastry. Just eating one won’t commit you to finishing a large pastry (like a turnover), but I can’t promise you won’t eat three or four of them anyway.

Ingredients:

1 1/4 cups butter
2/3 cup sugar
2 hard-cooked egg yolks mashed or pressed through a sieve
1 raw egg yolk
1 teaspoon grated orange zest
2 teaspoons vanilla extract
2 1/2 cups sifted all-purpose flour
1/2 teaspoon salt
thick jam or preserves
2 egg whites
2 teaspoons water

Lightly grease and flour 2 baking sheets or line with parchment paper.

Cream butter with sugar. Stir in hard-cooked egg yolks, raw egg yolk, orange zest, and vanilla. Gently add flour and salt. Mix just to combine. Chill dough.

Roll out dough 1/8 inch thick. Cut into 2-inch squares. Place a small dab of thick jam on each square. Fold in half to make triangles. Pinch edges together and place on baking sheets. Chill again.

Preheat oven to 350 degrees. Prick top of each cookie with a fork. Beat egg whites with water and brush each cookie. Bake 10-15 minutes until lightly browned.

Yield about 20-25 cookies

Viennese Pockets

Peach Melba

Peach Melba

This summery ice cream based dessert may seem more appropriate for August than September. Classic Peach Melba uses summery peaches and raspberries, normally in season in late July and early August. However, most produce has been late this year and surprisingly so has the weather. So far, September in NYC has been hotter than August. It may change soon but in the meantime, sweet juicy peaches from the farmers market are perfect for this cool timeless dessert.

Some of you may not be familiar with Peach Melba. Besides the name, there is nothing particularly unique about this old fashioned dessert. In its most basic form, it simply consists of vanilla ice cream with peaches and raspberry sauce. It is somewhat historic though – legend says it was developed by the French chef Escoffier in the late 1800’s and named after Opera singer, Nellie Melba.  This recipe is adapted from the James Beard version in “The James Beard Cookbook.” It continues to surprise me how this one time dear friend and mentor of my grandmother, is becoming more and more of a famous culinary figure. There is currently a movie in the works about him (“America’s First Foodie”) as well as postage stamps (yes, James Beard Postage Stamps).

The main difference in this recipe from the James Beard one is the use of fresh raspberries for the raspberry sauce. I would imagine this is somewhat closer to the original that Escoffier made (I doubt frozen raspberries were common then but who knows). I also used homemade vanilla ice cream instead of store bought – a rich recipe based on classic crème anglaise. The sweet fresh fruit and rich eggy homemade ice cream makes the flavor of each element stand out on its own. Enjoy this summery dessert while the warm weather lasts.

Ingredients:

4 peaches
1 cup sugar
1 cup water
1 teaspoon vanilla extract
1 cup raspberries
1 teaspoon lemon juice
4 teaspoons powdered sugar (depending on sweetness of raspberries)
Vanilla Ice Cream (recipe follows)

Blanch peaches to peel by slicing an X in the skin at the bottom of peaches. Boil 2-3 minutes until skin starts to peel back slightly on peaches. Remove and place immediately in ice water. Once chilled, peel and slice peaches.

Combine the sugar, water, and vanilla in a small saucepan. Bring to a boil and cook 5 minutes. Add peaches and poach gently, spooning hot liquid over them. When tender but not mushy, remove from heat and allow to cool in syrup.

While peaches cool, make raspberry sauce. Puree raspberries with a little water. Push through sieve to remove seeds. Whisk in lemon juice and powdered sugar. Chill.

Scoop vanilla ice cream into cold dishes. Spoon poached peaches and raspberry sauce over ice cream. Serve immediately.

Homemade Vanilla Ice Cream
2 cups heavy cream
2 cups 1 or 2% milk
3/4 cup plus 2 tablespoons sugar
6 large egg yolks
1 vanilla bean or 1 tablespoon vanilla extract

In a medium saucepan, bring heavy cream, milk, and vanilla to a boil over medium low heat – be careful not to let it boil over. Meanwhile beat egg yolks with sugar until pale.

Slowly whisk hot milk cream mixture into egg yolks. Pour back into saucepan. Place over low heat. Stir constantly until mixture thickens and coats the back of a spoon. Be careful not to overheat – eggs will curdle. Strain mixture and chill. Churn in ice cream maker according to manufacturer instructions.


Salad Nicoise with a Twist

Salad Nicoise with a Twist

With so many variations of salad nicoise these days, it’s difficult to decipher which are authentic and which are simply tasty tuna vegetable salads. This summery French dish is said to have originated in Provence, a region along the Mediterranean Sea often known for its Italian Greek-like Mediterranean style cuisine, which includes more of an emphasis on vegetables and fruits. The contents of an authentic Salad Nicoise are debated. Should it include boiled potatoes? Cucumbers? Capers? Green Bell Pepper? Should it have canned tuna or fresh tuna? Anchovies? Then it must be decided if it should be served as a composed salad (aesthetically arranged on the plate) or mixed all together. Maybe this salad has evolved so much that there are no longer any rules. Perhaps the only thing that matters (besides a delicious final salad), is that it includes Nicoise olives – after all, that is what the salad is named after. But even that can be disputed due to availability nicoise olives in the US (black olives are often substituted).

My version of Salad Nicoise doesn’t follow any of the rules. I wanted a really good salad and simply used the French version as an idea or base. This salad is a combination of my grandmother’s recipe from “The Art of Good Cooking,” my mother’s version which was really my first introduction to Salad Nicoise, and the more by-the-book version I was taught in French Culinary School. I also used earthy purple Peruvian potatoes, cherry tomatoes instead of sliced, and added garlic scapes. If you haven’t experienced garlic scapes, I encourage you to hunt them down at your local farmers market asap. These spicy curly stems can be cut in 1-inch pieces and boiled or steamed. After they are cooked, they look similar to the green beans (unless you are using the traditional haricot vert) but they add a mild garlic surprise to this easy salad exploding with different flavors and textures. This is one of the best ways to take advantage of prime produce season and enjoy the last of those hot summer days.

Ingredients:

2 lbs small potatoes (purple, red, fingerling, and/or baby dutch)
1/3 cup red wine vinegar
2/3 cup olive oil
2 tablespoons dijon mustard
1 1/2 teaspoons kosher salt
freshly ground pepper
1/2 lb green beans, stems removed and cut in 1 inch pieces
1 bunch garlic scapes (about 8-10 scapes), stems removed and cut in 1 inch pieces
7 ounces of tuna in oil (or two 4 oz cans)
1 cup cherry tomatoes, halved
1/2 cup scallions, chopped
2 tablespoons parsley, chopped
1/4 cup pitted or unpitted nicoise olives
5 hard boiled eggs, peeled and quartered

Bring a large pot of water to a boil. Meanwhile halve or quarter potatoes. Salt the water and add the potatoes. Boil 20-30 minutes or until tender. Drain.

While potatoes cool, make the vinaigrette. Whisk together vinegar, oil, mustard, salt, and pepper until emulsified. Pour about half the vinaigrette over warm potatoes and toss to combine. Chill potatoes.

Bring another large pot of water to a boil. Add salt, green beans, and garlic scapes. Boil for about 5 minutes until just barely tender. Drain and chill.

In a large bow, combine cooked potatoes, green beans, garlic scapes, tuna, tomatoes, scallion, parsely, and Nicoise olives. Dress with remaining vinaigrette. Season with salt and pepper. Toss to combine.

Serve with hard boiled egg slices.

Serves 4-6.

Salad Nicoise


Crunchy Homemade Pickles

Homemade Pickles

It’s been a little while since I’ve posted. Returning from my summer hiatus, it may seem strange that I selected a pickle recipe – but I absolutely love pickles. And apparently, I’m not the only one. They seem to be growing in popularity and I continue to see more and more specialty pickles at regular grocery stores. The basic dill and bread n butter pickles still remain the staples but now there are garlic dill, horseradish dill, spicy dill, half sour, and sour, just to name a few. There are also different and trendy, often hipster like brands that specialize in..well…specialty pickles. They are delicious but usually expensive, often charging $8-$9 for a small jar. This is why making homemade pickles seems so well worth it. Not only can you add and adjust the spices to your liking, but with just a few ingredients, you can make enough pickles for a year, at less than half the price.

I made quite a few modifications to this recipe, originally from “The Art of Good Cooking.” Most notably, I eliminated the whole cup of olive oil my grandmother instructed to use. I find that vinegar and water works perfectly fine and is both healthier and less expensive. I also added sprigs of dill and adjusted some of the spices. The actual process of making the pickles is very basic and despite what some may believe, no special canning equipment is needed. Just a big pot and canning jars are sufficient. The most important part of the process is salting and chilling the sliced cucumbers and onions. This seems to help ensure a crunchy pickle, which in my opinion, is the key to a good pickle. I’m not a fan of the soft ones, with little or no resistance when you bite into them. The crunchier, the better. A crisp crunchy pickle is a reminder of the fresh cucumber it was made from. That tasty tang from the brine and vinegar makes it the perfect add on to any end of summer barbecue dish – especially hamburgers!

Ingredients:

12 large kirby cucumbers (about 4 lbs)
1/2 cup coarse salt
4 onions, thinly sliced
whole garlic cloves (as many as you have jars)
fresh sprigs of dill (as many as you have jars)
bay leaves (as many as you have jars)
2 quarts cider vinegar
1 quart of water
1/4 cup sugar
2 tablespoons yellow mustard seeds
2 tablespoons black mustard seeds
2 tablespoons pickling spices
2 tablespoons celery seeds
4 quart jars or 8 pint jars, sterilized (see note)

In a large bowl, make alternate layers of sliced cucumbers, salt, and sliced onions. Let stand in refrigerator 5 hours. Rinse in ice water and drain well, pressing out as much liquid as possible. Return vegetables to bowl. Place a clove of garlic, a sprig of dill, and a bay leaf in each jar. Pack jars with vegetables.

Pour cider vinegar and water into a pot. Add sugar, mustard seeds, pickling spices, and celery seeds. Bring to a rolling boil. Pour mixture into each jar to cover vegetables. Cover tightly. Store in the refrigerator for two weeks or to make pickles shelf stable, place jars in a canner or pot of boiling water for 5-10 minutes or until the lid does not move up or down when pressed in the center.

Note: To sterilize jars and lids, simply boil them in a large pot of water for 5 minutes.

Adapted from “The Art of Good Cooking,” by Paula Peck.

Cucumbers and Onion for Pickles


Smoked Salmon in Sour Cream-Horseradish Sauce

Smoked Salmon Spread


Growing up in Minnesota, I wasn’t particularly familiar with smoked salmon or its popularity. My limited experience consisted of the bagels and Nova lox my father made a point to bring home every time we visited NYC. It was considered a treat when we had it (though I may have been more into the bagel and cream cheese at that time than the salmon). I had no idea that there were different kinds of smoked salmon and that it could be bought by the pound and on sandwiches at almost every New York deli.

The quality of smoked salmon varies – usually depending on price but also on the smoking method and/or curing method. Lower quality smoked salmon is usually saltier and somewhat mushier. I like Nova lox, which is technically a cold smoked salmon, but regular lox (which is just cured and not smoked), Scottish, or Norwegian smoked Salmon are also good depending on your preference. Whether you’re eating it on a sandwich or making a spread such as this, it’s important to use a smoked salmon you really like. Unlike most salmon spreads, the actual salmon flavor (and not just the saltiness) can be tasted in this dip-like spread. The horseradish, scallion, and dill complement the salmon and provide a freshness. No cooking, no fuss. Add a few slices of cucumbers for a refreshing crunch and this is the perfect light lunch or appetizer on a hot summer day.

Ingredients:

1/2 lb smoked salmon, shredded
1/2 cup finely chopped scallions
2 teaspoons fresh dill, chopped
3/4 cup sour cream
2 tablespoons horseradish
1 tablespoon mayonnaise
salt and pepper
1 teaspoon lemon juice (optional)
1 cucumber, thinly sliced (optional)

Add scallions and dill to smoked salmon.

In a separate bowl, combine sour cream, horseradish, and mayonnaise. Season with salt and pepper.

Add dressing to salmon mixture. Toss gently. Serve on thinly sliced rye or pumpernickel bread or multi-grain crackers layered with cucumbers (if using).

Adapted from “The Art of Good Cooking,” by Paula Peck.

Smoked Salmon Spread 2

Strawberry Shortcake

Strawberry Shortcake

It’s berry season here in the Northeast and the first local strawberries have arrived. Smaller and juicier than the California variety that are available year round, these berries are delicious on their own but even tastier in the all-American classic, Strawberry Shortcake. Until now, my limited experience with strawberry shortcake consisted of pound cake (also excellent) and not the traditional shortcake, a sweetened biscuit that acts as the vehicle for the berries and cream. It’s clear that the density and texture of real shortcake changes this dessert entirely, creating a rich and substantial end to any meal.

This is another “friends of Paula Peck” recipe. It is adapted from a Blueberry Shortcake recipe in “John Clancy’s Favorite Recipes,” by John Clancy as well as “The James Beard Cookbook,” by James Beard. As mentioned in other posts, John Clancy was a friend and colleague of my grandmother and also a restaurant owner and chef instructor. James beard was of course…James Beard, amazing chef and mentor to my grandmother (amongst other famous chef such as Julia Child). The main difference between the two shortcake recipes is the use of vegetable shortening in the James Beard recipe. Though it provides a flakier pastry, I don’t usually keep shortening around and prefer to use butter. Both recipes contain instructions for one large shortcake to be eaten in slices like regular cake. I prefer individual shortcakes – making more of a personalized presentation and allowing you to put together just a few cakes at a time and save some for the next day. The last adaptation I made is the addition of vanilla extract to the macerated strawberries. While adding sugar to the strawberries, a touch of vanilla goes a long way and makes them even more fragrant and sweet. How can you go wrong with strawberries, cake, and cream?

Ingredients:

Strawberries
1 lb strawberries, hulled
2 tablespoons granulated sugar
1/2 teaspoon vanilla extract

Shortcake
3 cups all-purpose flour
3 1/2 teaspoons double-acting baking powder
1 1/2 teaspoons salt
4 tablespooons granulated sugar
8 tablespoons unsalted butter, cut into small pieces
1 1/4 cups heavy cream
1 tablespoon softened butter
cinnamon sugar (optional)

Whipped Cream
1/2 cup heavy cream, whipped with 1-2 tablespoons sugar and 1/2 teaspoon vanilla

Slice strawberries and mix with both sugar and vanilla extract. Refrigerate for 15-30 minutes.

Preheat oven to 400 degrees. Grease or cover a large baking sheet with parchment paper. Sift the flour, baking powder, salt, and sugar into a large bowl. Add the butter and with your fingers rub the ingredients together until they turn into coarse, separate pieces. Stir in the heavy cream with a wooden spoon and mix until a soft dough is formed.

Turn dough out onto a lightly floured board and knead it just 1 minute. Divide the dough, making 4 portions. Divide the 4 portions, making one of each of the portions a little larger than the other. Roll the larger portions into rounds 1/2 inch thick and place them on a cookie sheet. Spread the 1 tablespoon of softened butter on top. Roll the second piece of dough into rounds a little less than 1/2 inch thick and roll sides and top in cinnamon sugar (if using). Place them on top of the larger pieces. Bake on the middle shelf of the preheated oven for 20 minutes or until firm.

Remove the top layers of the cakes and spread strawberries on the bottom layer. Dollop whip cream on top and replace top layer. Add more whipped cream and strawberries on top layer.

Serves 4.

Asparagus au Gratin


Asparagus au Gratin

As asparagus floods the farmers markets, Spring is quickly turning into summer. This seasonal vegetable along with arugula, are often a few of the first signs of warmer weather yet to come. Now, with the abundance of fresh summer produce within reach, it’s time to end Asparagus season with a bang. Asparagus au Gratin is a rich decadent dish that sounds a little fancier than it really is. Think cheesy asparagus…or better yet: Mac & Cheese (minus the Mac).

It may seem like a shame to take a healthy vegetable like asparagus and make it somewhat unhealthy. Many French dishes have a knack for doing this but once you taste them, you forget why you were ever concerned in the first place. This is one of those dishes. Another delightful recipe adapted from “The New York Times Cookbook” by my grandmother’s friend and dear colleague, Craig Claiborne. Cheddar and Parmesan cheeses are added to a simple béchamel style sauce and then layered with barely cooked fresh green asparagus spears. A quick browning in the oven blends the two together and gives this dish the final touch. Perfect as a side dish for grilled meat, chicken, or even fish – this gratin is a crowd pleaser. And don’t worry, your beach body diet can wait an extra day…

Asparagus au Gratin

Asparagus au Gratin

Ingredients

1/4 cup unsalted butter
1/4 cup all purpose flour
1 3/4 cups chicken broth
1/4 cup light cream
3/4 cup grated Cheddar cheese
1/2 cup Parmesan cheese
salt and pepper
36 asparagus spears

Instructions

Cook asparagus in a large pot of boiling, salted water until just barely tender. Strain and set aside.

In a saucepan, melt the butter, add the flour and stir with a wire whisk until well blended. Meanwhile bring the chicken broth and cream to a boil and add all at once to a butter-flour mixture, stirring vigorously with the whisk until the sauce is thickened and smooth. Add the cheeses, salt and pepper, and stir until cheeses melt.

Place alternate layers of sauce and asparagus in a buttered casserole, ending with a layer of sauce. Sprinkle with additional Parmesan cheese and brown quickly under a preheated boiler or bake in preheated oven at 450 degrees for 5 minutes.

Adapted from “The New York Times Cookbook,” by Craig Claiborne.

Grilled Swordfish Skewers

Grilled Swordfish Skewers

After what seemed like a never-ending cold snowy winter in the Northeast, grilling season is finally here. Lucky for us, “The Art of Good Cooking” by my grandmother, Paula Peck, has many barbecue recipes I have yet to share. Similar to this Grilled Swordfish recipe, most are in the form of skewers – one of my favorite ways to grill. There is nothing revolutionary about this grilled skewer recipe but it’s simple and delicious. The marinade, which consists of garlic, olive oil, soy sauce, lemon, salt, and pepper, is just light enough to bring out the fresh clean taste of not only swordfish, but any seafood (check out the shrimp shown in this photo). With its meaty firm texture, swordfish is one of the few fish that can actually hold up to being cut into chunks, skewered, and grilled. Like all fish, it’s important not to overcook it – no one enjoys chunks of rubber.

Grilling can be challenge here in NYC. For the authentic grilling experience, the only options are the park or the roof deck or backyard of a wealthy friend. I usually end up doing most of my grilling out of town on vacation. However, the limited grilling options in NYC never stopped my grandmother. Although all of her grilling recipes can be converted to the oven or broiler, she grilled right in her Harlem kitchen. She would set up the grill plate on the stove and fan the smoke out the window, as best she could. The neighbors definitely didn’t appreciate this and I doubt she could get away it now. An actual grill (particularly charcoal) will produce a more flavorful result. But by marinating the fish for 2-3 hours and following the proper cooking times, juicy garlicky swordfish will become a favorite whether broiled, baked, or grilled. Don’t forget the grilled vegetables and fruit– my favorites are bell peppers, grape tomatoes, eggplant, and pineapple!

Ingredients:

2 lbs swordfish steak
3 cloves garlic, finely minced
1/4 cup olive oil
3 tablespoons lemon juice
1 tablespoon soy sauce
salt and pepper

Lemon Parsley Sauce (for serving)
6 tablespoons lemon juice
6 tablespoons olive oil
1/2 cup chopped parsley

Dry fish well on paper towels. Cut into 1 1/2 inch chunks.
Combine garlic, olive oil, lemon juice, and soy sauce. Place swordfish in a bowl and pour mixture over the chunks. Marinate in the refrigerator for at least 3 hours, turning occasionally.

Thread chunks on skewers. Broil, preferably over charcoal, turning occasionally, until swordfish is lightly brown all over. Season with salt in pepper.

Mix together sauce ingredients and spoon over skewered swordfish.

Serves 4-5.

Adapted from “The Art of Good Cooking,” by Paula Peck.

Crème Brûlée

Creme Brulee


Crème brulee is one of those semi-fancy French-American desserts that often seems too pretentious to make at home. This rich custard, also known as burnt cream – a reference to its hard caramelized top layer, is not as fussy to make as it looks. Those familiar with crème brulee may think you need those cute little kitchen blow torches to make it properly. A blow torch is definitely more fun but not necessary. This dessert was around long before anyone determined a blow torch was the best way to caramelize the sugar on top of the cream. I can’t imagine my grandmother using a blow torch in the 1960’s, when she did the majority of her cooking and baking. Although this is not her recipe, it was published around the same time period in 1961 in “The New York Times Cookbook,” by friend and colleague, Craig Claiborne.

So what can you use instead of a blow torch? The broiler, of course. The texture may not be as perfect but a similar sugary glass-like shell can be achieved. Shallow ramekins (unlike the ones shown here) will also help the cooking process. They simply allow the crème to bake faster and provide more surface area for caramelization. Blow torch or not, that first spoonful of the crispy burnt caramel with rich vanilla crème will make the few extra steps to make this impressive dessert, well worth it.

Ingredients:

3 cups heavy cream
6 tablespoons sugar
6 egg yolks
2 teaspoons vanilla extract
1/2 cup light brown sugar

Preheat oven to 300 degrees.

Heat cream over boiling water (in a double boiler) and stir in sugar. Beat the egg yolks until light and pour the hot cream over them gradually, stirring vigorously. Stir in the vanilla and strain the mixture into ramekins.

Place the dishes in a pan containing one inch of hot water and bake until a knife inserted in the center comes out clean, or 35 minutes. Do not over-bake. The custard will continue to cook from retained heat when it is removed from the oven. Chill thoroughly.

Before serving, cover surface with brown sugar. Set the dishes in a pan with cracked ice and put under the broiler until sugar is brown and melted. Serve immediately.

Serves 6-8.


Classic Baked Lasagna

Lasagna No RicottaUntil recently, I’ve made very few lasagnas in my life. It always seems like a long process for an average, everyday pasta dish that appears on the menu at almost every red-sauce Italian restaurant. But this lasagna has changed my mind. I give credit to the absence of one of the most common ingredients in lasagna: ricotta cheese. I don’t have a particular problem with ricotta. The crumbly, almost grainy like texture doesn’t bother me like it does some people. I even thought I liked it in lasagna but that was before I tried replacing the ricotta with a basic béchamel sauce. The simple French sauce made of butter, flour, and milk (or cream) is often used as the base for many other sauces (like the cheesy sauce in baked mac & cheese). In lasagna, the béchamel sauce adds an unexpected smooth creaminess to the dish without making it overwhelmingly rich.

This lovely classic was adapted from John Clancy’s Cookbook, “John Clancy’s Favorite Recipes.” Another talented friend of my grandmother, John Clancy was a chef and restaurateur who like my grandmother, was mentored by James Beard. He later opened his own culinary school and authored a number of cookbooks. Although he was known for his fish and seafood recipes (and baking recipes in his inner circle), this lasagna recipe is exceptionally tasty. I did, however; make some modifications. The original recipe instructions state to cook the tomato sauce for 4 hours. Who has that kind of time?! I’m sure it might make a more flavorful sauce but a tasty one can be made in under 30 minutes and then allowed to simmer while the pasta and béchamel are prepared. Instead of a combination of ground veal, pork, and beef – which I’m sure is delicious – I decided to keep it simple by just using beef (ground turkey could also be used). And lastly, I added cheese! A sprinkle of parmesan on top was just not enough so I added both grated parmesan and mozzarella between each layer. Ricotta lover or not, this classic lasagna will quickly become your favorite and replace that tomato sauce-drenched version from the local mediocre Italian restaurant.

Ingredients:

Meat Sauce

4 tablespoons olive oil
1 1/2 lbs ground beef
1 cup finely chopped onion
6 cloves of garlic, minced
2 tablespoons tomato paste
2 – 28 oz cans crushed tomatoes
1 1/2 teaspoons dried oregano
1/2 cup fresh basil, shredded or chopped (or 1 1/2 teaspoons dried)
salt and pepper

Bechamel Sauce

3 cups light cream
4 tablespoons unsalted butter
6 tablespoons flour
1 teaspoon salt
1/4 teaspoon white pepper
1/8 teaspoon nutmeg

1/2 lb lasagna noodles
1 cup Parmesan cheese
1/2 lb shredded mozzarella (or one 8 ounce package)

For the meat sauce:

In a large, heavy skillet, heat the oil until it is very hot. Add ground beef and brown, breaking up meat with a fork or spatula. Drain fat. Stir in onion and garlic and saute until translucent. Season with salt and pepper. Add tomato paste and cook a minute longer. Add the crushed tomatoes, oregano, dried basil (if using fresh, wait to add until right before building lasagna), and salt and pepper to taste. Bring to a boil then reduce to a simmer. Continue to simmer while preparing the bechamel and lasagna noodles.

Heat the water for the lasagna noodles and cook according to package instructions while preparing the bechamel. A tablespoon of oil can be added to the water to help prevent the noodles from sticking. Cook until just slightly resilient to the bite.

For the bechamel sauce:

Place the light cream in a small saucepan. Heat cream until hot and set aside.

Melt the butter in a heavy 1 quart saucepan, add the flour, and stir until smooth. Whisk in hot cream and place the saucepan over high heat, bringing the sauce to a boil and whisking constantly. When the sauce is very thick, lower the heat and cook for an additional 3 minutes. Add the salt, pepper, and nutmeg. Remove from heat and set aside.

To assemble lasagna:

Preheat oven to 350 degrees.

Spread a thin layer of the meat sauce on the bottom of a 9 x 12 x 3 inch casserole. Spread about 1/4 of the bechamel sauce on top. Add a 1/4 of the Parmesan and mozzarella. Add a layer of pasta on top. Repeat layering three more times, ending with meat sauce bechamel and cheese.

Bake in a preheated oven until lasagna is bubbling hot, about 30 minutes. Remove from oven and allow to cool 5 minutes before serving.

Adapted from “John Clancy’s Favorite Recipes,” by John Clancy.